Advertisement
Getting Started With Your Flair 58
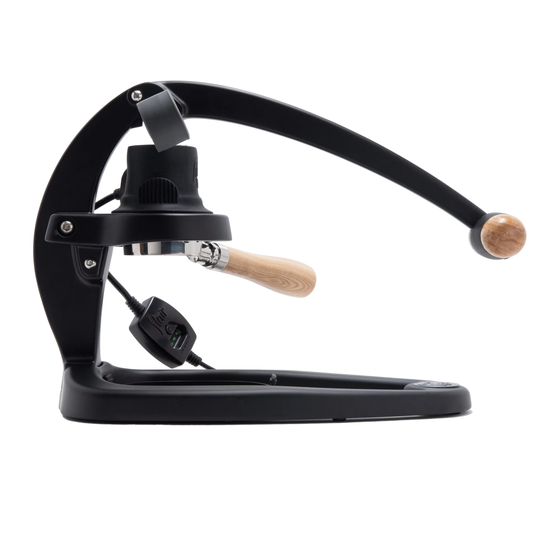
Welcome to the world of café-quality handcrafted espresso with your Flair 58! Before pulling your first
shot, please follow the steps below to set-up your Flair. Also, please remember that your Flair 58 requires
uniform grounds from a high-quality burr grinder.
1
5
4
Using Your Preheat System
The Flair 58 can
preheat*
the brewing cylinder to three temperatures: Low, Medium or High. Please find
usage details below and full safety instructions in our attached "Safety and Instructions Guide."
TURN ON - Press & hold button (3 sec) - LEFT light will BLINK - then...
LOW
~85° C (185° F)
Wait A Few Minutes
(for preheat to complete)
Left Light Will Become
SOLID
(when Low Temp is reached)
TURN OFF - Press & hold button (3 sec) - ALL lights OFF
*NOTE:
Without electricity, seal the brew cylinder's bottom with the preheat cap and fill with boiling water
for 45 seconds. Discard water, then repeat as needed. Remove cap and insert brew cylinder onto brew base.
1.
Bolt base & lever
assembly together firmly
2.
Remove preheat cap
& install brew cylinder
onto brew base. Rotate
2 2
counterclockwise to lock
3.
Align (a) plunger stem
tabs to slots on plunger.
Rotate (b) stem to lock.
Push stem down to seal
plunger. Pressure gauge
should face front of the
Flair 58
3
(a)
4.
Connect all wires for
the Preheat System - use
(b)
arrows to align tabs
5.
Set drip tray directly
below brew base
MEDIUM
HIGH
~90° C (194° F)
Push Button AGAIN
Push Button 2 TIMES
(CENTER light will BLINK)
(RIGHT light will BLINK)
Wait A Few Minutes
Wait A Few Minutes
(for preheat to complete)
(for preheat to complete)
LEFT & CENTER Lights
ALL Lights SOLID
Become SOLID
(when High Temp is reached)
(when Med Temp is reached)
Brewing Espresso With Your Flair 58
#1 - Prepare the Flair
(a) Turn on Preheat System and set desired preheat
temperature (b) Raise lever to the upright position
(c) Insert portafilter for preheat by aligning it with
the brew base and (d) rotating the portafilter handle
counterclockwise until it is firmly in place
#2 - Prepare the Portafilter
(a) Boil water (b) Grind 18-20 grams of freshly roasted
beans with burr grinder (c) Remove portafilter from brew
base, add grounds and tamp, then reinsert portafilter
#3 - Prepare the Brew Head
(a) Unlock and lift lever hook all the way up (b) then turn
plunger stem counterclockwise until two tabs align with
openings in plunger and remove stem by gently lifting (c)
Pour brew water into cylinder until opening of the plunger
is filled. Reinsert stem and lock back in by reversing order
for removal (d) Connect lever to plunger stem by engaging
the lever hook
#4 - Brew your Espresso
(a) Slowly lower lever to build pressure in the system and
commence brewing (b) When first starting out, aim for
a shot duration of 30-35 seconds at 6-10 BAR (c) When
~95° C (203° F)
desired shot weight/volume is reached, or lever is fully
lowered, raise the lever back to starting position
#5 - Purge your System
(a) Place an empty cup on drip tray to catch any remaining
brew water. (b) Expel remaining brew water by lowering
lever all the way down to allow the remaining liquid to
drain. (c) To remove the portafilter for cleaning, simply
raise the lever back to the upright position and rotate the
portafilter clockwise to release
(c)
(d)
(c)
(a)
(b)
(c)
(d)
(c)
Brew Time
(a)
(b)
30-35s
(b)
(a)
Advertisement
Table of Contents

Related Manuals for Flair 58


Summary of Contents for Flair 58
- Page 1 Welcome to the world of café-quality handcrafted espresso with your Flair 58! Before pulling your first #1 - Prepare the Flair shot, please follow the steps below to set-up your Flair. Also, please remember that your Flair 58 requires uniform grounds from a high-quality burr grinder.
- Page 2 “Flair-istas” who have mastered their technique will brew between 6 and 10 BAR at a time between 30-35 seconds. Your Flair 58 comes with a pressure gauge to ensure your espresso is to your specifications at all times. Please use the chart below to help you dial-in.
Need help?
Do you have a question about the 58 and is the answer not in the manual?
Questions and answers