Advertisement
Available languages
Available languages
Quick Links
Installation Instructions
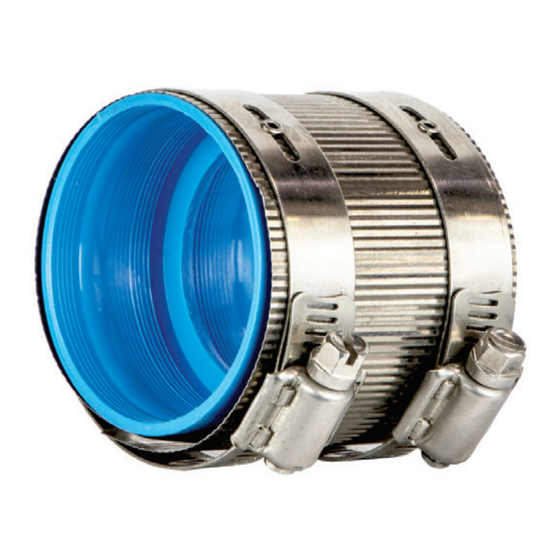
Orion No-Hub
Corrugated Couplings
Grooving Pipe & Joint Assembly
Polypropylene and PVDF Chemical
Waste Systems
WARNING
!
WARNING
!
Local building or plumbing codes
may require modifications to
the information provided. You
are required to consult the local
building and plumbing codes prior
to installation. If the information
provided here is not consistent
with local building or plumbing
codes, the local codes should be
followed. This product must be
installed by a licensed contractor
in accordance with local codes
and ordinances.
NOTICE
Follow the guidelines listed here for
proper installation, operation, and
maintenance.
Read this Manual BEFORE using this equipment.
Failure to read and follow all safety and use information can result in death,
serious personal injury, property damage, or damage to the equipment.
Keep this Manual for future reference.
Advertisement

Subscribe to Our Youtube Channel
Related Manuals for Watts IS-OR-NH


Summary of Contents for Watts IS-OR-NH
- Page 1 Installation Instructions Orion No-Hub Corrugated Couplings Grooving Pipe & Joint Assembly Polypropylene and PVDF Chemical Waste Systems WARNING Read this Manual BEFORE using this equipment. Failure to read and follow all safety and use information can result in death, serious personal injury, property damage, or damage to the equipment. Keep this Manual for future reference.
- Page 2 Installation Guidelines - Grooving Pipe Step 1 Material preparation is essential to achieving satisfactory No-Hub coupling assem- bly. Pipe must be free of scoring or other surface damage, and should be wiped down with a clean cloth sprayed with 90% isopropyl alcohol before cutting to remove cement dust, mud, or other debris that will interfere with the cutter, pipe grooving tool, or interfere wtih assembly integrity and cause a leak.
- Page 3 Installation Guidelines - Joint Assembly Step 1 Loosen No-Hub coupling outer band bolts until the inner plastic body moves freely. Step 2 Inspect coupling inner plastic body; clean out all cement dust, mud or other debris from the inner body surface with a clean cloth sprayed with 90% isopropyl alcohol. Step 3 Insert the pre-grooved pipe or fitting end into the coupling inner body until the coupling ridge can be felt snapping into place in the groove.
- Page 4 Limited Warranty: Watts (the “Company”) warrants each product to be free from defects in material and workmanship under normal usage for a period of one year from the date of original shipment. In the event of such defects within the warranty period, the Company will, at its option, replace or recondition the product without charge.
- Page 5 Instrucciones de instalación de los acoplamientos ondulados Orion No-Hub Ranurado de tuberías y ensambles de juntas para sistemas de residuos químicos de polipropileno y PVDF ADVERT E NC I A Lea este manual ANTES de utilizar este equipo. PIENSE No leer y no seguir toda la información de seguridad y de uso puede PRIMERO EN provocar la muerte, lesiones personales graves, daños materiales o LA SEGURIDAD...
- Page 6 Lineamientos de instalación: ranurado de tuberías Paso 1 La preparación del material es esencial para lograr un ensamblaje satisfactorio del acoplamiento No-Hub. El tubo debe estar libre de rayaduras u otros daños en la superficie, y debe limpiarse con un paño limpio rociado con alcohol isopropílico al 90 % antes de cortar, para eliminar el polvo de cemento, lodo u otros residuos que puedan interferir con el cortador, la herramienta de ranurado de tuberías o interferir con la integridad del ensamblaje y causen una fuga.
- Page 7 Pautas de instalación: ensamblaje de juntas Paso 1 Afloje los pernos de la banda exterior de acoplamiento No-Hub hasta que el cuerpo interior de plástico se mueva libremente. Paso 2 Inspeccione el cuerpo interior de plástico del acoplamiento; limpie todo el polvo de cemento, lodo u otros residuos de la superficie interior del cuerpo con un paño limpio rociado con alcohol isopropílico al 90 %.
- Page 8 Garantía limitada: Watts (la “Compañía”) garantiza que cada producto está libre de defectos en los materiales y la mano de obra en condiciones de uso normal durante el período de un año a partir de la fecha de envío original. En caso de que tales defectos se presenten dentro del período de garantía, la Compañía, a su discreción, remplazará...
- Page 9 Instructions d’installation des accouplements ondulés sans emboîtement Tuyau rainuré et assemblage du joint des systèmes d’évacuation des déchets chimiques en polypropylène et PVDF AVERT IS S E M E N T Lire ce manuel AVANT d’utiliser cet équipement. LA SÉCURITÉ Ne pas lire et ne pas respecter toutes les informations relatives à la AVANT sécurité...
- Page 10 Directives d’installation – Tuyau rainuré Étape 1 La préparation du matériel est essentielle pour obtenir un assemblage sans emboîtement satisfaisant. Avant de le couper, le tuyau doit être exempt d’entailles ou d’autres dommages à la surface. Il devrait également être essuyé avec un chiffon propre pulvérisé avec de l’alcool isopropylique à...
- Page 11 Directives d’installation – Assemblage du joint Étape 1 Desserrer les boulons de la bande extérieure du raccord sans emboîtement jusqu’à ce que le corps en plastique interne se déplace librement. Étape 2 Inspecter le corps en plastique intérieur du raccord; nettoyer toute poussière de ciment, toute trace de boue ou tout autre débris de la surface intérieure du corps avec un chiffon propre pulvérisé...
- Page 12 Garantie limitée : Watts (la « Société ») garantit que chacun de ses produits est exempt de vice de matériau et de fabrication dans des conditions normales d’utilisation pour une période d’un an à compter de la date d’expédition d’origine. Si une telle défaillance devait se produire au cours de la période sous garantie, la Société...
Need help?
Do you have a question about the IS-OR-NH and is the answer not in the manual?
Questions and answers