
Related Manuals for VM Audio ELUX EXAT30-BK-CR


Summary of Contents for VM Audio ELUX EXAT30-BK-CR
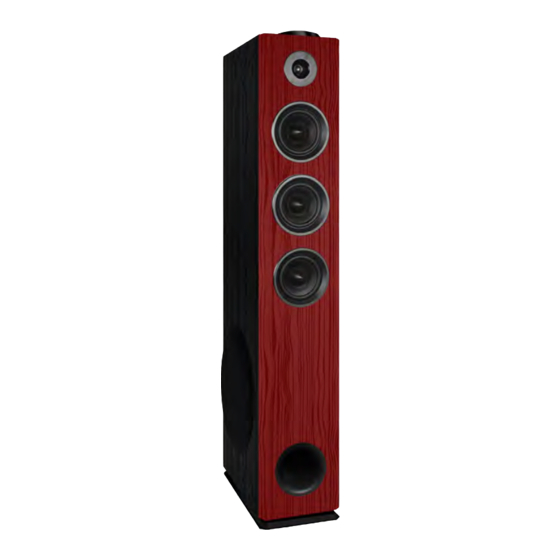
- Page 1 EXAT30-BK-CR / EXAT31-BK EXAT32-CR-BK / EXAT33-CR ELUX SERIES ACTIVE FLOORSTANDING LOUDSPEAKERS...
-
Page 2: Welcome
Welcome! Congratulations on your purchase of an Elux Series product from VM Audio. You have seen that with years of acquired taste for quality, the Elux Series has the right design and performance to satisfy your utmost demand. With music... -
Page 3: Table Of Contents
Table of Contents Welcome Table of Contents Warning Precautions System Features Included Overview Connections Settings & Adjustments Operation Speaker Placement Troubleshooting Warranty Specifications... -
Page 4: Warning
Warning! WARNING RISK OF ELECTRIC SHOCK To prevent fire or electric shock: • Do not expose the unit to rain or moisture. • Do not open the cabinet. • Do not use these speakers near water. • Do not expose these speakers to dripping or splashing liquids •... -
Page 5: Precautions
Precautions On Safety • Contact between bare speaker wires may result in a short-circuit. • Should any liquid or solid object fall into the speaker system, unplug the system’s power cord and have the system checked before operating it any further. On Power Sources •... -
Page 6: System Features
System Features • Definitive Clarity Sound With Sensational Performance • Easy 1-2-3 Direct Play Setup • All-In-One Home Audio Solution • Wide Range 3-Way Soundstage Performance • Fully Powered, Bi-amplified System • Advanced Wireless Bluetooth Connectivity • Digital Audio Optical Input •... -
Page 7: Included
Included Review the contents of the package and make sure the following items are included: Speaker Cabinets Remote RCA-to-RCA Cables 20ft Speaker Wire RCA-to-3.5mm Cable User Guide... -
Page 8: Overview
Overview Front View Left Speaker Right Speaker... - Page 9 Overview Rear View Amplifier Back Plate Speaker Connector Left Speaker Right Speaker...
- Page 10 Overview Side View Digital Control Side Panel Control Left Speaker...
- Page 11 Overview Top View Digital Control Left Speaker...
- Page 12 Overview Level Control Panel VOLUME TREBLE BASS ECHO MIC. VOL...
- Page 13 Overview Amplifier Back Plate Audio Input Optical Jacks Input Speaker Output Power Switch Power Cord...
- Page 14 Overview Digital Control POD...
- Page 15 Overview Digital Control POD Functions Input selector / On-OFF wake button. Tone control selector button. Play / Pause control button. Reverse skip function / Volume down button. Forward skip function / Volume up button. LED indicator for bass adjustment. LED indicator for treble adjustment. LED indicator for Bluetooth operation.
- Page 16 Overview Remote...
- Page 17 Overview Remote Function Buttons System On-OFF wake. Input selector switch. Play / Pause control function. Reverse skip function. Forward skip function. Direct numeric input keypad. Repeat function. Volume level adjustment. Bass level adjustment. 10 - Treble level adjustment. 11 - Equalizer preset function.
-
Page 18: Connections
Connections Speaker Wire Connection Right Speaker 1. Push the negative (Black) spring loaded tab to open and insert the negative wire into the terminal. 2. Push the positive (Red) spring loaded tab to open and insert the positive wire into the terminal. - Page 19 Connections Speaker Wire Connection Left Speaker Be sure to only connect positive speaker wires to positive terminals (Red), and negative speaker wires to negative terminals (Black).
- Page 20 Connections Connection Audio Source Be sure to turn off the power of each component before making the connections. When connecting the RCA cable, be sure to match the color-coded cord to the appropriate jacks on the components. Red (right) to Red and White (left) to White. Be sure to make firm connections to avoid humming and noise.
- Page 21 Connections Power Cord Connection Connect this power cord after all other cables and cords are connected.
-
Page 22: Settings & Adjustments
Settings & Adjustments Turning Speaker System On • Volume level will automatically self adjust to 45 and it will display on the LED screen. • Input source from the last session will be selected. Press POWER switch to ON position to provide power to system. - Page 23 Settings & Adjustments Source Input Selection Use this function to select the desired input audio source. Using Digital Control POD Press INPUT repeatedly to select the desired audio source. Using remote Press INPUT button repeatedly to select the desired audio source. Select the following: AUX - To play directly from a portable audio device.
- Page 24 Settings & Adjustments Adjusting Volume Using Level Control Panel Turn VOLUME knob clockwise to increase volume, turn counterclockwise to decrease volume. Using remote Press VOL + to increase, VOL - to decrease volume.
- Page 25 Settings & Adjustments Adjusting Volume Using Digital Control POD This function is only available when AUX input is selected. Press VOL + to increase, VOL - to decrease volume. Mute Sound Using Remote Press MUTE to silence sound, press again to enable sound.
- Page 26 Settings & Adjustments Adjusting Tone Quality Using Level Control Panel Adjusting Treble Adjusting Bass Turn TREBLE knob Turn TREBLE knob clockwise to increase clockwise to increase level, counterclockwise level, counterclockwise to decrease level. to decrease level. Using Remote Press BASS + to increase, BASS - to decrease level.
- Page 27 Settings & Adjustments Adjusting Tone Quality This function is only available when AUX input is selected. Using Digital Control POD Press Menu to select BASS or TREBLE Press VOL + to increase level, VOL - to decrease level.
- Page 28 Settings & Adjustments Adjusting Microphone Level Using Level Control Panel Turn TREBLE knob clockwise to increase, counterclockwise to decrease level. Using Remote Press TRE + to increase, TRE - to decrease level.
- Page 29 Settings & Adjustments Adjusting Echo Level Using Level Control Panel Turn TREBLE knob clockwise to increase, turn counterclockwise to decrease level. Using Remote Press TRE + to increase, TRE - to decrease level.
- Page 30 Settings & Adjustments Choosing Music File To Play Function only available when BLU (Bluetooth) or USB/SD input is selected. Using Control POD 1. Press the >>l + button to go to the next track or forward skip tracks until the track number you want appears on the display of the Digital Control...
- Page 31 Settings & Adjustments Direct Access Play This function allows quick access to tracks by entering their track number. Track number can be entered at any time during playback. Function only available when BLU (Bluetooth) or USB/SD input is selected. Using Remote •...
- Page 32 Settings & Adjustments Repeat Play This function allows you to repeat one track, shuffle tracks (play in random), and continuous play all the tracks in a loop when in USB/SD or Bluetooth is use. Repeating The Current Track While the track you want is being played, press REPEAT until “ONE”...
- Page 33 Settings & Adjustments Repeat Play This function allows you to “shuffle” tracks and play in random order. Random Order Play While the track you want is playing, press REPEAT until “ANd” appears on the display in the Digital Control POD. All the tracks in USB drive or SD card will play in random order continuously.
- Page 34 Settings & Adjustments Pausing Music Playback Function only available when BLU (Bluetooth) or USB/SD input is selected. Using Control POD 1. Press the >ll button once to pause. 2. Press, >ll button once again to resume playback. Using Remote Note LED display will blink when pausing.
- Page 35 Settings & Adjustments EQ Presets Four equalizer presets are available to customize the sound (Pop, Jazz, Rock, Classic). Note Function only available when USB/SD input is selected. 1. Repeatedly press Remote the EQ button to cycle through the EQ options (EQ1, EQ2, EQ3, EQ4) 2.
- Page 36 Settings & Adjustments Sleep Function Use SLEEP feature to put speaker system in Stand-by mode at a predetermined time. You can set time in 10 minute intervals. 1. Press SLEEP repeatedly until the desired time is reached and it appears in the Digital Control POD display. 2.
-
Page 37: Operation
Operation Using AUX Audio Source Step 1: Select AUX as the audio INPUT source if it is not already selected (see page 23). Step 2: Start audio source and play track (refer to the audio source’s user guide for instructions). Step 3: Adjust the VOLUME level (see pages 24-25). - Page 38 Operation Using USB/SD Audio Source Step 1: Insert the USB drive or SD card to it’s corresponding USB or SD port on the Digital Control POD. Step 2: Music playback will begin automatically. Step 3: Search select MUSIC_BTO1 Step 4: Adjust VOLUME level (see page 24). Step 5: Adjust TONE to the desired levels (see page 26).
- Page 39 Operation Using Microphone Step 1: Connect the microphone to the input plug on the Level Control Panel. Step 2: Adjust the microphone level (see page 28). Step 3: Adjust the ECHO level (see page 29). Caution • Do not drop or tap microphone as damage to the mic or speakers may occur.
-
Page 40: Speaker Placement
Speaker Placement Placement The speakers should be placed within a 1.5 meter and 3 meters apart. You should position your speakers so that each one is at least 0.5 meter away from any bare wall. Improving Sound Quality The speaker system allows for an extensive amount of settings that are user-friendly. -
Page 41: Troubleshooting
Troubleshooting No Power • Press the Power/Standby button to turn power on. • Make sure unit is connected to AC power. No Sound • Raise volume to check output. • Volume ON from the audio source might be muted or low. •... -
Page 42: Warranty
Limited Warranty Agreement Your product is covered by a limited warranty by VM Audio as established below: Electronics Limited Warranty Products purchased from an Authorized VM Audio Dealer are warranted to be free of defects in material and workmanship for one (1) year from the date of original purchase under normal usage. - Page 43 - Damage during freight from poor packaging or handling. - Return shipping on non-defective items. Warranty Turnaround Time It is VM Audio’s goal to turnaround the merchandise in a timely fashion of 1 week. Unexpected delays may occur due to repair parts or replacement shortage.
-
Page 44: Specifications
Specifications EXAT30-BK-CR Loudspeaker Type Full Range System Cabinet Color Black-Cherry High Frequency 1 1/2” Composite Soft Dome Midrange Driver 4” Treated Composite Fiber Bass Driver 10” Dual Pulp Cone Analog, Bluetooth, USB, SD and Audio Input Optical Frequency Range 32 Hz - 20 kHz Power (RMS/Peak) 800W / 2400W Weight... - Page 45 Specifications EXAT31-BK Loudspeaker Type Full Range System Cabinet Color Black High Frequency 1 1/2” Composite Soft Dome Midrange Driver 4” Treated Composite Fiber Bass Driver 10” Dual Pulp Cone Analog, Bluetooth, USB, SD and Audio Input Optical Frequency Range 32 Hz - 20 kHz Power (RMS/Peak) 800W / 2400W Weight...
- Page 46 Specifications EXAT32-CR-BK Loudspeaker Type Full Range System Cabinet Color Cherry-Black High Frequency 1 1/2” Composite Soft Dome Midrange Driver 4” Treated Composite Fiber Bass Driver 10” Dual Pulp Cone Analog, Bluetooth, USB, SD and Audio Input Optical Frequency Range 32 Hz - 20 kHz Power (RMS/Peak) 800W / 2400W Weight...
- Page 47 Specifications EXAT33-CR Loudspeaker Type Full Range System Cabinet Color Cherry High Frequency 1 1/2” Composite Soft Dome Midrange Driver 4” Treated Composite Fiber Bass Driver 10” Dual Pulp Cone Analog, Bluetooth, USB, SD and Audio Input Optical Frequency Range 32 Hz - 20 kHz Power (RMS/Peak) 800W / 2400W Weight...
- Page 48 FCC STATEMENT This device complies with Part 15 of the FCC Rules. Operation is subject to the following two conditions: (1) This device may not cause harmful interference. (2) This device must accept any interference received, including interference that may cause undesired operation.
Need help?
Do you have a question about the ELUX EXAT30-BK-CR and is the answer not in the manual?
Questions and answers