
Related Manuals for iHome iBT297v2


Summary of Contents for iHome iBT297v2
- Page 1 Model: iBT297v2 Bluetooth Color Changing Dual Alarm Clock Radio with USB Charging and Voice Control with USB Char instruction manual Questions? Contact Customer Service at 1-800-288-2792...
-
Page 2: Table Of Contents
Table of Contents What’s Included/Meet Your iBT297v2....................2 Quick Set-Up ..............................3-4 The Display................................5 Setting the Time ............................... 6 Setting the Alarm ............................. 7 Previewing the Alarm/Using the Alarm/Snooze Button/Sleep Mode ........8 FM Radio/Setting and Using FM Presets....................9 Using FM Radio in Other Countries/Charging Devices via USB Port........ -
Page 3: What's Included/Meet Your Ibt297V2
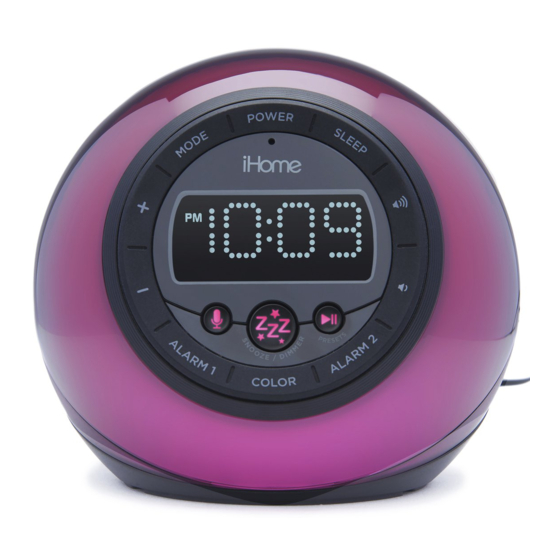
What’s 100V-240V universal iBT297v2 unit AC adapter Included: Meet Your iBT297v2 Mode Button Power Button Sleep Button Plus Settings Button Volume Up Button Minus Settings Button Volume Down Button Voice Control Button Play/Pause/Presets Button (End Calls) Alarm 1 Button Alarm 2 Button... - Page 4 Quick Set-Up: Step One Connecting the Unit Connect the included AC adapter to the DC jack T R E S E T T T E S T located on the back of the unit and connect the other end to a working wall outlet. Step Two Setting Your Clock •...
-
Page 5: Quick Set-Up
MODE • Turn on your Bluetooth device and make it ‘discoverable’ by turning on Bluetooth mode. • Press the Mode Button on the iBT297v2 as needed until the ‘BT’ indicator icon appears on the display. • Press and hold the Bluetooth Pairing Button on the back of the unit for 2 seconds. -
Page 6: The Display
The Display Time/Alarm Time/Radio Frequency Display PM/AM Indicators Low Backup Battery Indicator Bluetooth/Pairing Indicator Alarm Active Indicator Sleep Mode Indicator Color Mode: Current Fade, Fast, Mode: 1 Color, Pulse, Bluetooth, Sky, Lamp, Off FM Radio... -
Page 7: Setting The Time
Setting the Clock - Step by Step Press and hold the Time Set Button on the bottom of the unit for 3 seconds until the clock display flashes and a beep sounds. 2. Press the – or + Buttons to adjust the clock to the current time (hold for rapid setting). Make sure you set the correct AM/PM time. -
Page 8: Setting The Alarm
Setting and Using the Alarms This unit features dual alarms which can be set to different times and alarm sources. Each is set in the same way. Instructions are given as “Alarm Button”; use Alarm 1 Button or Alarm 2 Button to set respective alarms. -
Page 9: Previewing The Alarm/Using The Alarm/Snooze Button/Sleep Mode
Previewing the Alarm and Turning the Alarm On/Off Press and release the desired Alarm Button as needed to preview the alarm and to toggle the alarm ON (indicated by the alarm icon) or OFF (no alarm icon). To turn off a sounding alarm and reset it to come on the next day at the same time, press the Power Button or the associated alarm button (Alarm 1 Button or Alarm 2 Button) to reset alarm. -
Page 10: Fm Radio/Setting And Using Fm Presets
FM Radio Extend the FM antenna for best reception. Press and release the Mode Button as needed until the FM indicator icon and current FM radio frequency appear on the display. 2. Press the – or + Buttons to tune the radio to the desired station (hold to scan for the next clear station). -
Page 11: Using Fm Radio In Other Countries/Charging Devices Via Usb Port
Using FM Radio in Other Countries Different areas of the world use different FM frequency steps and ranges. By default, this unit is set to USA frequency steps. To use the radio outside the USA: 1. Make sure unit is OFF. 2. -
Page 12: Pairing Your Bluetooth Device
Pairing is the set-up process to introduce your Bluetooth-capable device to the iBT297v2. Once your device is paired, the iBT297v2 can recognize it and you can play your audio through it. 1. Turn on your Bluetooth device and make it “discoverable” by turning on Bluetooth mode (check in Options or Settings). -
Page 13: Playing Audio Via Bluetooth/Using The Speakerphone Feature
Playing Audio via Bluetooth 1. Press and release the Mode Button as needed until the “BT” indicator icon appears on the display. 2. Press the Play/Pause/Presets Button on the unit to play, pause and resume play of audio from your linked Bluetooth device. 3. -
Page 14: Color Change Mode/Using The Voice Control Feature
Color Change Mode Press and release the Color Mode Button as needed to cycle to the desired color mode light setting. Indicators on the display show the current light mode for 5 seconds: SLOW FADE: Gradually fades from one color into the next FAST: Fades quickly from color to color 1-COLOR:... -
Page 15: Replacing And Installing Clock Backup Battery
Replacing and Installing Clock Backup Battery Note: 1 CR2450 battery is included with the unit. Pull battery tab before using the unit. This model is equipped with a battery backup circuit that will maintain the time and alarm time settings in the event of a temporary power interruption (the display is NOT maintained). -
Page 16: Troubleshooting
Unit doesn’t respond (no power) • Check that all connections are correct and properly plugged in. • Make sure your device is properly paired with the iBT297v2. • Make sure the Power is ON. Unit doesn’t respond (locked up or frozen) •... -
Page 17: Maintenance
Maintenance • Place the unit on a level surface away from sources of direct sunlight or excessive heat. • Protect your furniture when placing your unit on a natural wood and lacquered finish. A cloth or other protective material should be placed between it and the furniture. •... -
Page 18: Consumer Product Safety Guide
Consumer Product Safety Guide IMPORTANT SAFETY INSTRUCTIONS When used in the directed manner, this unit has been designed and manufactured to ensure your personal safety. However, improper use can result in potential electrical shock or fire hazards. Please read all safety and operating instructions carefully before installation and use, and keep these instructions handy for future reference. -
Page 19: Fcc Information
FCC Information FCC Radiation Exposure Statement This equipment complies with FCC RF radiation exposure limits set forth for an uncontrolled environment. This Device complies with RSS-210 of the IC Rules; Operation is subject to the following two conditions: (1) This device may not cause interference and (2)This device must accept any interference received, including interference that may cause undesired operation This device complies with Part 15 of the FCC Rules, operation is subject to the following two conditions: (1) This device may not cause harmful interference, and (2) this device must accept any interference received, including interference that may cause... -
Page 20: Warranty
Limited 1 Year Warranty iHome Products, a division of SDI Technologies Inc. (hereafter referred to as SDI), warrants this product to be free from defects in workmanship and materials, under normal use and conditions, for a period of one (1) year from the date of original purchase.
Need help?
Do you have a question about the iBT297v2 and is the answer not in the manual?
Questions and answers