Table of Contents
Advertisement
Quick Links
Advertisement
Table of Contents

Subscribe to Our Youtube Channel
Related Manuals for ZTE-G R228


Summary of Contents for ZTE-G R228
- Page 1 دﻟﻴﻞ اﻟﻤﺴﺘﺨﺪم اﻟﻬﺎﺗﻒ اﻟﻤﺤﻤﻮل ZTE‐G R228 ...
- Page 2 ﻣﻌﻠﻮﻣﺎت ﻗﺎﻧﻮﻧﻴﺔ ﻣﺆﺳﺴﺔ ﺣﻘﻮق اﻟﻨﺴﺦ ﻣﺤﻔﻮﻇﺔ 2011 © ﺟﻤﻴﻊ اﻟﺤﻘﻮق ﻣﺤﻔﻮﻇﺔ ،ﻻ ﻳﻤﻜ ﻦ اﻗﺘﺒ ﺎس أو ﻧ ﺴﺦ أو ﺗﺮﺟﻤ ﺔ أو اﺳ ﺘﺨﺪام أي ﺟ ﺰء ﻣ ﻦ ه ﺬا اﻟﻜﺘﻴ ﺐ ﺑ ﺄي ﺷ ﻜﻞ أو ﺑ ﺄي وﺳ ﻴﻠﺔ ﻴﻜ...
- Page 3 اﻟﻤﺤﺘﻮﻳﺎت ت اﻟﺬاآﺮة ﺗﺮآﻴﺐ آﺎر اﻷﻣﻦ دﻟﻴﻞ اﻟﻬﺎﺗﻒ ﺗﻌﻠﻴﻤﺎت اﻟﺴﻼﻣﺔ إرﺳﺎل واﺳﺘﻘﺒﺎل ﻣﻜﺎﻟﻤﺎت إﺗﺒ ﺎع ﺗﻌﻠﻴﻤ ﺎت ﻟﺠﻨ ﺔ اﻻﺗ ﺼﺎﻻت اﻟﻔﻴﺪراﻟﻴﺔ ﻣﺮآﺰ اﻻﺗﺼﺎﻻت ﺣﺪود اﻟﻤﺴﺌﻮﻟﻴﺔ إرﺳﺎل رﺳﺎﺋﻞ واﺳﺘﻼم رﺳﺎﺋﻞ اﻟﻮﻇﺎﺋﻒ اﻟﺮﺋﻴﺴﻴﺔ إرﺳ ﺎل رﺳ ﺎﺋﻞ واﺳ ﺘﻼم ﺑﺮﻳ ﺪ ﺗﻮﺻ...
- Page 4 أوﺿﺎع اﻟﻀﺒﻂ اﻷﻳﻘﻮﻧﺎت اﻟﺒﻠﻮﺗﻮث آﺘﺎﺑﺔ ﻧﺺ ﺗﻄﺒﻴﻘﺎت اﻟﺒﻄﺎرﻳﺔ ﺗﺮآﻴﺐ آﺎرت اﻟﻮﺳﺎﺋﻂ اﻟﻤﺘﻌﺪدة ﺑﺮﻧﺎﻣﺞ ﺟﺎﻓﺎ MIDLETS م اﻟﺨﺪﻣﺎت اﺳﺘﺨﺪا ...
- Page 5 اﻷﻣﻦ ﻟﺤﻤﺎﻳ ﺔ اﻟﻬ ﺎﺗﻒ اﻟﻤﺤﻤ ﻮل ﻣ ﻦ اﻟﻌﺒ ﺚ واﻻﺳ ﺘﺨﺪام ﻏﻴ ﺮ اﻟﻤﺮﻏ ﻮب ﻓﻴ ﻪ ﻣ ﻦ ﺁﺧ ﺮﻳﻦ، اﺗﺒ ﻊ ﺗﻌﻠﻴﻤ ﺎت اﻷﻣﻦ اﻟﺘﺎﻟﻴﺔ ﻓﻲ آﺎرت اﺿﺒﻂ آﻮد رﻗﻢ اﻟﺘﻌﺮﻳﻒ اﻟﺸﺨﺼﻲ اﺿﺒﻂ آﻮد ﻗﻔﻞ اﻟﻬﺎﺗﻒ ...
- Page 6 ﻟﻸﺿ ﻮاء ﻗ ﺪ ﻳﺘﻌ ﺮض ﺑﻌ ﺾ اﻷﺷ ﺨﺎص ﻟﻨﻮﺑ ﺎت ﺻ ﺮع أو ﻓﻘ ﺪ اﻹﺑ ﺼﺎر اﻟﻠﺤﻈ ﻲ ﻋﻨ ﺪ اﻟﺘﻌ ﺮض إذا آﻨﺖ ﺗﻌﺮﺿ ﺖ ﻟﻨﻮﺑ ﺎت ﺻ ﺮع ﻞ أﻟﻌﺎب اﻟﻔﻴﺪﻳﻮ اﻟﺴﺎﻃﻌﺔ، ﻣﺜ ﻼ ً ﻋﻨﺪ ﻣﺸﺎهﺪة اﻟﺘﻠﻴﻔﺰﻳﻮن أو ﺗﺸﻐﻴ أو...
- Page 7 اﻷﺟﻬﺰة اﻟﻄﺒﻴﺔ اﻟﻬﺎﺗﻒ ﺑﺎﻟﻘﺮب ﻣﻦ اﻻﺣﺘﻴﺎﻃﺎت اﻟﺘﻲ ﻳﺠﺐ ﻣﺮاﻋﺎﺗﻬﺎ ﻋﻨﺪ اﺳﺘﺨﺪام ﺐ، ﻳﺠﺐ أن ﻳﻜﻮن اﻟﻬ ﺎﺗﻒ ﻋﻠ ﻰ ﻣ ﺴﺎﻓﺔ ﻋﻨﺪ اﺳﺘﺨﺪام اﻟﻬﺎﺗﻒ ﺑﺎﻟﻘﺮب ﻣﻦ أﺟﻬﺰة ﺿﺒﻂ ﻧﺒﻀﺎت اﻟﻘﻠ ﻻ ﺗ ﻀﻊ اﻟﻬ ﺎﺗﻒ ﻓ ﻲ ﻣﻦ اﻟﺠﻬﺎز ﻋﻨﺪﻣﺎ إرﺳﺎل أو اﺳﺘﻼم ﻣﻜﺎﻟﻤ ﺎت ﺳﻢ...
- Page 8 اﺳ ﺘﺨﺪام أي ﻳﺠ ﺐ اﺳ ﺘﺨﺪام اﻹآﺴ ﺴﻮارات اﻷﺻ ﻠﻴﺔ أو اﻟﻤﻌﺘﻤ ﺪة ﻣ ﻦ اﻟ ﺸﺮآﺔ اﻟ ﺼﺎﻧﻌﺔ ﻟﻠﻬ ﺎﺗﻒ ﺗﻠ ﻒ ﻟﻠﻬ ﺎﺗﻒ أو ﺗﻌ ﺮض ﺐ ﻤ ﺪة ﻗ ﺪ ﺗ ﺆﺛﺮ ﻋﻠ ﻰ أداء اﻟﻬ ﺎﺗﻒ وﻳﻤﻜ ﻦ أن ﺗ ﺴﺒ إآﺴ...
- Page 9 اﻻﺳ ﺘﺨﺪام اﻟﻌﻨﻴ ﻒ ﻟﻠﻬ ﺎﺗﻒ ﻳﻤﻜ ﻦ أن أو ﺗﺨ ﺒﻂ أو ﺗ ﺴﺘﺨﺪم اﻟﻬ ﺎﺗﻒ ﺑﻄﺮﻳﻘ ﺔ ﻏﻴ ﺮ ﻣﻨﺎﺳ ﺒﺔ ﻻ ﺗ ﺴﻘﻂ ﻳﺴﺒﺐ ﺗﻠﻒ ﻟﻮﺣﺎت اﻟﺪواﺋﺮ اﻟﺪاﺧﻠﻴﺔ ﻻ ﺗﻮﺻﻞ اﻟﻬﺎﺗﻒ ﻣﻊ أي ﺗﻌﺰﻳﺰات ﻏﻴﺮ ﻣﺘﻮاﻓﻘﺔ ...
- Page 10 ﻘ ﺔ ﻓ ﻲ ﻣﺨ ﺎزن اﻟ ﻨﻔﻂ أو اﻟﻤ ﺼﺎﻧﻊ اﻟﻜﻴﻤﺎﺋﻴ ﺔ، ﺣﻴ ﺚ ﻳ ﺘﻢ ﻳﺠﺐ ﻣﺮاﻋ ﺎة ﻗﻴ ﻮد اﺳ ﺘﺨﺪام اﻟﻬ ﺎﺗﻒ اﻟﻤﻄﺒ إﻧﺘﺎج ﻏﺎزات ﻗﺎﺑﻠﺔ ﻟﻼﻧﻔﺠﺎر أو ﻣﻮاد ﻣﺘﻔﺠﺮة، وﺑﻤﺎ أن اﻟﻬﺎﺗﻒ ﺣﺘﻰ ﻓﻲ اﻟﺤﺎﻟﺔ اﻟﺨﺎﻣﻠﺔ ﻳﺮﺳﻞ ﻃﺎﻗﺔ ،...
- Page 11 اﻟ ﺸﺮارة ﻓ ﻲ اﻷﺟ ﻮاء اﻟﻘﺎﺑﻠ ﺔ ﻟﻼﻧﻔﺠ ﺎر ﻻ ﺗﺨﺮج أو ﺗﺮآﺐ أو ﺗﺸﺤﻦ اﻟﺒﻄﺎرﻳﺎت ﻓ ﻲ ه ﺬﻩ اﻷﻣ ﺎآﻦ ﻳﻤﻜﻦ أن ﺗﺴﺒﺐ اﻧﻔﺠﺎر أو ﺣﺮﻳﻖ ﻳﻨﺘﺞ ﻋﻨﺪ إﺻﺎﺑﺎت ﺟﺴﺪﻳﺔ أو ﻗﺪ ﺗﺆدي إﻟﻰ اﻟﻮﻓﺎة ﻟﺘﺠﻨﺐ اﻟﺘﺪاﺧﻞ اﻟﻤﺤﺘﻤﻞ ﻣﻊ ﻋﻤﻠﻴﺎت اﻟﺘﻔﺠﻴﺮ، أﻓ ﺼﻞ اﻟﻬ ﺎﺗﻒ ﻋﻨ ﺪ اﻟﻘ ﺮب ﻣ ﻦ ﻋﺮﺑ ﺎت اﻟﺘﻔﺠﻴ ﺮات أﻓ...
- Page 12 ،آ ﻴﺲ اﻟﻬ ﻮاء اﻧﺘﻔ ﺎخ ﻳﻨ ﺘﻔﺦ آ ﻴﺲ اﻟﻬ ﻮاء ﺑﻘ ﻮة آﺒﻴ ﺮة، إذا وﺿ ﻊ اﻟﻬ ﺎﺗﻒ ﻓ ﻲ ﻣﻨﻄﻘ ﺔ آﻴﺲ اﻟﻬﻮاء ﺪ ﻳﻘ ﺬف اﻟﻬ ﺎﺗﻒ ﺑﻘ ﻮة آﺒﻴ ﺮة وﻳ ﺴﺒﺐ إﺻ ﺎﺑﺎت ﺟ ﺴﻴﻤﺔ ﻟﺮآ ﺎب وﻓ...
- Page 13 ﻻ ﺗﺨﺰن اﻟﺒﻄﺎرﻳﺔ ﻓﻲ أﻣﺎآﻦ ﺣﺎرة أو إﻟﻘﺎﺋﻬﺎ ﻓﻲ ﻧﺎر ﻣﺸﺘﻌﻠﺔ، ﻓﻘﺪ ﻳﺴﺒﺐ هﺬا ﺣﺪوث اﻧﻔﺠﺎر ﺎول ﺗﻔﻜﻴﻚ أو إﻋﺎدة ﺗﺠﻤﻴﻊ اﻟﺒﻄﺎرﻳﺔ، ﻓﻘﺪ ﻳﺴﺒﺐ هﺬا ﺗﺴﺮﻳﺐ ﻟﻠ ﺴﺎﺋﻞ وﺣ ﺮارة زاﺋ ﺪة واﻧﻔﺠ ﺎر ﻻ ﺗﺤ واﺷﺘﻌﺎل اﻟﺒﻄﺎرﻳﺔ ﺧﺰن...
- Page 14 ﺘ ﺴﺮﻳﺐ اﻟﻘ ﺎدم ﻣ ﻦ اﻟﺒﻄﺎرﻳ ﺔ ﻓﻲ ﺣﺎﻟﺔ ﺗﻼﻣﺲ اﻟ إذا آﺎﻧﺖ اﻟﺒﻄﺎرﻳﺔ ﺗﺎﻟﻔﺔ، ﻻ ﺗﻘﻮم ﺑﺘﻔﺮﻳﻎ اﻟﺒﻄﺎرﻳﺔ ﺗﺤﺬﻳﺮ ﻣﻊ اﻷﻋﻴﻦ أو اﻟﺠﻠﺪ، ﻗﺪ ﺑﻐﺴﻞ اﻟﻤﻨﻄﻘﺔ اﻟﻤﻼﻣﺴﺔ ﺑﻜﻤﻴﺔ وﻓﻴﺮة ﻣﻦ ﻣﺎء ﻧﻈﻴﻒ واﺳﺘﺸﺮ اﻟﻄﺒﻴﺐ إﺗﺒﺎع ﺗﻌﻠﻴﻤﺎت ﻟﺠﻨﺔ اﻻﺗﺼﺎﻻت اﻟﻔﻴﺪراﻟﻴﺔ ﻳﺨﻀﻊ...
- Page 15 ﺴﺘﺨﺪم ﺗﺼﺤﻴﺢ اﻟﺘﻠﻴﻔﺰﻳﻮن، اﻟﺬي ﻳﻤﻜﻦ ﺗﺤﺪﻳﺪﻩ ﻋﻦ ﻃﺮﻳﻖ ﺗﺸﻐﻴﻞ وﻓﺼﻞ اﻟﺠﻬﺎز، ﻳﻤﻜﻦ أن ﻳﺤﺎول اﻟﻤ اﻟﺘﺪاﺧﻞ ﺑﺄﺣﺪ أو أآﺜﺮ ﻣﻦ اﻟﺘﺪاﺑﻴﺮ اﻟﺘﺎﻟﻴﺔ • إﻋﺎدة ﺗﻮﺟﻴﻪ أو ﺗﻐﻴﻴﺮ ﻣﻜﺎن هﻮاﺋﻲ اﻻﺳﺘﻘﺒﺎل • زﻳﺎدة اﻟﻤﺴﺎﻓﺔ ﺑﻴﻦ اﻟﺠﻬﺎز واﻟﻤﺴﺘﻘﺒﻞ • ﺗﻮﺻﻴﻞ...
- Page 16 اﻟﻤﺴﺘﻮى اﻟﻘﻴﺎﺳﻲ ﻟﻠﺘﻌﺮض ﻟﻠﻬﻮاﺗﻒ اﻟﻤﺤﻤﻮﻟﺔ اﻟﻼﺳ ﻠﻜﻴﺔ ﻳ ﺴﺘﺨﺪم وﺣ ﺪة ﻗﻴ ﺎس ﺗ ﺴﻤﻰ ﻣﻌ ﺪل اﻻﻣﺘ ﺼﺎص ﺣﺪود ﻣﻌﺪل اﻻﻣﺘﺼﺎص اﻟﻨﻮﻋﻲ اﻟﻤﺤﺪدة ﻣﻦ ﻗﺒﻞ ﻟﺠﻨﺔ اﻻﺗ ﺼﺎﻻت اﻟﻔﻴﺪراﻟﻴ ﺔ ه ﻲ اﻟﻨﻮﻋﻲ أو ﻨ ﺔ ﻮﻟ ﺔ ﻣ ﻦ ﻟﺠ ع...
- Page 17 وﻋﻠ ﻰ اﻟ ﺮﻏﻢ ﻣ ﻦ وﺟ ﻮد اﺧﺘﻼﻓ ﺎت ﺑ ﻴﻦ ﻣ ﺴﺘﻮﻳﺎت ﻣﻌ ﺪﻻت اﻻﻣﺘ ﺼﺎص اﻟﻨﻮﻋﻴ ﺔ ﻟﻠﻬﻮاﺗ ﻒ اﻟﻤﺨﺘﻠﻔ ﺔ ﻋﻨ ﺪ أوﺿﺎع ﻣﺨﺘﻠﻔﺔ، إﻻ أﻧﻬﺎ ﺟﻤﻴﻌﺎ ﺗﻠﺒﻲ اﻟﻤﺘﻄﻠﺒﺎت اﻟﺤﻜﻮﻣﻴﺔ ﺾ اﺳﺘﺨﺪام ﺟﻬﺎز ﻟﻤﻮدﻳﻞ هﺬا اﻟﻬﺎﺗﻒ ﻟﺠﻤﻴﻊ ﻣ ﺴﺘﻮﻳﺎت ﻣﻌ ﺪل وﻗﺪ...
- Page 18 اﺳﺘﺨﺪام ﻣﻠﺤﻘﺎت ﻋﻠﻰ اﻟﺠﺴﻢ وﻋﺪم وﺿﻊ اﻟﻬﺎﺗﻒ ﻋﻠﻰ اﻷذن، ﻳﺠﺐ ﺗﻮﺟﻴﻪ اﻟﻬﺎﺗﻒ ﻋﻨﺪ ﻣﺴﺎﻓﺔ ﻻ ﺗﻘﻞ ﻋ ﻦ ﺳﻢ ﻣﻦ اﻟﺠﺴﻢ ﻋﻨﺪ ﺗﻮﺻﻴﻞ اﻟﻬﺎﺗﻒ ﺑﺎﻟﻄﺎﻗﺔ ﺣﺪود اﻟﻤﺴﺌﻮﻟﻴﺔ ﺮة أو ﻣ ﺴﺌﻮﻟﻴﺔ أي ﺧ ﺴﺎﺋﺮ ﻓ ﻲ اﻷرﺑ ﺎح أو أي ﺗﻠﻔﻴ ﺎت ﺗﺎﺑﻌ ﺔ ﺑﻄﺮﻳﻘ ﺔ ﻏﻴ ﺮ ﻣﺒﺎﺷ ﻻ...
- Page 19 اﻟﻮﻇﺎﺋﻒ اﻟﺮﺋﻴﺴﻴﺔ ...
- Page 20 اﻟﻮﺻﻒ اﻟﻮﻇﻴﻔﺔ ﻹﺟﺮاء اﻟﻮﻇﻴﻔﺔ اﻟﻤﻮﺿﺤﺔ ﻋﻠﻰ اﻟﺠﺎﻧﺐ اﻷﻳﺴﺮ اﻟﺴﻔﻠﻲ ﻣﻦ اﻟﺸﺎﺷﺔ ﻣﻔﺘﺎح ﻳﺴﺎر ﻹﺟﺮاء اﻟﻮﻇﻴﻔﺔ اﻟﻤﻮﺿﺤﺔ ﻋﻠﻰ اﻟﺠﺎﻧﺐ اﻷﻳﻤﻦ اﻟﺴﻔﻠﻲ ﻣﻦ اﻟﺸﺎﺷﺔ ﻣﻔﺘﺎح ﻳﻤﻴﻦ ﺑﺎﻟﻀﻐﻂ ﻋﻠﻴﻪ ﻳﺘﻢ ﺗﺄآﻴﺪ اﻹﺟﺮاءات وﻋﻤﻞ اﺧﺘﻴﺎرات ﻣﻔﺘﺎح اﻟﻮﺳﻂ ﻳﺴﻤﺢ ﺑﺎﻟﺘﺼﻔﺢ ﺧﻼل أﻋﻠﻰ وأﺳﻔﻞ وﻳﺴﺎر وﻳﻤﻴﻦ ﻣﻔﺎﺗﻴﺢ...
- Page 21 ﺑﺎﺳﺘﻤﺮار اﻟﻀﻐﻂ ﻳﺘﻢ ﺗﻮﺻﻴﻞ وﻓﺼﻞ وﺿﻊ ﺻﺎﻣﺖ ﻓﻲ وﺿﻊ ﻣﻔﺘﺎح اﻟﺸﺒﺎك ﺟﺎهﺰ اﻟﻜﺸﺎف ﻳﺘﻢ ﻓﺼﻞ وﺗﻮﺻﻴﻞ اﻟﻜﺸﺎف ﻓﻲ ﺑﺎﺳﺘﻤﺮار اﻟﻀﻐﻂ ﻋﻠﻰ ﻣﻔﺘﺎح وﺿﻊ ﺟﺎهﺰ ﻣﻔﺎﺗﻴﺢ اﻷرﻗﺎم واﻟﺤﺮوف ي وﺣﺮوف ﻣﻦ أ ﺑﺎﻟﻀﻐﻂ ﻋﻠﻴﻬﺎ ﻳﻤﻜﻦ إدﺧﺎل أرﻗﺎم ﻣﻦ ﺗﻌﻨﻲ أن ﺗﻘﻮم ﺑﺎﻟﻀﻐﻂ ﻋﻠﻰ اﻟﻤﻔﺘﺎح ﺛﻢ ﺗﺮآﻪ "...
- Page 22 اﻟﺸﺎﺷﺔ أوﺿﺎع ﺿﺒﻂ ﻣﺘﻨﻮﻋﺎت أوﺿﺎع ﺿﺒﻂ اﻟﻬﺎﺗﻒ إﻋﺪاد ﻓﻲ اﻟﻘﺎﺋﻤﺔ ﻓﻲ ﺣﺎﻟﺔ ﻋﺪم ﺗﺸﻐﻴﻞ اﻟﻬﺎﺗﻒ ﺧﻼل هﺬا ، اﺿﺒﻂ زﻣﻦ ﺿﻮء ﺧﻠﻔﻴﺔ اﻟﺸﺎﺷﺔ ﺿﻮء ﺧﻠﻔﻴﺔ اﻟﺸﺎﺷﺔ ﻟﺸﺎﺷﺔ اﻟﺰﻣﻦ، ﺗﻨﻄﻔﺊ ا اﺿﻐﻂ ﻋﻠﻰ أي ﻣﻔﺘﺎح ﻟﺘﺸﻐﻴﻞ اﻟﻬﺎﺗﻒ ﻣﻦ وﺿﻊ اﻟﻨﻮم ﺗﺤﺮﻳﺮ...
- Page 23 اﻷﻳﻘﻮﻧﺎت ﻣﻌﻨﺎهﺎ اﻷﻳﻘﻮﻧﺔ ﻣﻌﻨﺎهﺎ اﻷﻳﻘﻮﻧﺔ رﺳﺎﻟﺔ ﻗﺼﻴﺮة ﺟﺪﻳﺪة، ﺻﻨﺪوق ﻗﻮة اﻹﺷﺎرة اﻟﺮﺳﺎﺋﻞ ﻣﻤﻠﻮء ﻋﻨﺪﻣﺎ ﺗﻮﻣﺾ رﺳﺎﻟﺔ وﺳﺎﺋﻂ ﻣﺘﻌﺪدة ﺟﺪﻳﺪة ﺑﺮﻳﺪ ﺻﻮﺗﻲ ﺟﺪﻳﺪ ﺗﻮﺟﻴﻪ اﻟﻤﻜﺎﻟﻤﺔ ﻣﻜﺎﻟﻤﺔ ﻓﺎﺋﺘﺔ ﺻﺎﻣﺖ GPRS ﺣﺎﻟﺔ اﻟﺒﻄﺎرﻳﺔ ﺑﺎﻟﺪاﺧﻞ ﺿﺒﻂ اﻟﻤﻨﺒﻪ ﺑﺎﻟﺨﺎرج ﻟﻮﺣﺔ اﻟﻤﻔﺎﺗﻴﺢ ﻣﻐﻠﻘﺔ اﺟﺘﻤﺎع...
- Page 24 آﺘﺎﺑﺔ ﻧﺺ ﻳﻤﻜﻦ اﺳﺘﺨﺪام ﻟﻮﺣﺔ اﻟﻤﻔﺎﺗﻴﺢ ﻓﻲ إدﺧﺎل رﺳﺎﺋﻞ وﺑﻴﺎﻧﺎت أرﻗﺎم هﻮاﺗﻒ وﻣﻼﺣﻈﺎت واﻟﻤﺰﻳﺪ • ﻟﺘﻐﻴﻴﺮ وﺿﻊ اﻟﺪﺧﻞ اﺿﻐﻂ ﻋﻠﻰ ﻣﻔﺘﺎح اﻟﺸﺒﺎك ﺗﻐﻴﻴﺮ وﺿﻊ اﻟﺪﺧﻞ • ، اﺿ ﻐﻂ ﺑﺎﺳ ﺘﻤﺮار ﻋﻠ ﻰ ﻣﻔ ﺎﺗﻴﺢ اﻷﺣ ﺮف ﻓ ﻲ وﺿ ﻊ إدﺧ...
- Page 25 • ﻓ ﻲ ﻐﻂ ﻋﻠ ﻰ ﻣﻔﺘ ﺎح رﻗ ﻢ ﻣ ﺮة واﺣ ﺪة ﻹدﺧ ﺎل رﻗ ﻢ ، اﺿ ﻓ ﻲ وﺿ ﻊ إدﺧﺎل أرﻗﺎم AR123 ، واﺧﺘ ﺮ رﻗ ﻢ ﺑﺎﻟ ﻀﻐﻂ رﻗ ﻢ ، اﺿﻐﻂ ﻋﻠ ﻰ ﻣﻔﺘ ﺎح وﺿﻊ...
- Page 26 • ﻣﻔ ﺎﺗﻴﺢ اﻟﺘ ﺼﻔﺢ ﻳ ﺴﺎر ﺑ ﻴﻦ اﻟ ﻨﺺ، اﺿ ﻐﻂ ﻋﻠ ﻰ ﺗﺤﺮﻳﻚ ﻣﺆﺷﺮ اﻟ ﺸﺎﺷﺔ إﻟ ﻰ اﻟﻴ ﺴﺎر أو اﻟﻴﻤ ﻴﻦ ﻟﺘﺤﺮﻳﻚ ﻣﺆﺷﺮ اﻟﺸﺎﺷﺔ إﻟﻰ اﻟﻴﺴﺎر أو اﻟﻴﻤﻴﻦ ﻳﻤﻴﻦ اﻟﺒﻄﺎرﻳﺔ ﻓﻚ ﺗﻐﻠﻴﻔﻬﺎ ﺑﻌﺪ ﻳﻤﻜﻦ اﺳﺘﺨﺪام ﺑﻄﺎرﻳﺔ اﻟﻬﺎﺗﻒ اﻟﻠﻴﺜﻴﻮم أﻳﻮن ﻣﺒﺎﺷﺮة ﺮآﻴﺐ...
- Page 27 ﻓﻚ وإﺧﺮاج اﻟﺒﻄﺎرﻳﺔ ﺗﺄآﺪ ﻣﻦ ﻓﺼﻞ اﻟﻬﺎﺗﻒ اﻧﺰع ﻏﻄﺎء اﻟﺒﻄﺎرﻳﺔ اﺳﺤﺐ اﻟﺒﻄﺎرﻳﺔ ﻷﻋﻠﻰ وأﺧﺮﺟﻬﺎ ﻣﻦ اﻟﻬﺎﺗﻒ ﺷﺤﻦ اﻟﺒﻄﺎرﻳﺔ ﻨﺼﺢ ﻟﺘﺤﻘﻴﻖ أﺣﺴﻦ أداء ﻟﻠﺒﻄﺎرﻳﺔ، ﻳ ﺗﻮﺻﻞ اﻟﻄﺎﻗﺔ ﻟﻠﻬﺎﺗﻒ ﻋﻦ ﻃﺮﻳﻖ ﺑﻄﺎرﻳﺔ ﻗﺎﺑﻠﺔ ﻹﻋﺎدة اﻟﺸﺤﻦ ﺑﺎﺳﺘﻬﻼك ﻃﺎﻗﺔ اﻟﺒﻄﺎرﻳﺔ ﺑﺎﻟﻜﺎﻣﻞ ﺛﻢ إﻋﺎدة ﺷﺤﻨﻬﺎ ﺑﺎﻟﻜﺎﻣﻞ ﻳﺘﺤﻘﻖ اﻷداء اﻟﻜﺎﻣﻞ ﻟﻠﺒﻄﺎرﻳﺔ اﻟﺠﺪﻳﺪة ﺑﻌﺪ ﺛﻼﺛﺔ...
- Page 28 وﺻﻞ اﻟﺸﺎﺣﻦ ﻋﻞ ﺟﺎﻧﺐ اﻟﻬﺎﺗﻒ اﻷﻳﻤﻦ آﻤﺎ هﻮ ﻣﻮﺿﺢ ﺑﺎﻟﺮﺳﻢ وﺻﻞ اﻟﻨﻬﺎﻳﺔ اﻷﺧﺮى ﻣﻦ اﻟﺸﺎﺣﻦ ﺑﺴﻮآﺖ ﻣﺼﺪر إﻣﺪاد اﻟﻄﺎﻗﺔ رﻳﺔ، ﻳﻈﻬﺮ ﻣﺒﻴﻦ ﺷﺤﻦ اﻟﺒﻄﺎرﻳﺔ أﺛﻨﺎء ﺷﺤﻦ اﻟﺒﻄﺎ ﻋﻨﺪ ﺷﺤﻦ اﻟﺒﻄﺎرﻳﺔ ﺑﺎﻟﻜﺎﻣﻞ، اﻓﺼﻞ اﻟﺸﺎﺣﻦ ﺗﺮآﻴﺐ آﺎرت إذا...
- Page 29 أﺗﺒﻊ اﻟﺨﻄﻮات اﻟﺘﺎﻟﻴﺔ ﻟﺘﺮآﻴﺐ آﺎرت ﺪم ﺗﻮﺻﻴﻞ اﻟﺸﺎﺣﻦ ﻣﻊ اﻟﻬﺎﺗﻒ ﺗﺄآﺪ ﻣﻦ ﻓﺼﻞ اﻟﻬﺎﺗﻒ وﻋ أﻗﻠﺐ اﻟﻬﺎﺗﻒ وارﻓﻊ ﻏﻄﺎء اﻟﺒﻄﺎرﻳﺔ ﻓﻚ اﻟﺒﻄﺎرﻳﺔ إذا آﺎﻧﺖ ﻣﺮآﺒﺔ واﻟ ﺮآﻦ اﻟﻤﻘﻄ ﻮع ﻓ ﻲ اﻻﺗﺠ ﺎﻩ اﻟﻤﻮﺿ ﺢ ﺑﺎﻟ ﺼﻮرة، ﺛ ﻢ أزﻟ ﻖ اﻟﻜ ﺎرت داﺧ ﻞ اﻣ...
- Page 30 ﻋﺒﺎرة ﻋﻦ ﺷﺮﻳﺤﺔ ﻣﺘﻨﺎهﻴﺔ اﻟﺼﻐﺮ ﺗﺤﻤﻞ ﺑﻴﺎﻧﺎﺗﻚ اﻟﺸﺨﺼﻴﺔ ﻣﺜ ﻞ وﺣﺪة اﻟﺘﻌﺮﻳﻒ ﺑﺎﻟﻤﺸﺘﺮك آﺎرت اﺗ ﺼﺎل ﻋﻠ ﻰ آ ﺎرت إذا آﺎﻧ ﺖ ﻟ ﺪﻳﻚ أرﻗ ﻢ ﻻ ﻳﻌﻤﻞ اﻟﻬ ﺎﺗﻒ ﺑ ﺪون ه ﺬا اﻟﻜ ﺎرت اﻷﺳﻤﺎء وأرﻗﺎم اﻟﻬﻮاﺗﻒ ،...
- Page 31 دﻟﻴﻞ اﻟﻬﺎﺗﻒ ه ﺬﻩ اﻷرﻗ ﺎم ﻟ ﺪﻟﻴﻞ إذا آ ﺎن ﻟ ﺪﻳﻚ ﺑﻌ ﺾ اﻷرﻗ ﺎم اﻟﺘ ﻲ ﺗﻘ ﻮم ﺑﻄﻠﺒﻬ ﺎ اﻟﻌﺪﻳ ﺪ ﻣ ﻦ اﻟﻤ ﺮات، ﻓﻴﻤﻜﻨ ﻚ إﺿ ﺎﻓﺔ اﻟﻬﺎﺗﻒ، وﻳﻤﻜﻨﻚ ﺑﻌﺪ ذﻟﻚ اﻟﻮﺻﻮل ﻟﻬﺬﻩ اﻷرﻗﺎم ﺑﺴﻬﻮﻟﺔ وﺳﺮﻋﺔ ...
- Page 32 إﻋ ﺪاد دﻟﻴ ﻞ ← ﺧﻴ ﺎرات دﻟﻴ ﻞ اﻟﻬ ﺎﺗﻒ ﻳﻤﻜ ﻦ اﻟ ﺬهﺎب إﻟ ﻰ Options Contacts Storage ﻟﻀﺒﻂ اﻟﺘﺨﺰﻳﻦ ﻟﺘﺨﺰﻳﻦ اﻟﻤﻔﻀﻞ ← اﻟﻬﺎﺗﻒ Preferred Storage واﺣﻔﻈﻬﺎ ﻗﻢ ﺑﺘﺤﺮﻳﺮ اﻟﺒﻴﺎﻧﺎت ﺣﻔﻆ رﻗﻢ ﻓﻲ دﻟﻴﻞ اﻟﻬﺎﺗﻒ ﻲ ﻗﺎﺋﻤ ﺔ دﻟﻴ ﻞ ﻳﻤﻜﻦ...
- Page 33 ﻳﻤﻜ ﻦ أﻳ ﻀ ًﺎ ﻧ ﺴﺦ اﻷرﻗ ﺎم إﻟ ﻰ ﻣﻠ ﻒ أو إﻟ ﻰ اﻟﻬ ﺎﺗﻒ ﻳﻤﻜﻦ ﻧ ﺴﺦ أو ﻧﻘ ﻞ أرﻗ ﺎم ﻣ ﺴﺠﻠﺔ إﻟ ﻰ آ ﺎرت أو ﻧﻘﻞ ﻧﺴﺦ ← اﺧﺘﺎر ﺧﻴﺎرات Move Copy Options اﻟﺘﻌﻠﻴﻢ...
- Page 34 ،، اﺑﺤ ﺚ ﻋ ﻦ اﺳ ﻢ اﻟ ﺸﺨﺺ اﻟﻤ ﺮاد ﻣﻜﺎﻟﻤﺘ ﻪ دﻟﻴ ﻞ اﻟﻬ ﺎﺗﻒ ← اذه ﺐ إﻟ ﻰ ﻗﺎﺋﻤ ﺔ Phonebook Menu ﻟﻄﻠﺐ اﻟﺮﻗﻢ واﺿﻐﻂ ﻋﻠﻰ ﻣﻔﺘﺎح اﻹرﺳﺎل Send key إﺟﺮاء ﻣﻜﺎﻟﻤﺔ ﻃﻮارئ ﻃﺎﻟﻤﺎ أﻧﻚ ﻣﻮﺟﻮد ﻓﻲ ﻧﻄﺎق ﺗﻐﻄﻴﺔ اﻟﺸﺒﻜﺔ إﺟﺮاء...
- Page 35 ﻣﺮآﺰ اﻻﺗﺼﺎﻻت ﻣﺮآﺰ اﻻﺗﺼﺎﻻت ← اذهﺐ إﻟﻰ اﻟﻘﺎﺋﻤﺔ Call center Menu ﺗﺎرﻳﺦ اﻟﻤﻜﺎﻟﻤﺎت إذا آ ﺎن ﺳ ﺠﻞ ﺗ ﺎرﻳﺦ ﺗ ﺎرﻳﺦ اﻟﻤﻜﺎﻟﻤ ﺎت اﻟﻤ ﺴﺘﻘﺒﻠﺔ واﻟﻔﺎﺋﺘ ﺔ ﻓ ﻲ ﻳ ﺘﻢ ﺣﻔ ﻆ ﺟﻤﻴ ﻊ اﻟﻤﻜﺎﻟﻤ ﺎت اﻟﻤﺰوﻟ ﺔ و ﻹدﺧﺎل...
- Page 36 ﺣﺬف ﺟﻤﻴﻊ اﻷرﻗﺎم اﻟﻤﺴﺠﻠﺔ ﺣﺬف اﻟﻜﻞ ﻋﺮض ﻣﺆﻗﺖ، ﺗﻜﻠﻔﺔ اﻟﻤﻜﺎﻟﻤﺔ، ﻋﺪاد اﻟﺮﺳﺎﺋﻞ اﻟﻨﺼﻴﺔ و ﻋﺪاد وﻇﺎﺋﻒ أﺧﺮى GPRS ﺔ إﻋﺪاد اﻟﻤﻜﺎﻟﻤ ♦ ﻳﻤﻜﻦ اﺧﺘﻴﺎر اﻟﻀﺒﻂ ﻋﻦ ﻃﺮﻳﻖ اﻟﺸﺒﻜﺔ أو إﺧﻔﺎء هﻮﻳ ﺔ رﻗ ﻢ اﻟﻄﺎﻟ ﺐ أو آﺎﺷﻒ...
- Page 37 ♦ ﺗﻐﻴﻴﺮ ﺧﻂ اﻟﻤﻜﺎﻟﻤﺔ اﻟﺘﻐﻴﻴﺮ ﺑﻴﻦ اﻟﺨﻄﻮط ♦ ﻳﻤﻜﻦ ﺿﺒﻂ ﻃﻠﺐ اﻟﺮﻗﻢ ﺗﻠﻘﺎﺋﻲ وﻋﺮض زﻣﻦ اﻟﻤﻜﺎﻟﻤﺔ وﻣﺬآﺮ زﻣﻦ اﻟﻤﻜﺎﻟﻤﺔ أﺧﺮى إﻋﺪادات إرﺳﺎل واﺳﺘﻼم رﺳﺎﺋﻞ آﺘﺎﺑﺔ رﺳﺎﻟﺔ ﺟﺪﻳﺪة ﻳﻤﻜﻦ اﺳﺘﺨﺪام اﻟﻬﺎﺗﻒ اﻟﻨﻘﺎل ﻓﻲ إرﺳﺎل واﺳﺘﻼم رﺳﺎﺋﻞ آﺘﺎﺑﺔ رﺳﺎﻟﺔ ←...
- Page 38 ﻹﺿ ﺎﻓﺔ ﺷ ﺮﻳﺤﺔ ﺸﺮاﺋﺢ ﺧﻴ ﺎرات اﻟ ← ﻳﻤﻜ ﻦ اﺧﺘﻴ ﺎر ﺧﻴ ﺎرات Slide Options Options ﺟﺪﻳﺪة ﻹدﺧ ﺎل إرﺳ ﺎل إﻟ ﻰ ← ﻋﻨ ﺪ اﻻﻧﺘﻬ ﺎء ﻣ ﻦ اﻟﻜﺘﺎﺑ ﺔ، اﺿ ﻐﻂ ﻋﻠ ﻰ ﺧﻴ ﺎرات Send ...
- Page 39 ة أﺧ ﺮى ﻟﻠﺮﺳ ﺎﻟﺔ ﻟﻠﺮد أو اﻟﺤ ﺬف أو اﻹرﺳ ﺎل ﻣ ﺮ أﺛﻨﺎء ﻓﺘﺢ اﻟﺮﺳﺎﻟﺔ، اﺳﺘﺨﺪم ﺧﻴﺎرات Options ﻳﻤﻜﻦ أﻳ ﻀ ًﺎ ﻃﻠﺐ رﻗﻢ اﻟﺮاﺳﻞ أو ﺣﻔﻆ رﻗﻢ اﻟﺮاﺳﻞ ﻓﻲ دﻟﻴﻞ اﻟﻬﺎﺗﻒ ﻳﻤﻜﻦ ﻋﺮض ﺻﻨﺎدﻳﻖ اﻟﺮﺳﺎﺋﻞ ﻓﻲ اﻟﻮﺻﻼت اﻟﺒﻴﻨﻴﺔ ﻟﻠﺮﺳﺎﺋﻞ ﻟﻌﺮض...
- Page 40 أوﺿ ﺎع ﺿ ﺒﻂ اﻟﺮﺳ ﺎﺋﻞ ← اﻟﺮﺳ ﺎﺋﻞ ← اذه ﺐ إﻟ ﻰ ﻗﺎﺋﻤ ﺔ Message Messaging Menu رﺳﺎﻟﺔ ﻧﺼﻴﺔ ← Text message Settings ﻳﺘﻢ ﺿﺒﻄﻬﺎ ﺗﻠﻘﺎﺋ ﻴ ًﺎ ﻣﻦ ﻣﻘﺪم اﻟﺨﺪﻣﺔ، واﺗﺼﻞ ﺑﻨﺎ إذا آﺎﻧﺖ ﻏﻴﺮ ﻣﺘﻮﻓﺮة أوﺿﺎع ﺿﺒﻂ اﻟﺒﻴﺎﻧﺎت ﻳﻤﻜ...
- Page 41 ﻋﻨ ﺪ اﻹرﺳ ﺎل، وﺗﻘﺮﻳ ﺮ اﻟﻘ ﺮاءة واﻷوﻟﻮﻳ ﺔ وزﻣ ﻦ اﻹرﺳ ﺎل وإﺧﻔ ﺎء اﻟﺮاﺳ ﻞ وإرﺳ ﺎل وﺣﻔ ﻆ اﻻﺳﺘﺮﺟﺎع، ﻳﻤﻜﻦ ﺿ ﺒﻂ اﻟ ﺸﺒﻜﺔ اﻟﺮﺋﻴ ﺴﻴﺔ واﻟﺘﺠ ﻮال واﻟﻔﻼﺗ ﺮ وﺗﻘﺮﻳ ﺮ اﻟﻘ ﺮاءة وﺗﻘﺮﻳ ﺮ اﻹرﺳ ﺎل اﻟﺬاآﺮة،...
- Page 42 اﻹﻟﻜﺘﺮوﻧﻲ اﻟﺨﺎص ﺑﻚ ﻗﻢ ﺑﺘﻔﻌﻴﻞ ﺣﺴﺎب اﻟﺒﺮﻳﺪ إرﺳﺎل ﺑﺮﻳﺪ إﻟﻜﺘﺮوﻧﻲ آﺘﺎﺑ ﺔ اﻟﺒﺮﻳ ﺪ ← ﺑﺮﻳ ﺪ إﻟﻜﺘﺮوﻧ ﻲ ← اﻟﺮﺳ ﺎﺋﻞ ← اذه ﺐ إﻟ ﻰ اﻟﻘﺎﺋﻤ ﺔ Email Messaging Menu ﻋﻨ ﺪ اﻻﻧﺘﻬ ﺎء ﻣ ﻦ اﻟﻜﺘﺎﺑ ﺔ، اﺧﺘ ﺎر إرﺳ ﺎل أو ﺣﻔ ﻆ ﻟﺘﺤﺮﻳ...
- Page 43 ﻳﻤﻜ ﻦ اﺧﺘﻴ ﺎر اﻟﺒﻴﺎﻧ ﺎت اﻟﻤﻔ ﻀﻠﺔ ﻓ ﻲ ﺑﻴﺎﻧﺎت اﻟﻤﺴﺘﺨﺪم ← اذهﺐ إﻟﻰ اﻟﻘﺎﺋﻤﺔ User Profiles Menu رج، وﺻ ﺎﻣﺖ وﺳ ﻤﺎﻋﺔ ﻋ ﺎم واﺟﺘﻤ ﺎع، وإﺟ ﺮاء ﻣﻜﺎﻟﻤ ﺔ ﻓ ﻲ اﻟﺨ ﺎ وﺗ ﺸﻤﻞ اﻟﺨﻴ ﺎرات ﻋﻠ ﻰ ه...
- Page 44 أوﺿﺎع اﻟﻀﺒﻂ أوﺿﺎع اﻟﻀﺒﻂ ← اذهﺐ إﻟﻰ اﻟﻘﺎﺋﻤﺔ ﻳﻤﻜﻦ إﺟﺮاء أوﺿﺎع ﺿﺒﻂ ﻣﺨﺘﻠﻔﺔ ﻟﻠﻬﺎﺗﻒ Settings Menu أوﺿﺎع ﺿﺒﻂ اﻟﻬﺎﺗﻒ رﻳﺦ واﻟﺘﺸﻜﻴﻞ اﻟﻤﺤﻠﻲ ﻳﻤﻜﻦ ﺿﺒﻂ اﻟﻤﺪﻳﻨﺔ واﻟﺘﻮﻗﻴﺖ واﻟﺘﺎ اﻟﻮﻗﺖ واﻟﺘﺎرﻳﺦ ﺿﺒﻂ زﻣﻦ اﻟﺘﻮﺻﻴﻞ واﻟﻔﺼﻞ اﻟﺘﻠﻘﺎﺋﻲ ﻟﻠﻄﺎﻗﺔ اﻟﺠﺪول اﻟﺰﻣﻨﻲ ﻟﻔﺼﻞ وﺗﻮﺻﻴﻞ اﻟﻄﺎﻗﺔ ...
- Page 45 ﻓ ﺼﻞ ﺿ ﺒﻂ ﻣﻔﺘ ﺎح ﺿ ﻮء ﺧﻠﻔﻴ ﺔ اﻟ ﺸﺎﺷﺔ ﻋﻠ ﻰ وﺿ ﻊ ﺗ ﺸﻐﻴﻞ أو ﻣﻔﺘ ﺎح ﺿ ﻮء ﺧﻠﻔﻴ ﺔ اﻟ ﺸﺎﺷﺔ ON/OFF أوﺿﺎع ﺿﺒﻂ اﻟﺸﺒﻜﺔ ﻻﺧﺘﻴ ﺎر ﻣﻘ ﺪم ﺧﺪﻣ ﺔ اﻟ ﺸﺒﻜﺔ ﻃﺒ ﻘ ً ﺎ ﻳﺪوي...
- Page 46 ﻏﻴ ﺮ ﺻ ﺤﻴﺢ ﺛﻼﺛ ﺔ ﻣ ﺮات إذا ﺗ ﻢ إدﺧ ﺎل آ ﻮد ﻟﻔ ﻚ ﻗﻔ ﻞ آ ﺎرت ﻣﻄﻠ ﻮب آ ﻮد ﻣﻼﺣﻈ ﺔ إذا ﻟﻢ ﻳﻜﻦ ﻣﻮﺟﻮد، اﺗﺼﻞ ﺑﻤﻘﺪم ﺧﺪﻣﺔ اﻟﺸﺒﻜﺔ ﻣﻊ آﺎرت آﻮد ﻳﻘﺪم آﻮد ﻣﺘﺘﺎﻟﻴﺔ...
- Page 47 إﻋﺎدة أوﺿﺎع ﺿﺒﻂ اﻟﻤﺼﻨﻊ ﻹﻋ ﺎدة أوﺿ ﺎع ﺿ ﺒﻂ ﺗﺤﺘ ﺎج إدﺧ ﺎل آﻠﻤ ﺔ اﻟﻤ ﺮور اﻟ ﺼﺤﻴﺤﺔ ﻟﻘﻔ ﻞ اﻟﻬ ﺎﺗﻒ واﻟ ﻀﻐﻂ ﻋﻠ ﻰ ﻣﻮاﻓ ﻖ اﻟﻤﺼﻨﻊ اﻟﺒﻠﻮﺗﻮث ﺑﻠﻮﺗ ﻮث ← اﻟﺘﻮﺻ ﻴﻞ ← أوﺿﺎع...
- Page 48 ، ﻳﻤﻜﻦ ﻟﺠﻤﻴﻊ اﻷﺟﻬﺰة اﻟﺘ ﻲ ﺑﻬ ﺎ ﺑﻠﻮﺗ ﻮث ﻋﻨﺪﻣﺎ ﻳﻜﻮن اﻟﻬﺎﺗﻒ ﻣﺮﺋﻲ، واﻟﺒﻠﻮﺗﻮث ﻋﻠﻰ وﺿﻊ اﻟﺘﺸﻐﻴﻞ ﻋﻠﻰ وﺿﻊ اﻟﺘﺸﻐﻴﻞ أن ﺗﻜﺘﺸﻒ هﺎﺗﻔﻚ إﻧﺸﺎء ﻣﺸﺎرآﺔ ﺑﻠﻮﺗﻮث ﻃﻠ ﺐ ﺟﻬ ﺎز ﺟﺪﻳ ﺪ ← ﺟﻬ ﺎزي ← اذه ﺐ إﻟ ﻰ ﺑﻠﻮﺗ ﻮث Search ...
- Page 49 ، ﺛﻢ ﺧﻼل اﻟﺒﻠﻮﺗﻮث ← إرﺳﺎل ← اﻟﻤﺘﻌﺪدة واﺿﻐﻂ ﻋﻠﻰ ﺧﻴﺎرات Via Bluetooth Send Options اﺧﺘﺎر اﺳﻢ اﻟﺠﻬﺎز اﻟﺘﻮﺻﻴﻞ ﻣﻊ ﺑﻠﻮﺗﻮث واﻟﻬﺎﺗﻒ ﻋﻦ ﺑﻌﺪ أو ﺑﺎﺳﺘﺨﺪام ﺳﻤﺎﻋﺔ رأس ﺳﺘﺮﻳﻮ ﻟﻬ ﺎﺗﻒ ﻋ ﻦ اﻟﺒﻌ ﺪ أو ﻟﻠ ﺴﻤﺎع إﻟ ﻰ اﻟﻤﻮﺳ ﻴﻘﻰ، ﻳﻤﻜ ﻦ اﺳ ﺘﺨﺪام اﻟﺒﻠﻮﺗ ﻮث واﻟﻬ ﺎﺗﻒ ﻋ ﻦ ﺑﻌ ﺪ أو ﻟﻤﺤﺎدﺛ...
- Page 50 ﻳﻤﻜﻦ اﻟﻀﻐﻂ ﻋﻠﻰ اﻟﺘﻮارﻳﺦ، وﺗﺼﻔﺢ اﻟﺘﻮارﻳﺦ واﻟﻀﻐﻂ ﻋﻠﻰ أﺳﻬﻢ اﻻﺗﺠﺎهﺎت ﻋﻠﻰ اﻟﺸﺎﺷﺔ ﻟﺘﻐﻴﻴﺮ اﻟﺴﻨﺔ اﻟﺸﺎﺷﺔ ﺗﺒ ﻌ ًﺎ ذﻟﻚ واﻟﺸﻬﺮ؛ وﻳﺘﻢ ﺗﻐﻴﻴﺮ اﻟﻤﻌﻠﻮﻣﺎت ﻋﻠﻰ اﻟﻤﻬﺎم ﻳﻤﻜﻦ إﺿﺎﻓﺔ ﻣﻬﺎم اﻟﻤﻨﺒﻪ ﻋﻨ ﺪ اﻟﻨﻘ ﺮ ﻋﻠ ﻰ ﻳﻤﻜ ﻦ أﻳ ﻀ ًﺎ ﺗﻤﻜ ﻴﻦ أو ﻣﻨ ﻊ أوﺿ ﺎع اﻟﺘﻨﺒﻴ ﻪ ﻳﻤﻜﻦ...
- Page 51 ادﺧﻞ اﻟﻘﻴﻤﺔ ﻹﺟﺮاء اﻟﺘﺤﻮﻳﻞ ﻮال ﻳﻮﺟﺪ ﺑﺎﻟﻬﺎﺗﻒ ﻣﺤﻮل وﺣﺪات ﻟﺘﺤﻮﻳﻞ اﻷوزان واﻷﻃ اﻟﺴﺎﻋﺔ اﻟﻌﺎﻟﻤﻴﺔ ﻳﻤﻜﻦ ﻋﺮض ﺗﻮﻗﻴﺖ اﻟﻤﺪن اﻟﻤﺨﺘﻠﻔﺔ اﻷﻟﻌﺎب ﻟﻤﺰﻳ ﺪ ﻣ ﻦ اﻟﻤﻌﻠﻮﻣ ﺎت، ادﺧ ﻞ ﻋﻠ ﻰ اﻟﻘﺎﺋﻤ ﺔ وﻋ ﺮض ﺗ ﻢ ﺗﺤﻤﻴ ﻞ أﻟﻌ ﺎب آﻼﺳ ﻴﻜﻴﺔ ﻋﻠ ﻰ اﻟﻬ ﺎﺗﻒ اﻟﻨﻘ ﺎل ﻣﺴﺎﻋﺪة...
- Page 52 ﺗﺸﻜﻴﻞ اﻟﻜﺎﻣﻴﺮا ﻟﺘﺸﻜﻴﻞ اﻟﻜﺎﻣﻴﺮا ﻣﻔﺘﺎح ﻳﺴﺎر ، اﺿﻐﻂ ﻋﻠﻰ اذهﺐ إﻟﻰ آﺎﻣﻴﺮا Camera اﻟﺼﻮر ﻋﺎرض ﻓﻲ اﻟﻬﺎﺗﻒ أو آﺎرت اﻟﺬاآﺮة، وﻓ ﻲ اﻟﺼﻮر ﻣﺠﻠﺪ ﻋﺎرض اﻟﺼﻮر ﻳﺠﺐ وﺿﻊ اﻟﺼﻮر اﻟﻤﺮاد ﻋﺮﺿﻬﺎ ﻓﻲ ، ﻳﺠﺐ ﺿﺒﻂ اﻟﺘﺨﺰﻳﻦ ﻓﻲ اﻟﻬ ﺎﺗﻒ أو ﻓ ﻲ آ ﺎرت اﻟ ﺬاآﺮة ﻋﻠ ﻰ ﺗﺨﺰﻳﻦ...
- Page 53 ﺗﻴﺢ اﻟﺘﺼﻔﺢ اﻷرﺑﻌﺔ ﻣﻔﺎ واﻟﺘﻘﺮﻳﺐ واﻟﻤﻘﺎس اﻟﺼﺤﻴﺢ ﺑﺎﻟﻀﻐﻂ ﻋﻠﻰ ﻗﺒﻞ ﺗﺴﺠﻴﻞ ﻓﻴﺪﻳﻮ، اﺿﺒﻂ اﻹﺿﺎءة ♦ ﺗﺸﻜﻴﻞ ﻣﺴﺠﻞ اﻟﻔﻴﺪﻳﻮ اﺿﻐﻂ ﻋﻠﻰ ﻣﻔﺘﺎح ﻳﺴﺎر ﻟﺘﺸﻜﻴﻞ ﻣﺴﺠﻞ اﻟﻔﻴﺪﻳﻮ اذهﺐ إﻟﻰ ﻣﺴﺠﻞ اﻟﻔﻴﺪﻳﻮ Video Recorder ﻣﺸﻐﻞ اﻟﻔﻴﺪﻳﻮ ﻓ ﻲ اﻟﻬ ﺎﺗﻒ أو ﻓ...
- Page 54 ﻘﻰ ﻓ ﻲ ﻣﺠﻠ ﺪ ﻣﻠﻔ ﺎت اﻟﻤﻮﺳ ﻴ ﻳﺠﺐ وﺿﻊ ﻣﻠﻔﺎت اﻟﻤﻮﺳﻴﻘﻰ اﻟﺘﻲ ﺗﺮﻳﺪ ﺳ ﻤﺎﻋﻬﺎ ﻓ ﻲ ﻣ ﺸﻐﻞ ﻣﻠﻔ ﺎت اﻟ ﺼﻮت ﻗﺎﺋﻤ ﺔ اﻟﺘ ﺸﻐﻴﻞ اﻟﻤ ﺴﺒﻘﺔ ← ﺧﻴ ﺎرات ← ﻓ ﻲ اﻟﻬ ﺎﺗﻒ أو آ ﺎرت اﻟ ﺬاآﺮة، وﻓ ﻲ ﻗﺎﺋﻤ ﺔ Options List ،...
- Page 55 ﻨﺎء اﻻﺳﺘﻤﺎع إﻟﻰ اﻟﺮادﻳﻮ، ﺳ ﻴﺘﻢ أﺛ ﻋﻨﺪ اﺳﺘﻘﺒﺎل ﻣﻜﺎﻟﻤﺔ ﻗﺎدﻣﺔ ﻟﺘﻮﻟﻴﻒ اﻟﺘﺮدد ﻳﻤﻴﻦ ﻣﻔﺎﺗﻴﺢ اﻟﺘﺼﻔﺢ ﻳﺴﺎر ﻹدﺧﺎل اﻟﻘﺎﺋﻤﺔ اﻟﻔﺮﻋﻴﺔ ﺧﻴﺎرات اﺧﺘﺎر ﻳﻘﺎف اﻟﺮادﻳﻮ ﻣﺆﻗﺘﺎ ا Options ﻤ ً ﺎ ﻋﻨ ﺪ ﺗﻌﻤ ﻞ أﺳ ﻼك ﺳ ﻤﺎﻋﺔ اﻟ ﺮأس آ ﺎﻟﻬﻮاﺋﻲ، ﺑﺎﻟﺘ ﺎﻟﻲ ﻳﺠ ﺐ ﺗﻮﺻ ﻴﻞ ﺳ ﻤﺎﻋﺔ اﻟ ﺮأس داﺋ ﻣﻼﺣﻈ...
- Page 56 ،ﻣ ﻦ ﺟﺎﻓ ﺎ ﺗ ﺪﻋﻢ اﻹﺻ ﺪار هﻲ ﺗﻄﺒﻴﻘﺎت ﺗﻌﺘﻤﺪ ﻋﻠ ﻰ ﺟﺎﻓ ﺎ ﻳﻤﻜ ﻦ ﺗ ﺸﻐﻴﻠﻬﺎ ﻋﻠ ﻰ ه ﺬا اﻟﻬ ﺎﺗﻒ MIDlets ﻓ ﺎ، ﻣﺜ ﻞ اﻷﻟﻌ ﺎب واﻷدوات اﻟﻤ ﺼﻤﻤﺔ ﺧﺼﻴ ﺼ ًﺎ ﺗ ﺴﻤﺢ ﺟﺎﻓ ﺎ ﺑﺘﻨﺰﻳ ﻞ ﺗﻄﺒﻴﻘ ﺎت ﺗﻌﺘﻤ ﺪ ﻋﻠ ﻰ ﺟﺎ J2ME ﻣﻦ...
- Page 57 ﻳﻤﻜﻦ اﻟﻮﺻ ﻮل إﻟ ﻰ ه ﺬﻩ اﻟﺨﺪﻣ ﺔ ﻣ ﻦ ﺧ ﻼل ﻣﻘ ﺪم ﻳﺪﻋﻢ اﻟﻬﺎﺗﻒ ﺑﺮوﺗﻮآﻮل اﻟﺘﻄﺒﻴﻘﺎت اﻟﻼﺳﻠﻜﻴﺔ وﺗﺴﻤﺢ ﺧﺪﻣ ﺔ اﻹﻧﺘﺮﻧ ﺖ اﻟﺤ ﺼﻮل ﻋﻠ ﻰ ﻣﻌﻠﻮﻣ ﺎت ﻋ ﻦ اﻷﺧﺒ ﺎر وﺗﻨﺒ ﻮءات اﻟﻄﻘ ﺲ، واﻟﻜﺜﻴ ﺮ ﻣ ﻦ اﻟﺸﺒﻜﺔ...
- Page 58 ♦ ﻟﻌ ﺮض ﻗﺎﺋﻤ ﺔ اﻟ ﺼﻔﺤﺎت اﻟﺘ ﻲ ﻗﻤ ﺖ ﺑﺰﻳﺎرﺗﻬ ﺎ اﺧﺘ ﺎر اﻟ ﺼﻔﺤﺎت اﻷﺧﻴ ﺮة Recent Pages ﻟﺰﻳ ﺎرة اﻟ ﺼﻔﺤﺔ ﻣ ﺮة اذه ﺐ إﻟ ﻰ ← اﺧﺘﺎر ﺑﻨ ﺪ، واﺧﺘ ﺎر ﺧﻴ ﺎرات ﻣﺆﺧ ﺮ ًا Go to Options أﺧﺮى...
- Page 59 ZTE-G R228 Mobile Phone User Manual...
- Page 60 LEGAL INFORMATION Copyright © 2011 ZTE CORPORATION. All rights reserved. No part of this publication may be excerpted, reproduced, translated or utilized in any form or by any means, electronic or mechanical, including photocopying and microfilm, without the prior written permission of ZTE Corporation.
-
Page 61: Table Of Contents
Table of Contents SECURITY ..........4 MAKING AND RECEIVING CALLS..32 SAFETY PRECAUTIONS ....... 4 CALL CENTER ........33 RF EXPOSURE........13 SENDING AND RECEIVING FCC COMPLIANCE ....... 14 MESSAGES..........35 LIMITATION OF LIABILITY....18 SENDING AND RECEIVING EMAIL... 39 KEY FUNCTIONS........ -
Page 62: Security
Security To protect your mobile phone from illegal use, take the security measures as follows: Set PIN codes of the SIM card. Set handset lock code. Set call restrictions. Safety Precautions This section includes some important information on safe and efficient operation. - Page 63 antenna area affects call quality and may cause the phone to operate at a higher power level than needed. Some people may be susceptible to epileptic seizures or blackouts when exposed to flashing lights, such as when watching television or playing video games.
- Page 64 Pull off the road and park before making or answering a call if conditions require. Precautions for Medical Devices and Facilities When using your phone near pacemakers, please always keep the phone more than eight inches (about twenty centimeters) from the pacemaker when the phone is switched on.
- Page 65 Mobile Phone Please use original accessories or accessories approved by the phone manufacturer. Using any unauthorized accessories may affect your mobile phone’s performance, damage your phone or even cause danger to your body and violate related local regulations about telecom terminals. Turn off your phone before you clean it.
- Page 66 Do not drop, knock or harshly treat the phone. Rough handling can break internal circuit boards. Do not connect the phone with any incompatible enhancement. Do not attempt to disassemble the mobile phone or battery. Do not store the phone with flammable or explosive articles. Do not charge the mobile phone without battery.
- Page 67 Do not touch the antenna while calling. Otherwise it will affect the quality of calling and waste battery energy. The damaged antenna will cause slight burn while touching your skin. Keep phone out of the reach of small children. Phone may cause injury if used as a toy.
- Page 68 To avoid possible interference with blasting operations, switch off your phone when you are near electrical blasting caps, in a blasting area, or in areas posted “Turn off electronic devices.” Obey all signs and instructions. Precautions for Electronic Devices Some electronic devices are susceptible to electromagnetic interference sent by mobile phone if inadequately shielded, such as electronic system of vehicles.
- Page 69 Please turn off your mobile phone at a refueling point, and the same to the place where the use of two-way radio is prohibited. Aircraft Safety Please turn off your mobile phone before the airplane takes off. In order to protect airplane’s communication system from interference, it is forbidden to use mobile phone in flight.
- Page 70 Do not disassemble or refit the battery. Otherwise, it will cause liquid leakage, overheating, explosion and ignition of the battery. Please store the battery in a cool dry place if you don’t use it for a long period. The battery can be recharged for hundreds of times, but it will eventually wear out.
-
Page 71: Rf Exposure
RF Exposure Specific Absorption Rate (SAR) Your mobile device is a radio transmitter and receiver. It is designed not to exceed the limits for exposure to radio waves recommended by international guidelines. These guidelines were developed by the independent scientific organisation ICNIRP and include safety margins designed to assure the protection of all persons, regardless of age and health. -
Page 72: Fcc Compliance
* The tests are carried out in accordance with EN 62209-1. Body Worn Operation Important safety information regarding radio frequency(RF) radiation exposure. To ensure compliance with RF exposure guidelines the phone must be used with a minimum of 15 mm separation from the body. Failure to observe these instructions could result in your RF exposure exceeding the relevant guideline limits. - Page 73 NOTE: This equipment has been tested and found to comply with the limits for a Class B digital device, pursuant to part 15 of the FCC Rules. These limits are designed to provide reasonable protection against harmful interference in a residential installation. This equipment generates, uses and can radiate radio frequency energy and, if not installed and used in accordance with the instructions, may cause harmful interference to radio communications.
- Page 74 Health and safety information Radio Frequency (RF) Energy This model phone meets the government’s requirements for exposure to radio waves. This phone is designed and manufactured not to exceed the emission limits for exposure to radio frequency (RF) energy set by the Federal Communications Commission of the U.S.
- Page 75 reach the network. In general, the closer you are to a wireless base station antenna, the lower the power output. The highest SAR value for the model phone as reported to the FCC when tested for use at the ear is 1.2 W/kg and when worn on the body, as described in this user guide, is 1.0 W/kg (Body-worn measurements differ among phone models, depending upon available enhancements and FCC requirements.)
-
Page 76: Limitation Of Liability
and the positions the handset a minimum of 1.5 cm from the body. Use of other enhancements may not ensure compliance with FCC RF exposure guidelines. If you do no t use a body-worn accessory and are not holding the phone at the ear, position the handset a minimum of 1.5 cm from your body when the phone is switched on. -
Page 77: Key Functions
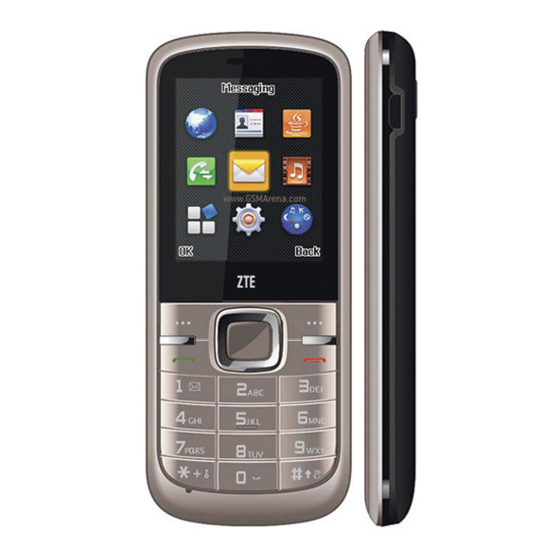
Key Functions Torch Earpiece Charger interface 4-Way Navigation keys and Center key Right soft key Left soft key End/Power key Send key Alpha numeric keys * key # key... - Page 78 Function Description Left soft key Performs the function indicated at the left bottom of the screen. Right soft key Performs the function indicated at the right bottom of the screen. Press to confirm actions and make selections. Center key 4-Way These keys (UP, DOWN, LEFT and RIGHT) allow for navigation Navigation through menu options and quick access to some function menus.
-
Page 79: Turning On / Off And Waking Up Your Phone
Note: In this User Manual, “press a key” means to press the key and release it immediately, while “hold a key” means to press the key for at least two seconds and then release it. Turning On / Off and waking up your phone Hold the Power key to turn your phone on or off. -
Page 80: Status Bar Icons
Locking the keypad can prevent unintentional operations on it. You can answer an incoming call with the regular operation when the keypad is locked. Status bar icons Indicator What it means Indicator What it means New SMS, message box full Signal strength when blinking New voicemail... -
Page 81: Writing Text
Writing text You can use the keyboard to enter messages, contact information, notes, and more. • Change input mode: Press the # key to change the input mode. • Input letters: In ABC/abc/Abc/AR mode, constantly press the corresponding letter key till the letter appears. •... -
Page 82: Battery
In ABC/abc/Abc/AR mode, constantly press the digit key until the number appears. • Input symbol: Press the * key to enter symbol mode, select the required symbol (common symbols) by pressing the Navigation keys and then press the Left soft key or Center key to confirm it. In eZi ABC/eZi abc/eZi Abc/eZi AR mode, press the 1 key, and select the required symbol (common symbols) by pressing the Navigation keys. - Page 83 unpacking. Installing the battery 1. Pull the battery cover from the notch on the bottom left edge and remove the cover. 2. Insert the battery by aligning the gold-coloured contacts with the contacts in the battery slot. 3. Push down the upper section of the battery until it clicks into place. 4.
- Page 84 Removing the battery 1. Make sure that your mobile phone is switched off. 2. Remove the battery cover. 3. Pull the battery up and remove it from the mobile phone. Charging the battery Your phone is powered by a rechargeable battery. For maximum battery performance, it is recommended that you first use up the battery power and then charge it completely.
-
Page 85: Inserting The Sim Card
• Connect your travel adapter to the right side of your mobile phone as shown in the diagram. • Connect the other end of the travel adapter to the mains socket. • When you charge the battery, the battery charging indicator appears. •... - Page 86 Insert the SIM card as follows: Make sure that the phone is switched off and the charger is disconnected from the phone. Turn the phone over and remove the battery cover. Remove the battery if it is already installed. Hold your SIM card with the cut corner oriented as shown and then slide it into the card holder with the gold-coloured contacts facing downward.
-
Page 87: Inserting The Memory Card
Every mobile phone has a SIM card (Subscriber Identity Module). This is a micro-chip that holds your personal information such as names and phone numbers. Your phone won’t work without it. If you already have contacts on your SIM card, they can be transferred in most cases. Inserting the Memory Card You can use a Memory card to expand the storage of the phone. -
Page 88: Contacts
Contacts There are some numbers that you may want to call again and again, so it makes sense to add these numbers to your Contacts. You can then access these numbers quickly and easily. • Add new contact Go to Menu Contacts Add new contact. - Page 89 Edit the information and save it. • Save number to Contacts You can also save a number right after you’ve made or received a phone call or a message from someone who is not yet in your Contacts list. • Quick search To quickly search for the contacts, enter the first letter of your desired contact on the screen.
-
Page 90: Making And Receiving Calls
Select Options→Mark several and then select the records you want to mark. • View memory status Select Options Contacts settings→Memory status to check the → memory status both of phone and SIM. Making and receiving calls • Basic way to make a call In the standby mode, press the Alpha numeric keys to input the number and then press the Send key to dial. -
Page 91: Call Center
• Answer a call Press the Send key. • End a call Press the End key. • Use call options During a call, you can select Options to enter the call options. You can put a call on hold, make a new call, and use applications such as Messages &... - Page 92 ♦ Call: Call the record again. ♦ Send message: Send a message to the record. ♦ Save to Contacts: Save the current number to phonebook. ♦ Edit before call: Edit the number before you call. ♦ Delete: Delete the current call record. ♦...
-
Page 93: Sending And Receiving Messages
activate this service. You can set the call divert service so that voice calls and data calls are diverted to a preset number under different conditions. ♦ Call barring: You can bar outgoing and incoming calls. ♦ Line switching: Switch the call line. ♦... - Page 94 3. If you want to change to MMS, you can press Options and choose Switch to MMS; or you can press Options and choose Add picture, Add sound, Add video or Add subject to directly insert multimedia contents to the message and it will be switched to MMS automatically.
- Page 95 the main menu to read the message. 2. While the message is open, use Options to reply, delete, or forward the message. You can also call back the sender. You can view the message boxes in the Messaging interface. ♦ Select Inbox to view received messages. ♦...
- Page 96 ♦ Common settings: You can set Delivery report and Reply path on or off. You can select to save sent messages or not. ♦ Memory status: View the SIM and phone memory status. ♦ Preferred storage: Set the preferred storage to SIM or Phone. ♦...
-
Page 97: Sending And Receiving Email
Sending and receiving email • Set up accounts First you have to setup your email accounts. If the account is not properly set or activated, you cannot send or receive any email. Go to Menu→Messages→Email→Email accounts. 1. Select Options, and then select New account. 2. -
Page 98: User Profiles
• Send and receive emails If you want to receive emails, go to Menu→Messages→Email. Press Send and receive, and the emails in your mailbox will be downloaded to your phone and the emails in the Outbox will be sent out. Go to Inbox to view your received emails. User profiles Go to Menu→User profiles. -
Page 99: Settings
connect. • Answer mode: Select Any key to answer a call. Note: The Headset mode can only be activated with the headset connected. And the Bluetooth mode can only be activated when the Bluetooth headset is connected. Settings You can adjust various settings of your phone. Go to Menu→Settings. •... - Page 100 ♦ Flight mode: You can select to use flight mode. In flight mode, all wireless functions are disabled. ♦ Misc. settings: You can set the LCD backlight brightness and time. ♦ Key backlight: Set the Key backlight On or Off. •...
- Page 101 incorrectly input the PIN code for three consecutive times. The PIN code and the PUK code may be supplied along with the SIM card. If not, contact the network provider. ♦ Phone lock: Phone lock can prevent your mobile phone from unauthorized use.
-
Page 102: Bluetooth
♦ Data account: You can add data account and view your GSM and GPRS data usage. • Restore factory settings You need to input the correct phone password to restore factory settings. Bluetooth Go to Menu Settings→Connectivity→Bluetooth. The Bluetooth → devices must be paired before the communication is performed. - Page 103 1. Go to Bluetooth→My device→Search new device to search other Bluetooth-enabled devices and list them. 2. Select the desired device name in the list and press Pair. 3. Then press Yes, the connection will be established. • Beam information using Bluetooth After the Bluetooth partnership is established, you can beam information, such as contacts, and calendar items, as well as files from your phone to another Bluetooth-enabled device.
-
Page 104: Applications
Go to Bluetooth→Search audio device to search for the Bluetooth hands-free or stereo headset. Applications Go to Menu→Applications. • Calendar Enter Calendar, the calendar of the current month will be displayed on the screen and the current date will be marked with special colour. You can browse the dates, and press the 4-Way Navigation keys to switch the date;... - Page 105 corresponding features of the alarm according to the instructions. • Calculator You can perform simple calculations. You can use 4-Way Navigation keys to perform add, subtract, multiply or divide calculation. Note: This calculator has limited accuracy and rounding errors may occur especially in long division.
-
Page 106: Multimedia
Multimedia Go to Menu→Multimedia. • Camera ♦ Take a photo Go to Camera to take a photo. Aim the camera at the object and then press the Center key to take the shot. Before capturing a photo, press the Left/Right Navigation keys to adjust brightness. - Page 107 correspondingly. You can select an image and view it. • Video recorder ♦ Take a video Go to Video recorder to record a scene. Aim the camera at the object and then press the Center key to start, press it again to pause, and press the Right soft key to finish recording.
- Page 108 • Video player The videos you want to play in Video player must be put in the ..\Videos folder in the phone or memory card, and in Options→Storage, the storage must be set to phone or card correspondingly. You can then select a video and play it. •...
- Page 109 Options→List to view the sound clips you recorded. • FM radio With the radio, you can search for radio channels, listen to them, and save them on your device. Note that the quality of the radio broadcast depends on the coverage of the radio station in that particular area.
-
Page 110: Java Midlets
Java MIDlets Go to Menu→Java MIDlets. MIDlets are Java™-based applications that can run on your phones. It supports Java 2 Edition, J2ME™. Java allows you to download Java-based applications, such as games and tools that are specifically designed for mobile phones. Java gives you the flexibility of installing and managing additional J2ME applications from the Internet. - Page 111 Your mobile phone supports STK service, but if your SIM card and network provider do not support the service, these functions can’t be used. • Internet service Your phone supports Wireless Application Protocol (WAP). You can get access to this service through your network provider. Internet service lets you get information about news, weather forecasts and more.
-
Page 112: Ec Declaration Of Conformity
♦ Status: Check the version and time. ♦ Advance: Select Sweep to remove useless licences and reboot your phone. EC Declaration of Conformity It is hereby declared that following designated product: Product Type: GSM/GPRS Dual-band Mobile Phone Model No: ZTE-G R228... - Page 113 Complies with the essential protection requirements of the Radio and Telecommunication Terminal Equipment Directive (EC Directive 1999/5/EC) and the Electromagnetic Compatibility Directive(2004/108/EC). This declaration applies to all specimens manufactured identical to the samples submitted for testing/evaluation. Assessment of compliance of the product with the requirements relating to the Radio and Telecommunication Terminal Equipment Directive (EC Directive 1999/5/EC) was performed by American TCB(Notified Body No.1588), based on the following standards:...
- Page 114 EN 301 511 V9.0.2; Radio EN 300 328 V1.7.1; EN 50360:2001; EN 62209-1:2006; Health EN 62209-2:2010; EN 50332-1:2000; EN 50332-2:2003 This declaration is the responsibility of the manufacturer: ZTE Corporation ZTE Plaza, Keji Road South, Hi-Tech, Industrial Park, Nanshan District, Shenzhen, Guangdong, 518057, P.R.China Authorised person signing for the company: Xu feng Quality Director Of ZTE Corporation...
Need help?
Do you have a question about the R228 and is the answer not in the manual?
Questions and answers