Midas MR18 Product Manual
18-input digital mixer for ipad/android tablets with 16 midas pro preamps, integrated wifi module and multi-channel usb audio interface, 12-input digital mixer for ipad/android tablets with 4 midas pro preamps, 8 line inputs, integrated wifi module and us
Hide thumbs
Also See for MR18:
- User manual ,
- Quick start manual (51 pages) ,
- Quick start manual (18 pages)
Table of Contents
Advertisement
Advertisement
Table of Contents

Subscribe to Our Youtube Channel
Related Manuals for Midas MR18


Summary of Contents for Midas MR18
- Page 1 MR18 18-Input Digital Mixer for iPad/Android Tablets with 16 MIDAS PRO Preamps, Integrated Wifi Module and Multi-Channel USB Audio Interface MR12 12-Input Digital Mixer for iPad/Android Tablets with 4 MIDAS PRO Preamps, 8 Line Inputs, Integrated Wifi Module and USB Stereo Recorder...
-
Page 2: Table Of Contents
11. Instructional Videos ..........42 5.15 Setup ................... 18 12. Block Diagrams ............43 5.16 Main EQ ................18 12.1 MR18 Block Diagram ............43 6. M AIR for Android ............ 18 12.2 MR12 Block Diagram .............44 FEDERAL COMMUNICATIONS COMMISSION 6.1 Main View ................ -
Page 3: Important Safety Instructions
All trademarks are the property of their respective by qualifi ed personnel. or table specifi ed by the owners. MIDAS, KLARK TEKNIK, LAB GRUPPEN, LAKE, manufacturer, or sold with This symbol, wherever it appears, TANNOY, TURBOSOUND, TC ELECTRONIC, TC HELICON, the apparatus. -
Page 4: Introduction
In fact, these are the same great effects found in the acclaimed M32 mixer, including legendary reverb, echo and chorus algorithms. Not just a live sound tool, the MR18 features an 18x18 USB audio/MIDI interface, and the MR12 allows 2-track stereo recording. This makes for a great mobile recording device, home studio interface, and enables live performances to be multitracked for later mixing. -
Page 5: Callouts
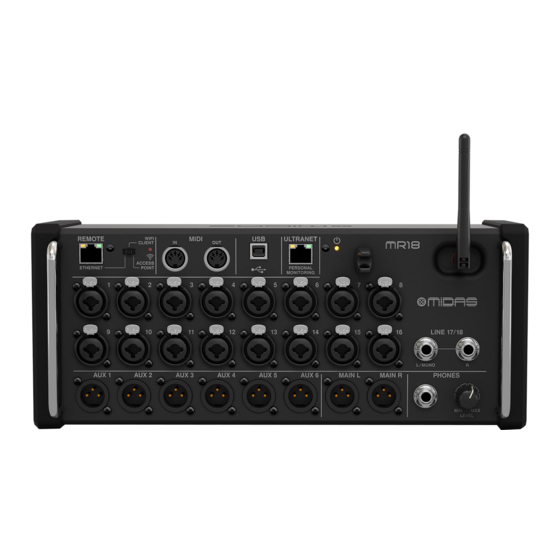
M AIR User Manual 2. Callouts 2.1 MR18 Callouts (7) (9) (8) (10) (11) (13) (12) (1) INPUTS accept balanced and unbalanced XLR and 1/4" plugs. (7) ETHERNET port allows the mixer to be controlled via LAN or connected Wifi router. -
Page 6: Mr12 Callouts
M AIR User Manual 2.2 MR12 Callouts (2) (3) (4) (11) (10) (12) (1) ETHERNET port allows the mixer to be controlled via LAN or connected (7) 1/4" inputs accept balanced or unbalanced 1/4" plugs. Channel 11 and 12 Wifi router. accept high impedance sources for direct connection of guitars and basses. -
Page 7: Hookup
M AIR User Manual 3. Hookup 3.1 MR18 Hookups 3.1.1 MR18 recording with iPad P16-D iPad* with camera connection kit for multi-track recording up to 18 tracks P16-M Wireless router (optional) BALANCED LINKED INPUTS DN100 Headphones Keyboard Active loudspeakers Active Monitors... - Page 8 M AIR User Manual 3.1.2 MR18 live performance P16-D iPad* for wireless control P16-M BALANCED LINKED INPUTS DN100 Headphones Active loudspeakers Keyboard Active Monitors...
- Page 9 M AIR User Manual 3.1.3 MR18 System Overview WIFI CLIENT mode (Mobile Devices with Wifi) ACCESS POINT mode (Mobile Devices with WiFi) P16-M iOS/Android* Router iOS/Android Android Win/Mac/Linux Win/Mac*/Linux* P16-D ETHERNET mode Computer with Ethernet port MIXER CONTROL AUDIO I/O...
-
Page 10: Mr12 Hookups
M AIR User Manual 3.2 MR12 Hookups 3.2.1 MR12 club performance Active loudspeakers Wireless router (optional) Flash Drive iPad* for remote control Insert sends from mixer Headphones Sub mixer (optional) Active monitors... - Page 11 M AIR User Manual 3.2.2 MR12 System Overview ACCESS POINT mode (Mobile Devices with Wi ) WIFI CLIENT mode (Mobile Devices with Wi ) iOS/Android* Router iOS/Android Android Win/Mac/Linux Win/Mac*/Linux* ETHERNET mode Computer with Ethernet port MIXER CONTROL AUDIO I/O CAT-5 cable AUDIO INPUTS AUDIO OUTPUTS...
-
Page 12: Network Connection
M AIR User Manual 4. Network Connection The M AIR mixers offer convenient digital control of the various mixing functions in three different ways - via Ethernet LAN, or wirelessly as a Wifi Client or as an Access Point. Selection is made with the REMOTE switch. You may view or change the network preferences for these on any of the M AIR remote control applications on the ’Setup/Network’... -
Page 13: Access Point
3. Click on ’Wifi ’ to select a network. From the list of networks, select your connect anyway. M AIR mixer’s name, e.g. “MR18-19-1B-07”. After a few seconds, the status should change to ’Connected’. 6. Once the app is connected to your mixer, all parameters will be transferred automatically. -
Page 14: M Air For Ipad
M AIR User Manual 5. M AIR for iPad 5.2 Input The M AIR applications for iOS, Android and Mac/Win/Linux allow all of the The Input section allows adjustment of the most common preamp parameters physical controls and features normally found on analog mixers to be adjusted such as gain and phantom power. -
Page 15: Dynamics
M AIR User Manual 9. Select a high-pass, low-pass or mid peak frequency and slope for the key filter. The specific frequency can be selected by dragging the line across the frequency chart. 10. Press the Advanced button to select between normal and advanced gate operation. -
Page 16: Channel Eq
M AIR User Manual 5.7 Insert 7. Use the Gain fader to compensate for changes in level caused by the processor. 8. Engage the Key Filter with the on/off button. 9. Select between an aggressive Linear or smooth Logarithmic operation, and between Peak or RMS input response. RMS is most common in compressors, and responds to the average level of incoming audio, whereas the Peak setting responds to brief spikes in loudness that would be allowed through when set to RMS. -
Page 17: Meters
M AIR User Manual Whenever an auto mix bus is engaged, a blue gain reduction meter will indicate Global Settings allow the input/output routing to be recalled, as well as saving the amount of signal reduction for any channels assigned to the bus. This allows DCA assignments and FX block settings. -
Page 18: Setup
M AIR User Manual 5.15 Setup The Audio/MIDI tab allows global settings for audio, MIDI and monitor options. The Setup page is accessed via the icon at the top of the main screen. The console operates at 48 kHz by default, but can be changed to 44.1 kHz. This allows the channel layout to be modified, a console reset, and network The RTA can be switched from pre to post-EQ to monitor the effect of EQ settings to be adjusted. -
Page 19: Input
M AIR User Manual 13. When using the Sends on Faders function, the bus to which the channel signals are sent is selected with the button directly below the Sends on Faders button. Pressing the Bus Master button will allow the send level for the selected bus to be adjusted. -
Page 20: Gate
M AIR User Manual 3. Engage the 48 V phantom power by pressing and holding this button. 10. Select the frequency for the key filter. It is best practice to engage phantom power before running audio in 6.5 EQ a channel, allowing all voltages to stabilize and prevent any noise during the performance. -
Page 21: Dynamics
M AIR User Manual There are 3 EQ options for the Main LR and Aux buses: 6-band parametric, 15. Select the filter frequency and source for the key signal. In most applications, graphic, and “true” EQ. The parametric EQ functions the same as the channel a channel's own signal, i.e. -
Page 22: Meters And Rta
M AIR User Manual 6.9 Meters and RTA Click the camera icon at the top of the main screen. A window will open with a list of parameters to select for recall. You can select individual channels/parameters that will be recalled from a previously saved snapshot, or click the ‘All’ button to The Meters tab allows easy monitoring of all analog and digital levels, including choose everything in a category. -
Page 23: Setup
The console can operate at 48 kHz or 44.1 kHz. Mute the main LR fader before changing clock rates as pops can occur. The MR18 has an 18x18 channel USB audio interface built-in, which is useful for The Setup menu is accessed via the top right corner of the Main View screen. -
Page 24: M Air Edit For Pc
M AIR User Manual 1. The Navigation Tabs allow quick access to various edit menus. 2. The Channel Strip area gives a quick reference to the status of phantom power, aux send levels, pan, etc., The gain, aux levels, FX send levels and pan can be adjusted by clicking and dragging left or right inside the respective section. -
Page 25: Input Tab
M AIR User Manual (4) (5) (10) (11) 3. The Phantom button engages the 48 V phantom power for use with condenser microphones and active DI boxes. It is recommended to engage phantom power well ahead of running audio in a channel in order to allow all voltages to stabilize and prevent any noise during performance. -
Page 26: Eq Tab
M AIR User Manual 10. Select the type of filter and frequencies with these faders. 1. Select one of the 4 Presets to automatically optimize the parameters for one of these common sources. 11. Select a channel or bus for the side chain from the pull-down menu. For the gate and expander functions, the key filter is usually set to “self”, but the 2. -
Page 27: Main Tab
Note - save your settings to your computer’s hard drive before updating the firmware! By default, a generic name, such as MR18-1B-10-F3, will be assigned to your mixer. This can be changed to something more specific and recognizable. The console can also be initialized back to its factory state, but be aware that all settings will be erased. -
Page 28: Snapshot Page
Click the Initialize button to clear the stored window configuration, useful in case some resizing operations have rendered windows inaccessible or The MR18 has an 18x18 channel interface built-in, but sometimes this is overkill moved off the screen. -
Page 29: Utilities
M AIR User Manual 7.13 Utilities The Decay adjustment controls how quickly the frequency bands fall after reaching their initial indication. Peak Hold will leave a small marker to indicate Utilities offer convenient editing and customization of items that are not easily the peak measurement over a longer period of time while still monitoring the controlled on other windows or menus. -
Page 30: Auto Mix
M AIR User Manual Similar to the Buses utility, the DCA utility window allows all 4 DCA groups to be easily monitored and adjusted. A custom set of channels, buses and/or DCA groups can also be configured in 2 user-defined windows. This has the added feature of expanding the channel strip to include the gain level, bus sends, and other information that is normally visible in the mixer tab in the main window. -
Page 31: Midi
M AIR User Manual 8. MIDI MIDI RX / TX Value Comment Program Changes 1-64 on Channel 1 can be used to Snapshots Prg Chg 1-64 recall snapshots 1-64 stored inside M AIR mixers. Fader CH Faders 0-15 0...127 Input Channels 1-16 CH Faders 0...127 AuxLineIn 17-18 / USB Recorder Playback (stereo) -
Page 32: Specifications
Connectors adjacent channels Programmable mic preamps, 16 XLR/TRS combo jacks, balanced Mic/Line 1-16 Input impedance 10 kΩ designed by MIDAS PRO XLR jack, unbal. / bal. Line / Aux inputs, stereo 2 TRS, balanced Non clip maximum +23.5 dBu Main outputs... -
Page 33: Mr12
Antenna External, SMA connector, 50 Ω Programmable mic preamps, 4 XLR/TRS combo jacks, balanced Access Point, number of clients Max. 4 designed by MIDAS PRO IEEE 802.11 b/g standard 2.4 GHz Line inputs 8 TRS, balanced Frequency Range 2412-2462 MHz... - Page 34 M AIR User Manual Input/Output Characteristics WLAN Module Frequency range, @ 48 kHz 20 Hz - 20 kHz Antenna External, SMA connector, 50 Ω sample rate, +/- 0.5 dB dB Access Point, number of clients Max. 4 Dynamic range, analog in to 108 db, 22 Hz - 22 kHz unweighted IEEE 802.11 b/g standard 2.4 GHz...
-
Page 35: Effect Descriptions
M AIR User Manual 10. Effect Descriptions Vintage Reverb Here is a list and brief description of the effects available on the M AIR mixers. When Stereo and Dual versions of an effect are offered, use the Stereo version when the left and right signal are to be altered together (e.g. on linked stereo channels or buses), or Dual when you want to dial different settings for the left and right signal. - Page 36 M AIR User Manual Gated Reverb The MIX control lets you blend the source signal and the delayed signal. TIME adjusts the master delay time up to three seconds. LO CUT adjusts the low frequency cut, allowing lower frequencies to remain unaffected by the delay. HI CUT adjusts the high frequency cut, allowing higher frequencies to remain unaffected by the delay.
- Page 37 M AIR User Manual Stereo Chorus Dimensional Chorus The Dimensional Chorus offers the most user-friendly and classic sounds, Chorus samples the input, slightly detunes it and mixes it with the original best described as “space” and “dimensional”. The 4 MODE buttons can signal to produce a somewhat thicker, shimmering sound.
- Page 38 M AIR User Manual Stereo Tremolo Chorus + Chamber Stereo Tremolo creates an up and down volume change at a constant and even Taking up only one FX slot, the Chorus + Chamber effect combines the shimmer tempo just like the guitar amps of yesteryear. Use the Stereo Tremolo to add a and doubling characteristics of a studio-grade Chorus with the sweet sound of a unique “surf-music”...
- Page 39 M AIR User Manual Graphic and Tru EQ The TIME knob adjusts the delay time, and the PATTERN knob sets the delay ratio for the right channel and negative values activate a cross feedback between the two channels. The FEEDHC knob adjusts the delay high-cut frequency, while the FEEDBACK knob adjusts the number of repeats.
- Page 40 M AIR User Manual Xtec EQ1 AUTOGAIN activates an additional long-term gain correction, allowing automatic gain scaling of varying input level ranges. STEREO LINK applies limiting to both channels equally when activated. INPUT GAIN provides up to 18 dB of gain to the input signal prior to limiting.
- Page 41 M AIR User Manual Ultimo Compressor Stereo Imager A Stereo Imager is typically used to control the placement of a signal within the stereo field during mixdown or mastering. Modeled after the BEHRINGER Edison The Ultimo Compressor is based on the Urei 1176LN Limiting Amplifier and rack unit, the Stereo Imager will lend a professional quality to your live and authentically captures the smooth character of the original class-A output stage recording performances.
-
Page 42: Instructional Videos
M AIR User Manual 11. Instructional Videos The PREAMP knob adjusts the amount of input gain prior to the band-specific distortion adjustment. BUZZ adjusts the low-end breakup, PUNCH adjusts A Youtube playlist with over 40 tutorial videos can be found by searching the midrange distortion, and CRUNCH tailors the high-frequency content and for “X AIR How To Videos”... -
Page 43: Block Diagrams
M AIR User Manual 12. Block Diagrams 12.1 MR18 Block Diagram... -
Page 44: Mr12 Block Diagram
M AIR User Manual 12.2 MR12 Block Diagram... -
Page 45: Federal Communications Commission Compliance Information
M AIR User Manual FEDERAL COMMUNICATIONS COMMISSION COMPLIANCE INFORMATION M AIR MR18/MR12 Responsible Party Name: MUSIC Group Services NV Inc. Address: 5270 Procyon Street Las Vesgas, NV89118 Phone Number: +1 702 800 8290 M AIR MR18/MR12 Contains Transmitter Module FCC ID:... - Page 46 M AIR User Manual...
- Page 47 M AIR User Manual...
- Page 48 midasconsoles.com...
Need help?
Do you have a question about the MR18 and is the answer not in the manual?
Questions and answers