Table of Contents
Advertisement
Quick Links
Advertisement
Table of Contents

Related Manuals for Kreg Sofa Arm Table


Summary of Contents for Kreg Sofa Arm Table
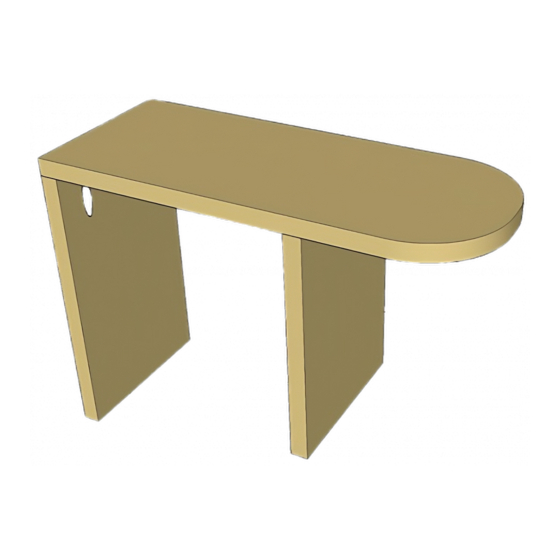
- Page 1 Sofa Arm Table Difficulty Easy Here’s the perfect place to park your beverage, snacks, remotes; anything you want close at hand while you’re relaxing on the couch. It’s a “table,” made from just three boards, that straddles the arm of your favorite sofa or chair.
- Page 2 Tools Materials Kreg Tools Wood Products Board , 1x8 , 48" Kreg Pocket-Hole Jig® 720 Hardware & Supplies 1 1/4" Pocket-hole Screws Other Tools Stain Or Paint Jigsaw Miter Saw Compass Drill (cordless) Sander Page 2 of 6...
- Page 3 Cut List & Parts Back , 3/4" X 7 1/4" X 12" Top , 3/4" X 7 1/4" X 18" Front , 3/4" X 7 1/4" X 10" Page 3 of 6...
- Page 4 Directions Cut the Parts Cut one Back, one Top, and one Front to length from a 1x8 board, as shown in the cutting diagram. Add Curves and Pocket Holes Using a compass, lay out a 2 1/2" radius on two corners of the Top, and cut the arcs using a jigsaw. Sand the arcs smooth. Then, with your pocket-hole jig set up for 3/4"...
- Page 5 Attach the Back Attach the Back to the Top using 1 1/4" pocket-hole screws. If you’re using hardwood, such as oak, use fine-thread screws. Use coarse-thread screws for softwoods like pine. Page 5 of 6...
- Page 6 Attach the Front Before you attach the front, check the width of your sofa or chair arm. You should subtract 1/2" or so in order to make sure the table will slide over and fit snugly. Once you’ve determined where to position the Front, attach it using 1 1/4" pocket-hole screws.
Need help?
Do you have a question about the Sofa Arm Table and is the answer not in the manual?
Questions and answers