Table of Contents
Advertisement
Quick Links
Advertisement
Table of Contents
Troubleshooting

Related Manuals for LEMEGA MSY2


Summary of Contents for LEMEGA MSY2
- Page 1 MSY2 ALL-IN-ONE MUSIC SYSTEM...
-
Page 2: Table Of Contents
Table of content …………………………………………..3 1. Introduction ……………………………………….... 3 1.1 Safety ……………………………………...……..5 1.2 Features ………………………………………..... 5 1.3 Carton contents ………………………………………………..6 2 Controls, connectors and display ………………………………......6 2.1 Main controls ………………………………......7 2.2 Connectors ……………………………………….…..7 2.3 Remote control ………………….,…………….………...…..9 3 Started and setup …………………………….………..…..…10 4 DAB radio mode (Optional) …………………………......11... -
Page 3: Introduction
Introduction 1.1 Safety Instructions Please store this instruction manual for future reference. • WARNING: To reduce the risk of fire or electric shock, do not expose this apparatus to rain or moisture. The apparatus shall not be exposed to dripping or splashing and that objects filled with liquids, such as vases, shall not be placed on apparatus. - Page 4 • Clean only with a dry cloth. • Unplug this product from the wall outlet before cleaning. • Place the unit on a solid surface. • Do not put it in a closed bookcase or a cabinet that may keep air from flowing through its ventilation openings.
-
Page 5: Features
In the rare event you experience an error, unplug the power cord for 60 seconds and then plug it back in firmly. 1.2 Features This manual describes how to use the MSY2: • DAB/DAB+ digital radio with a wide choice of channels and digital quality sound broadcast free-to-air •... -
Page 6: Controls, Connectors And Display
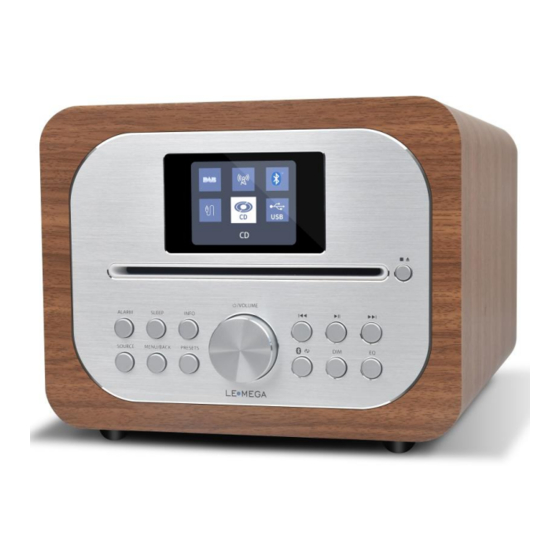
Controls, connectors and display 2.1 Main control Alarm button SOURCE:Press to Source to select different modes DAB, FM, Bluetooth, Aux in, CD and USB playback SLEPP: Press to set the sleep Menu/Back button BACK: press the BACK to return to the previous screen. MENU: press the MENU to show the MENU for the current mode. -
Page 7: Connectors
13. CD/Bluetooth skip next/Tune+button 14. CD stop and eject button 15. CD slot 16. TFT color Display 2.2 Connectors As shown below has connectors (from left to right) for the following: Remote control In additional to duplicating most of buttons on top of the unit, the remote control adds the following functions:... - Page 8 1, 2, 3, 4, 5, 6, 7, 8, 9,10: Short press to preset the stations. For the 10+, it needs to long press the 10+ and then short press the 1-9 to get the 10+ preset number : Press to play / pause the playing BT mode and CD mode. Auto Scan stations under DAB and FM mode.
-
Page 9: Started And Setup
MSY2 is easy to use by the below 3 steps: Place the MSY2 on a suitable shelf or table; Extend the telescopic antenna; Connect the power adapter between MSY2 and the mains supply and press the Power/Volume dial to turn the device on. Set Time/Date (wizard) The time and date can be updated manually or automatically. -
Page 10: Dab Radio Mode (Optional)
Manual set If you set No update, the wizard now prompts you to set the time and date manually. The date and time are displayed as dd-mm-yyyy and hh:mm AM/PM with the first value, dd, active (flashing). Adjust each value with the Select control. As each value is set, the next value becomes active and flashes. -
Page 11: Selecting Stations
(for example, classical music while cooking). To change the DRC of the MSY2, select Menu > DRC, and then DRC high, DRC low or DRC off. -
Page 12: Fm Radio Mode (Optional)
broadcast. 5. FM radio mode FM radio mode receives analogue radio from the FM band and displays RDS (Radio Data System) information about the station and show (where broadcast). To enter FM mode, please refer the below steps: Press ‘Source’ button to enter Audio Source Menu and use/rotate ‘Navigation’ dial to select FM To automatically scan for station, long press Tune +’... -
Page 13: Aux In Mode
1).Connect the external audio source to the Aux In (RCA) stereo socket. 2). Either press Source and select AUX in 3). Adjust the volume of MSY2 (and, if necessary, the audio source device) as required. 7. Bluetooth mode Prior to pairing, verify your device supports Bluetooth 5.0 and your device is not connected to any other Bluetooth product. -
Page 14: Cd Playback
drive, Select Source> USB. Browsing folders From this point on, menus are generated from the folders on the USB device. Browse folders with the Select control and Back button. The display shows folder and file names (not necessarily track names). 9. -
Page 15: Alarms And Sleep
10. Alarms and sleep 10.1 Alarms To set or change an alarm, press Alarm button Select the alarm number (1 or 2) then configure the following parameters: Alarm: on/off, Frequency: Daily, Once, Weekends or Weekdays, Time:0-max Source: Buzzer, DAB, FM ... -
Page 16: Factory Reset
11. Factory reset A factory reset resets all user settings to default values, so time/date, and presets are lost. However, the radio’s current software version is maintained. To perform a factory reset, select Menu > System settings > Factory reset proceed >Yes. -
Page 17: Troubleshooting
12.2 Troubleshooting Problem Cause Solutions FM: Hiss Low signal Check/move antenna DAB: strength Move radio burbling/intermittent Rescan local (high-strength) stations only cut-out For DAB, check local coverage at www.ukdigitalradio.com/coverage DAB: ‘No stations Low signal As above then rescan stations. available’ message strength CD playback does CD format is not... -
Page 18: Technical Specifications
13 Technical Specification: Model: MSY2 ALL-IN-ONE MUSIC SYSTEM Type: CD/DAB/DAB+/FM/AUX/Bluetooth Music system Speaker: 1 x 3” (full range) Power: RMS 15W Power Supply: 12V/2.5A power adapter Dimension (mm): 200W x 160H x 280D Weight: 3.0 KG Specifications are subject to change without notice If you have any questions or suggestions, please share with us. - Page 19 -Connect the equipment into an outlet on a circuit different from that to which the receiver is connected. -Consult the dealer or an experienced radio/TV technician for help Changes or modifications not expressly approved by the party responsible for compliance could void the user's authority to operate the equipment. This device complies with Part 15 of the FCC Rules.
Need help?
Do you have a question about the MSY2 and is the answer not in the manual?
Questions and answers