
Related Manuals for ACC SmarTouch Digital


Summary of Contents for ACC SmarTouch Digital
- Page 1 SMARTOUCH DIGITAL USER MANUAL APPLIED COMPUTER CONTROLS 701 W. Foothill Blvd., Azusa, CA 91702 (626) 969-9655 Fax (626) 334-4809 www.acc-spas.com...
- Page 2 Safety and reliability are built-in to meet or exceed the most stringent, up to date requirements set by (UL) Underwriters Laboratories. SmarTouch Digital is the culmination of proven designs and extensive testing… from Applied Computer Controls.
-
Page 3: Table Of Contents
T BLE OF CONTENTS INTRODUCTION ....... . 3 TEMPERATURE SETTING ......4 SETTING TIME-OF-DAY. -
Page 4: Introduction
INTRODUCTION Thank you for buying a spa equipped with a SmarTouch Digital con- trol system. Many years of experience went into the design of this family of controls. You can be assured your spa control system is the most advanced, it is highly reliable and will serve you for many years to come. -
Page 5: Temperature Setting
HURRY - RE D THIS SmarTouch Digital comes to you with a universal set of default settings. If you choose to keep these settings, then you only need to remember 2 things: how to set the spa temperature and to press the SET key whenever you are done using the spa. -
Page 6: Setting Time-Of-Day
S ETTING TIM E-OF-D Y Setting Time-Of-Day Press and hold for 2 sec. the DOWN (Time) arrow key. Controller will display 12:00 noon. Use to set the correct time-of-day. ¡ *After every selection “Hours , Minutes” press SET key. Cool-Down Timer A 30-second timer keeps the low speed jets, ON, after the heater turns OFF, to remove all residual heat from the heater element. -
Page 7: Spa-Side Control Panel 2020
SP -SIDE CONTROL P NEL 2020 FUNCTIONS If primary pump is dual Speed. Press once to activate the low jets. Press again for high jets. A third depression turns the jets OFF, if the heater is off. Press, for third or fourth pump. If auxillary pump is dual speed the AUX button functions as above. -
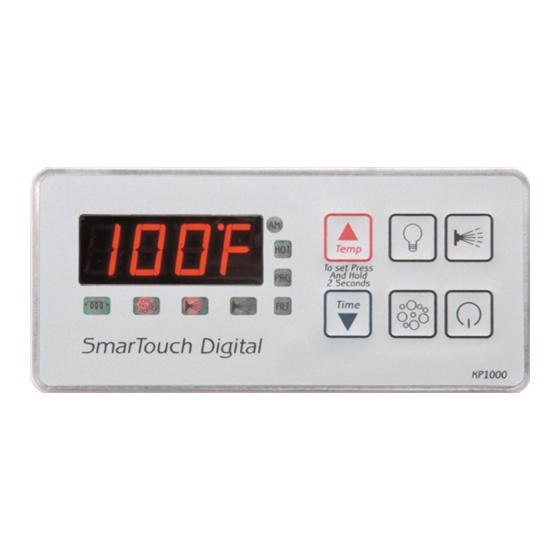
Page 8: Spa-Side Control Panel 1000
SP -SIDE CONTROL P NEL 1000 FUNCTIONS Press once to activate the low jets. Press again for high jets. A third depression turns the jets OFF, if the heater is off. Press, for air bubbles or second single speed pump if applicable. Button will be marked “AUX”. -
Page 9: User & System Options
USER OPTIONS To Save Changes nd Exit Go To Code SEnd To Exit Without Saving Changes Go To Code C nC S ELF DI GNOSTIC CODES Error Messages Page 8... - Page 10 S Y STEM OPTIONS To Save Changes nd Exit Go To Code SEnd To Exit Without Saving Changes Go To Code C nC S ELF D I GNOS TIC C ODES Error Messages Page 9...
-
Page 11: Start-Up Procedure
S T RT-UP PROCEDURE Once the spa is delivered and the electrical installation accomplished, the next step is to fill it and heat the water. IMPORT NT It is recommended to perform the following procedure when you drain and refill the spa, to protect the heater element. •... -
Page 12: Important Safety Instructions
IMPORT NT S FETY INSTRUCTIONS Page 11... -
Page 13: Programming (Optional)
PROGR MM ING SmartTouch Digital comes with factory settings. Programming the SmartTouch controller is optional. The following options are nec- essary only if you have certain requirements or you need to in- crease the filtration and heating cycles. Parameter Programming is a means by which the spa owner / user can change the various timing elements and calibrate tem- perature. - Page 14 SETTING FILTR TION PERIODS & SILENT MODE * FP1, FP2, FP3, FP4 & SIL BEFORE YOU ST RT THIS PROCEDURE PLE SE M KE SURE YOU SET THE CORRECT TIME-OF-D Y. Note the a.m. LED light -Press SET & DOWN arrow keys together at the same time. -Code “FP1”...
- Page 15 P R M ETER M ENU LIST Press momentarily the “SET” & “DOWN ARROW” keys at the same time to access the following options. Max Detail 12:00 Start time of filtration period 1 12:00 Start time of filtration period 2 12:00 Start time of filtration period 3 12:00...
- Page 16 Max Detail CLDN Cool Down cycle in seconds. Whenever the heater is turned off the pump keeps running the extra seconds to even the temperature of the heater element and the surrounding water to prevent scale build up and premature heater failure. Economy Cycle Length.
- Page 17 Max Detail CALB This is not a time element. It is one of the distinctive features of the Smartouch Control System. The number is internal and in indicative of what the processor sees as temperature. It is used to calibrate the temperature reading.
-
Page 18: Electrical Instructions
ELECTRIC L CONNECTION INSTRUCTIONS. NOTICE: All spa electrical wiring must be performed by a qual- ified licensed electrician and must meet all NEC (National Elec- trical Code) and state and local codes and requirements. D NGER – RISK OF ELECTRIC SHOCK 1. - Page 19 ELECTRIC L INST LL TION INSTRUCTIONS Page 18...
- Page 20 BR NCH CIRCUIT BRE KER REQUIREMENTS 240 Volts 4 Wire System 30/50 mp 2 Pole Breaker USE COPPER CONDUCTOR ONLY. #6 WG WIRE 120 Volts 3 Wire System 20 mp 1 Pole Breaker C UTION: A new breaker must be used for a new spa installation. Do not use an existing or used breaker.
-
Page 21: Fcc Regulatory Approval
FC C REGUL TORY PPROV L U.S. . Contains FCC ID: W7OMRF24WG0MAMB This device complies with Part 15 of the FCC Rules. Operation is subject to the following two conditions: (1) this device may not cause harmful interference, and (2) this device must accept any interference received, including interfer- ence that may cause undesired operation. -
Page 22: Wifi Feature (Optional)
W IFI C ONNECTIV ITY PR OC EDUR E Switch OFF power to the spa. Disconnect spaside control panel / keypad. Open WIFI box and reconnect keypad to the WIFI board. Connect WIFI board to the spa controller then turn power back ON. Select “Settings”... - Page 23 WIRING DIAGRAM FOR SMTD 1000 COM2 WIRING DIAGRAM FOR SMTD 2000 Page 22...
-
Page 24: Wiring Diagram
WIRING DIAGRAM FOR SC-1100 (JR.) WIRING DIAGRAM FOR SC-3000 Page 23... -
Page 25: Exploded View
Page 24... -
Page 26: Troubleshooting
TECH TALK..TROUBLESHOOTING GUIDE For SmarTouch Digital ERROR CODES COLD Water temperature below 40 F. Water temperature above 108 F. SESH Temperature sensor shorted. SEOP Temperature sensor open or disconnected HLer Overheat condition or overheat sensor disconnected PSOL Pressure-switch open with low speed jets ON. - Page 27 Check for the following: 1- Voltage at the Heater Contactor Coil Relay. Across the White and Yellow wires. 120V or 240V depending on power rating on contactor relay. If power is present and contactor does not engage, replace contactor. If there is no power replace PCBoard 2- Check power at load / output (right) side of contactor .
- Page 28 2.5” X 5.5" 3.25” X 7.25" SmarTouch Digital © 1999 Applied Computer Controls. SmarTouch & SmarTouch igital are trademarks of Applied Computer Controls. This manual may not be copied or reproduced without permission, in part or in total. Rev. 05/2017-ACC...
Need help?
Do you have a question about the SmarTouch Digital and is the answer not in the manual?
Questions and answers