Caen RFID skID R1280I Technical Information Manual
Mini sled rain rfid reader
Hide thumbs
Also See for skID R1280I:
- Technical information manual (105 pages) ,
- Technical information manual (124 pages)

Subscribe to Our Youtube Channel
Related Manuals for Caen RFID skID R1280I


Summary of Contents for Caen RFID skID R1280I
- Page 1 TECHNICAL INFORMATION MANUAL Revision 0.0 – 22 February 2021 skID R1280I Mini Sled RAIN RFID Reader...
-
Page 2: Scope Of Manual
All you need to start using your reader in a few clicks! Scope of Manual The goal of this manual is to provide the basic information to work with the skID R1280I Mini Sled RAIN RFID Reader. Change Document Record... - Page 3 No responsibility is assumed by CAEN RFID for the use of this information, including use of this information as the basis for manufacture or sale of any items, or for infringement of patents or other rights of third parties.
-
Page 4: Table Of Contents
Index Scope of Manua l................................2 Change Document Record ............................... 2 Reference Doc ument ................................ 2 Index 4 List of Figures ..................................... 5 List of Tables....................................5 INTRODUCTION ................................6 Product Description ................................6 Front panel ................................7 Bottom pa nel ................................. 8 Back panel ................................ -
Page 5: Index 4 List Of Figures
Tab. 8.4: skID R1280I Ba ttery Life – Intensive Use – Scenario B .................... 81 Tab. 8.5: skID R1280I Ba ttery Life – Moderate U se – Scenario C ................... 82 Tab. 8.6: skID R1280I Ba ttery Life – Moderate U se – Scenario D ................... 82 Tab. -
Page 6: Introduction
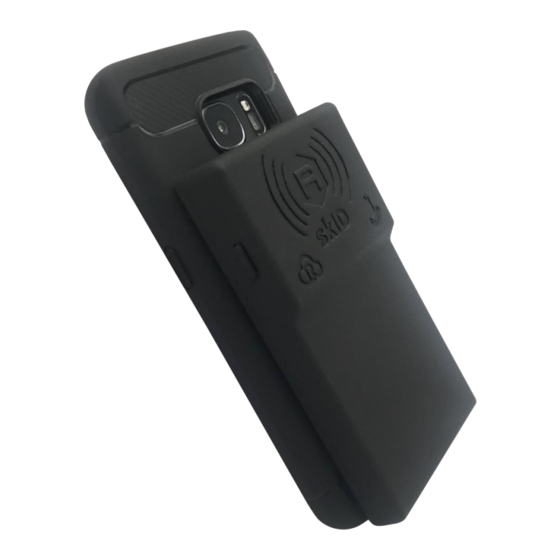
The skID can be easily fixed to the smartphone using 3 different methods: magnets, 3M Dual Lock, or SP- Connect. Designed for mobile operators, the skID is ideal for inventory management, mobile workers, service and maintenance applications. Fig. 1.1: skID R1280I Reader Fig. 1.2: skID R1280I Reader INTRODUCTION - skID Technical Information Manual... -
Page 7: Front Panel
Front panel The skID R1280I front panel houses the following buttons (see figure below): Fig. 1.3: Front Panel Name Description Inventory mode: press to perform an inventory cycle (hold down the button to Trigger button repeat inventory cycles) Press the button to switch on the reader, press for at least 2 seconds to switch it... -
Page 8: Bottom Panel
Bottom panel Fig. 1.4: Bottom Panel Name Description USB port type C Indicates the reader status and battery level (see § Tab. 1.3: Power LED Status Power LED Table page 8) Indicates the Bluetooth and USB/charger connection (see § Tab. 1.4: Bluetooth Link LED and USB/charger LED status table page 8) Tab. -
Page 9: Back Panel
USB connector A micro USB Type C socket connector is located in the bottom side of the skid R1280I and can be used to connect the reader to an USB host port or to an AC/DC battery charger. -
Page 10: Accessories
No. 1 3M Dual Lock No. 1 SP Connect No. 2 magnets Fig. 1.6: Supplied Accessories For the skID R1280I optional accessories see § Ordering Options page 11: Power Supply Fig. 1.7: Optional Accessories INTRODUCTION - skID Technical Information Manual... -
Page 11: Ordering Options
Ordering Options The reader is available in ETSI or FCC version: Code Description WR1280IXUSAA R1280I - skID - RAIN RFID Mini Sled Reader FCC Reader WR1280IXEUAA R1280I - skID - RAIN RFID Mini Sled Reader ETSI Accessories WALIM0000004 AC-DC power supply 5V 1A INTRODUCTION - skID Technical Information Manual... -
Page 12: Configuration Menu
2 CONFIGURATION MENU Introduction The skID R1280I configuration can be performed via USB using the R1280I Configuration Tool. In order to access the configuration menu follow the steps described below: Download from the skID R1280I web page the latest version of the skID R1280I Configuration Tool. - Page 13 Select the right COM port number from the RS232 Port combo box (COM15 in the example): Click on Connect. If the connection is not successful, the message “connection error” appears. The skID R1280I menu options are the following: RFID ...
-
Page 14: Rfid
EASY2READ (factory default) is the CAEN RFID easy2read communication protocol that permits to control the reader using the CAEN RFID Easy Controller Application or the SDK (Software Development Kit) library. For details on the use of the EASY2READ profile please refer to §... -
Page 15: Rf Power Up (Mw)
Power Up is expressed in mW Note that, when the reader is configured in the EASY2READ profile, to set the RF Power Up you can also use the CAEN RFID Easy Controller Application or the SetPower function of the SDK (Software Development Kit) library. -
Page 16: Easy2Read Parameters
Note that, when the reader is configured in the EASY2READ profile, to set the EPCC1G2 Parameters you can also use the CAEN RFID Easy Controller Application or the SDK (Software Development Kit) library. Warning: To save the changes click on the SAVE button (check the green dot on the bottom right side of the sidebar). -
Page 17: Hid Parameters
HID Parameters Choosing the HID profile, the HID parameters available are: Keyboard: The Keyboard options are the following: o QWERTY: standard keyboard. o AZERTY: French keyboard By default the Keyboard is set to “QWERTY”. You can change the default value using the drop-down menu. ... -
Page 18: Epc Code Parameters
Inter Line Delay (ms): The Inter Line Delay is the delay between printing one last character of a line and the first character of the next line. It is expressed in ms. The default value is 0. If set to 0, the reader does not introduce delay: the only delay is that of the BT of the device in use. - Page 19 Using the second part of the Tab. 2.1: EPC Code parameters page 18, the same parameters (Prefix, Suffix) can be set for individual memory banks (RESERVED, EPC, TID and USER). Addition parameters are: ADDRESS: The address to start counting the “length” value. By default the address string is empty. ...
-
Page 20: System
SYSTEM Bluetooth and USB communication Access the configuration menu as explained in the Introduction paragraph page 12. Use this section in order to set the communication interface: COMM INTERFACE: in the COMM INTERFACE box you can set two different communication interface: o USB o Bluetooth (BT or BLE, depending on the firmware uploaded into the reader's Bluetooth... -
Page 21: Bluetooth Low Energy Options
Bluetooth Low Energy Options By setting the COMM INTERFACE to Bluetooth, the window Bluetooth Low Energy Options is enabled. Warning: To enable the Bluetooth Low Energy it is necessary to set the Bluetooth option in the COMM INTERFACE and to upload the BLE firmware into the reader's Bluetooth module (see § BT-BLE switching page 72) In this section you can set the BLE communication parameters for iOS devices. -
Page 22: Buzzer
Buzzer Use this section in order to set the buzzer parameters: Power Up: beep at the power on of the reader Power Down: beep at the power off of the reader Inventory: beep at the identification of a tag o Success (ms): length of tone expressed in ms in case of success o Failure (ms): length of tone expressed in ms in case of failure By default, all the Buzzer options are disabled. -
Page 23: Easy2Read Profile
If your reader is in HID profile active, in order to set the EASY2READ profile please refer to the next paragraph § Set the EASY2READ profile page 23. Set the EASY2READ profile If your reader is in HID profile active, in order to set the EASY2READ profile, access the skID R1280I configuration menu via USB connection: Download from the skID R1280I web page the latest version of the skID R1280I Configuration Tool. - Page 24 On the main application window click on File -> Connect; the connection dialog box will appear. Select the right COM port number from the RS232 Port combo box (COM15 in the example): EASY2READ PROFILE - skID Technical Information Manual...
- Page 25 Click on Connect. If the connection is not successful, the message “connection error” appears. EASY2READ PROFILE - skID Technical Information Manual...
- Page 26 You can change the profile value using the drop-down menu: Warning: To save the changes click on the SAVE button (check the green dot on the bottom right side of the sidebar). On the main application window click on File Disconnect. Power off the reader, disconnect the USB cable and then power on the reader, the new settings are active.
-
Page 27: Easy2Read Profile Options
EASY2READ profile options It is possible to configure various options using the EASY2READ profile: For details on the EASY2READ configuration options, refer to § EASY2READ paragraph page 16. EASY2READ PROFILE - skID Technical Information Manual... -
Page 28: Android Devices
USB cable and then power on the reader, the new settings are active. Download on your Android device the CAEN RFID Easy Controller for Android App (available link at the skID R1280I web page, by clicking on the Android App on Google Play icon). - Page 29 Click on “Add reader”: EASY2READ PROFILE - skID Technical Information Manual...
- Page 30 Click on “Bluetooth” in the “Connection Type” window: EASY2READ PROFILE - skID Technical Information Manual...
- Page 31 Select the skID R1280I reader from the list of Bluetooth devices available (in this example the skID with serial number 20400008): Once the connection is established the Bluetooth blue light turns on. EASY2READ PROFILE - skID Technical Information Manual...
- Page 32 To start using your skID R1280I, click on the reader line: EASY2READ PROFILE - skID Technical Information Manual...
- Page 33 Click on “Start Inventory”: EASY2READ PROFILE - skID Technical Information Manual...
- Page 34 10. A list of the read tags is shown: EASY2READ PROFILE - skID Technical Information Manual...
-
Page 35: Windows Pcs
Follow the instructions given in paragraph § Bluetooth and USB communication page 20 to select the Bluetooth communication interface using the skID R1280I Configuration Tool: Warning: To save the changes click on the SAVE button (check the green dot on the bottom right side of the sidebar). - Page 36 In your Windows Pc go to Settings Devices. Click on Bluetooth & other devices Add Bluetooth or other device: Click on Bluetooth: EASY2READ PROFILE - skID Technical Information Manual...
- Page 37 Select the skID R1280I reader (in this example the skID with serial number 20400011): The message on the screen “Your device is ready to go!” informs you that the connection is established and the Bluetooth blue light of the reader turns on.
-
Page 38: Easy Controller For Windows Via Bluetooth Connection
Once the Bluetooth connection is established, a virtual COM port is created on the host PC. This COM port is used to connect to the reader with the CAEN RFID Easy Controller application. Follow the steps below to connect the skID reader using the Easy Controller for Windows via Bluetooth: Connect the skID reader to your PC using the Bluetooth connection as explained in previous paragraph (§... - Page 39 Look for the COM port in the Bluetooth Settings (COM 13 in the example below): Launch the CAEN RFID Easy Controller application. On the main application window click on File → Connect; the connection dialog box will appear. EASY2READ PROFILE - skID Technical Information Manual...
- Page 40 Select RS232 from the Connection Type combo box and the right COM port number from the RS232 Port combo box (COM13 in this example): Click on Connect. To verify if the connection with the reader has been established, check the green dot on the bottom left side of the sidebar.
- Page 41 10. Place tags in front of the reader and click on Start Inventory to see the tag information displayed on the main window: For more information on the CAEN RFID Easy Controller for Windows application usage, please refer to the relevant user manual: you can download it from the...
-
Page 42: Usb Communication Setup
USB Communication Setup The skID R1280I reader can be connected to a PC using the provided USB cable and it is detected by the PC as an emulated serial port. Follow the steps below to connect your Windows PC to the skID reader using the USB connection and the Easy Controller Application. -
Page 43: Easy Controller For Windows Via Usb Connection
Once the USB connection is established, a virtual COM port is created on the host PC. This COM port is used to connect to the reader with the CAEN RFID Easy Controller application. Follow the steps below to connect the skID reader using the Easy Controller for Windows via USB:... - Page 44 Select RS232 from the Connection Type combo box and the right COM port number from the RS232 Port combo box (COM12 in this example): Click on Connect. To verify if the connection with the reader has been established, check the green dot on the bottom left side of the sidebar.
- Page 45 Place tags in front of the reader and click on Start Inventory to see the tag information displayed on the main window: For more information on the CAEN RFID Easy Controller for Windows application usage, please refer to the relevant user manual: you can download it from the...
-
Page 46: Ios Devices
On the main application window click on File Disconnect. Power off the reader, disconnect the USB cable and then power on the reader, the new settings are active. Download on your iOS device the CAEN RFID Easy Controller for iOS App (available link at the skID R1280I web page, by clicking on the App Store icon). - Page 47 Launch the CAEN RFID Easy Controller for iOS App: EASY2READ PROFILE - skID Technical Information Manual...
- Page 48 Click on Menu: Connect. EASY2READ PROFILE - skID Technical Information Manual...
- Page 49 Click on icon: EASY2READ PROFILE - skID Technical Information Manual...
- Page 50 The available devices are shown, click on the skID R1280I reader (in this example skID s.n. 20400008): EASY2READ PROFILE - skID Technical Information Manual...
- Page 51 Into the Reader Information box you can find information on reader model, serial number and firmware release: EASY2READ PROFILE - skID Technical Information Manual...
- Page 52 Once the connection is established, the Bluetooth blue light on the skID R1280I reader turns on and y ou can start using your reader. Come back and click on the Menu Inventory: EASY2READ PROFILE - skID Technical Information Manual...
- Page 53 10. Click on icon to start the inventory. A list of the read tags is shown: EASY2READ PROFILE - skID Technical Information Manual...
-
Page 54: Hid Profile
If your reader is in EASY2READ profile active, in order to set the HID profile please refer to the next paragraph § Set the HID profile page 54. Set the HID profile If your reader is in EASY2READ profile active, in order to set the HID profile, access the skID R1280I configuration menu via USB connection: Download from the skID R1280I web page the latest version of the skID R1280I Configuration Tool. - Page 55 HID PROFILE - skID Technical Information Manual...
- Page 56 On the main application window click on File -> Connect; the connection dialog box will appear. Select the right COM port number from the RS232 Port combo box (COM15 in the example): Click on Connect. If the connection is not successful, the message “connection error” appears. HID PROFILE - skID Technical Information Manual...
- Page 57 You can change the profile value using the drop-down menu: Warning: To save the changes click on the SAVE button (check the green dot on the bottom right side of the sidebar). On the main application window click on File Disconnect. Power off the reader, disconnect the USB cable and then power on the reader, the new settings are active.
-
Page 58: Hid Profile Options
HID profile options It is possible to configure various options using the HID profile: For details on the EASY2READ configuration options, refer to § HID Parameters paragraph page 17. HID PROFILE - skID Technical Information Manual... -
Page 59: Android Devices
Follow the instructions given in paragraph § Bluetooth and USB communication page 20 to select the Bluetooth communication interface using the skID R1280I Configuration Tool: Warning: To save the changes click on the SAVE button (check the green dot on the bottom right side of the sidebar). - Page 60 On your Android device, go to Setting and enable the Bluetooth. A list of the Bluetooth available devices is shown: HID PROFILE - skID Technical Information Manual...
- Page 61 Click on the skID R1280I reader(in this example the skID with serial number 20400008), confirm the Bluetooth pairing and wait until the pairing is complete: Once the connection is established the Bluetooth blue light on the skID R1280I reader turns on.
- Page 62 EPCs of the tags: Note that, when configured in HID profile and paired to a device, the skID R1280I reader will automatically reconnect to the same device every time the Bluetooth link is active ( skID R1280I switched ON and Bluetooth activated on the host).
-
Page 63: Windows Pcs
Follow the instructions given in paragraph § Bluetooth and USB communication page 20 to select the Bluetooth communication interface using the skID R1280I Configuration Tool: Warning: To save the changes click on the SAVE button (check the green dot on the bottom right side of the sidebar). - Page 64 In your Windows Pc go to Settings Devices. Click on Bluetooth & other devices Add Bluetooth or other device: Click on Bluetooth: HID PROFILE - skID Technical Information Manual...
- Page 65 Select the skID R1280I reader (in this example the skID with serial number 20400011): The message on the screen “Your device is ready to go!” informs you that the connection is established and the Bluetooth blue light of the reader turns on.
- Page 66 EPCs of the tags (example using Notepad App): Note that, when configured in HID profile and paired to a device, the skID R1280I reader will automatically reconnect to the same device every time the Bluetooth link is active (skID R1280I switched ON and Bluetooth activated on the host).
-
Page 67: Ios Devices
Follow the instructions given in paragraph § Bluetooth and USB communication page 20 to select the Bluetooth communication interface using the skID R1280I Configuration Tool: Warning: To save the changes click on the SAVE button (check the green dot on the bottom right side of the sidebar). - Page 68 On your iOS device, go to Setting and enable the Bluetooth. Select the skID R1280I reader from the list of Bluetooth devices available (in this example the skID with serial number 20400008): HID PROFILE - skID Technical Information Manual...
- Page 69 Confirm the Bluetooth pairing and wait until the pairing is complete: HID PROFILE - skID Technical Information Manual...
- Page 70 Once the connection is established, the Bluetooth blue light on the skID R1280I reader turns on. Launch a text editing App (or any other App accepting keyboard input). HID PROFILE - skID Technical Information Manual...
- Page 71 Start an inventory cycle by pressing the trigger button. On the text editing App window you will see the EPCs of the tags (example using Note App): HID PROFILE - skID Technical Information Manual...
-
Page 72: Bt-Ble Switching
5 BT-BLE SWITCHING In the following table it is shown the compatibility between the skID R1280I reader profiles and BT/BLE/USB connection for different Operating Systems (Android, PC and iOS): Profile ANDROID devices WINDOWS PC iOS devices EASY2READ ۷ ۷ ۷... -
Page 73: Switching The Reader From Bt To Ble
Hold down the trigger button, power on the reader and release both power and trigger buttons when the reader beeps. The communication LED should turn green. Run the skID R1280I Image Loader Tool available at the skID R1280I web page In the Module ComboBox select the BLUETOOTH option, in the COM Port the reader's COM Port and in the Filename TextBox the R1280I_skID_BLE_firmware.bin file:... -
Page 74: Switching The Reader From Ble To Bt
10. Hold down the trigger button, power on the reader and release both power and trigger buttons when the reader beeps. The communication LED should turn green. 11. Run the skID R1280I Image Loader Tool available at the skID R1280I web page 12. -
Page 75: Reset The Reader
6 RESET THE READER To reset the reader, press the power and the trigger buttons (see § Fig. 1.4: Bottom Panel page 8) simultaneously for about five seconds and then release the buttons. The reader restarts by itself. Warning: Note that the reader SHALL NOT be connected to the USB port or to the battery charger during the reset, otherwise the reader enters in the firmware upgrade state. -
Page 76: Firmware Upgrade
7 FIRMWARE UPGRADE The skID R1280I firmware upgrade can be performed via USB using the skID R1280I Firmware Upgrade Tool, available for free at the skID R1280I web page. In order to upgrade the firmware follow the steps described below: With the reader switched off, connect the R1280I skID reader to a PC using the provided USB cable. - Page 77 Select the FW image file by clicking on the “Browse” button: Click on the “Upgrade Firmware” button and wait for the upgrade process to be completed. At the end of procedure, if the upgrade has been successfully performed, you will see the messa ges reported in the image below: Power off the reader, disconnect the USB cable and then power on the reader again: the reader is ready for normal operation.
-
Page 78: Technical Specifications
Temperature Weight 110 g Tab. 8.1: skID R1280I Technical Specifications Table Warning: The RF settings must match the operating country/region to comply with local laws and regulations. The usage of the reader in different countries/regions from the one in which the device has been sold is not allowed. -
Page 79: Technical Drawings
Technical Drawings The following drawings show the R1280I skID from different points of view. All dimensions are in millimeters. Fig. 8.1: skID R1280I Technical Drawings TECHNICAL SPECIFICATIONS - skID Technical Information Manual... - Page 80 Fig. 8.2: skID R1280I Technical Drawings – Front panel view Fig. 8.3: skID R1280I Technical Drawings – Back panel view Fig. 8.4: skID R1280I Technical Drawings – Bottom panel view TECHNICAL SPECIFICATIONS - skID Technical Information Manual...
- Page 81 Battery Life The following tables show the values of the battery life of the SKID R1280I reader in three operating states: Status Property Battery Life Not discoverable by BT Power down 50 days Not indication status battery Discoverable by BT...
- Page 82 8 hours No vibration No sound Tab. 8.5: skID R1280I Battery Life – Moderate Use – Scenario C Scenario D: Clothing store inventory In this scenario the reader is switch off between one inventory and another: Configuration...
- Page 83 This device may not cause harmful interference, and (2) this device must accept any interference received, including interference that may cause undesired operation. Any changes or modification not approved by CAEN RFID could void the user’s authority to operate the equipment.
Need help?
Do you have a question about the skID R1280I and is the answer not in the manual?
Questions and answers