Table of Contents
Advertisement
Advertisement
Table of Contents

Related Manuals for ZERO-X ZX-G1


Summary of Contents for ZERO-X ZX-G1
- Page 1 ZX-G1 USER MANUAL...
-
Page 3: Table Of Contents
CONTENTS 1.0 ABOUT THE ZX-G1 ....5 2.0 COMPONENTS..... 5 3.0 GETTING STARTED ....6 4.0 HOW TO CHARGE YOUR ZX-G1 ........... 7 4.1 TO START........7 4.2 HOW TO USE AND CALIBRATE THE ZX-G1 ........ 8 5.0 ZX-G1 CONTROLS AND FUNCTIONS ...... - Page 4 6.6 CONTROLLING THE CAMERA ..........14 7.0 INSTALLING AND USING THE ZERO-X GIMBAL APP ..14 8.0 MANUAL STEPS FOR CONNECTING TO THE ZERO-X GIMBAL APP ..15 9.0 ZERO-X GIMBAL APP MAIN USER SCREEN ....16 10.0 UPGRADE YOUR FIRMWARE ...........
-
Page 5: About The Zx-G1
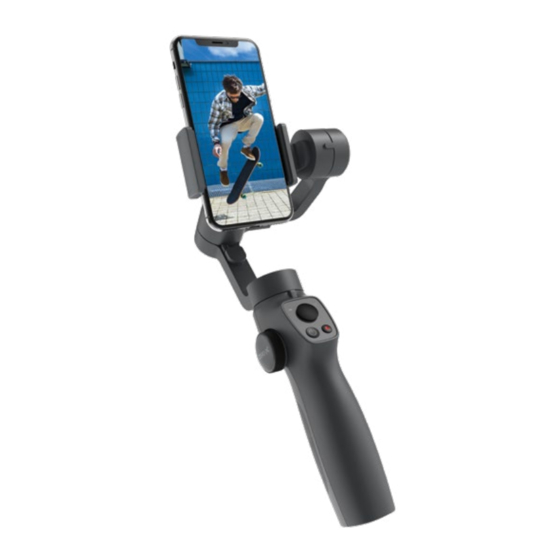
ABOUT THE ZX-G1 The ZX-G1 has been designed to turn your smartphone into a stable, smooth and lightweight 3 axis-camera. High precision motors make this gimbal exceptionally stable. COMPONENTS 1. Mobile Phone Holder 8. Power/Mode Button 2. Handle 9. Joystick 3. -
Page 6: Getting Started
ZX-G1 before you turn the gimbal on. UNFOLD THE ZX-G1 To operate the ZX-G1, you will need to unclip the arm. To do this, hold the handle with one hand as shown. Rotate the gimbal arm by 180 degrees (again, as shown in the diagram). -
Page 7: How To Charge Your Zx-G1
• Charging time: 3 hours (approx, with 5V 2A power adaptor). • Operating time: 12 hours (approx). • Charging port (Micro USB). TO START 1. To use the ZX-G1 gimbal you will need to secure your smartphone to clamp and turn it on. -
Page 8: How To Use And Calibrate
3. To turn on, press and hold the power button for three seconds. Your smartphone needs to be balanced for the ZX-G1 gimbal to maneuver it. HOW TO USE AND CALIBRATE THE ZX-G1 If the gimbal starts to drift slowly, press this icon to calibrate the sensors. -
Page 9: Camera Shutter Button
(when using the App). • Press and hold: Switch between photo / video mode. BATTERY LEVEL INDICATOR: Battery health will be shown by the left LED light. Green is healthy, red indicates the ZX-G1 needs charging. -
Page 10: Mode Indicator
MODE INDICATOR The ZX-G1’s function is indicated by flickering lights, as set out below. “M” Gimbal Triggered Indicator Description Mode Status Your smartphone camera Solid will follow the pitch green Follow Default and yaw of the ZX-G1 light smoothly. During this mode, the roll is locked. -
Page 11: Joystick
Move left and right to control the gimbal yaw. BEGINNERS TIP: The three axes of rotation in the ZX-G1, as controlled by the joystick are referred to as pitch, roll and yaw. When the joystick is used, the default movement of your smartphone will appear opposite to what is intended. -
Page 12: Functions
To use these functions, please open to the App. These functions are described on page 16. ORIENTATIONS The ZX-G1 can be used in a standard, upright position. VERTICAL SHOOTING MODE To shoot vertically, click the power button twice quickly. Double click the... -
Page 13: Inception Mode
360°. Inception will not work in this position. UNDERSLUNG If you hold the ZX-G1 upside down, it will transition to ‘underslung’ mode and will record footage close to the ground. -
Page 14: Operation Errors
Please extend the arm and adjust the phone re-balance and then reset the gimbal. CONTROLLING THE CAMERA The ZX-G1 can be connected to your phone via Bluetooth. The Zero-X Gimbal App also allows for the ZX-G1 gimbal to be operated wirelessly. -
Page 15: Manual Steps For
Please search the App Store for ‘Zero-X Gimbal’. The Zero-X Gimbal App requires iOS 11.0 and above on iPhone or Android device to run. MANUAL STEPS FOR CONNECTING TO THE ZERO-X GIMBAL APP 1. Turn on your phone and scan the QR code or search the App store for Zero-X Gimbal. -
Page 16: Zero-X Gimbal App Main User Screen
As shown by battery icon on App screen. 5. Smart Tracking Indicator This has two modes- face tracking and object tracking. Face / Object Tracking Mode: The Zero-X Gimbal App will recognise the closest face or object and calibrate the ZX-G1 gimbal to follow it. - Page 17 BEGINNERS TIP: A green, rectangle frame will appear on your phone screen/ Zero-X Gimbal App, once a face or object has been identified. If the object or face is not recognised the rectangle will become red, and you will need to start the tracking recognition process again.
- Page 18 11. Switch between Zoom or Focus Mode ‘Z’ stands for ‘zoom’. In this mode, the slider on the gimbal controls the zoom of the image. ‘F’ stands for ‘focus’. In this mode, the slider on the ZX-G1 controls the focus of the image.
- Page 19 The user can also reverse the up/ down and left/ right control of the joystick. 13. Parameters of the ZX-G1 App • The image resolution for panorama: There are 3 grades: low, medium and high. If necessary,...
-
Page 20: Upgrade Your Firmware
Please keep note of the progress bar during upgrade. Do not quit the app or minimise until upgrade is complete. The ZX-G1 will turn off once upgrade has finished. The user needs to turn on the ZX-G1 manually. If the upgrade fails, the user needs to reboot the ZX-G1 and reopen the Zero-X Gimbal App and try again. -
Page 21: Specifications
11.0 SPECIFICATIONS Specification Gimbal Model ZX-G1 Dimension 295 x 113 x 72mm Weight 490g Applicable model 67 - 92mm phone width Applicable model 6.9 - 11mm phone thickness Maximum Payload 300g Input Charging Voltage Operation Time 12 Hours Charging Time... -
Page 22: Warranty
12.0 WARRANTY WARRANTY TERMS & CONDITIONS Our goods come with guarantees that cannot be excluded under the Australian Consumer Law. You are entitled to a replacement or refund for a major failure and for compensation for any other reasonably foreseeable loss or damage. You are also entitled to have the goods repaired or replaced if the goods fail to be of acceptable quality and the failure... - Page 23 Zero-X and its subsidiaries and affiliates, relating to or arising out of your breach of any provision of these terms, your misuse of Zero-X or its services, or your unauthorized modification or alteration of products or software. WARRANTY AND WARRANTY...
- Page 24 Zero-X (including third party content), that any defects in the Zero-X will be corrected or that the Zero-X products or Zero-X services will be compatible with any other specific hardware or service. Further, Zero-X...
- Page 25 Zero-X equipment and services provided will detect or avert such incidents or their consequences. Zero-X does not undertake any risk that you or property, or the person or property of others, may be subject to injury or loss if such an event occurs.
- Page 26 The preceding preclusion and limitation of liability will also not apply to claims for damages arising out of loss of life, bodily injury or health impacts for which Zero-X may be liable, or for non- contractual liability.
- Page 27 Some states and countries do not allow the exclusion or limitation of incidental or consequential damages, so the above limitation or exclusion may not apply to you. Additionally, this provision is not intended to limit Zero-X’s liability in the event of Zero-X’s wilful or intentional misconduct.
-
Page 28: Notes
13.0 NOTES... - Page 32 Capture the action.™ ANOTHER DIRECTED BRAND All Images, Information and Content are www.zero-x.com.au Copyright © 2021 Directed Electronics www.zero-x.co.nz Australia Pty Ltd. All Rights Reserved.
Need help?
Do you have a question about the ZX-G1 and is the answer not in the manual?
Questions and answers