
Subscribe to Our Youtube Channel
Related Manuals for South bend SB1080


Summary of Contents for South bend SB1080
- Page 1 16" 3HP BANDSAW MODEL SB1080 OWNER'S MANUAL Copyright © May, 2020 For Machines Mfd. Since 5/20...
- Page 2 What did you like about it? Is there anything you would change to make it better? Did it meet your expectations for clarity, professionalism, and ease-of-use? South Bend Lathe, Inc. Technical Documentation Manager P.O. Box 2027 Bellingham, WA 98227 Email: manuals@southbendlathe.com...
-
Page 3: Table Of Contents
Table of Contents Blade Care & Break-In ........38 INTRODUCTION ...............2 Identification ............2 Blade Breakage ..........38 Description of Controls & Components ....3 Changing Blade ..........39 Product Specifications ......... 6 Tilting Table ............40 Ripping ............... 42 SAFETY ................8 Crosscutting ............ -
Page 4: Introduction
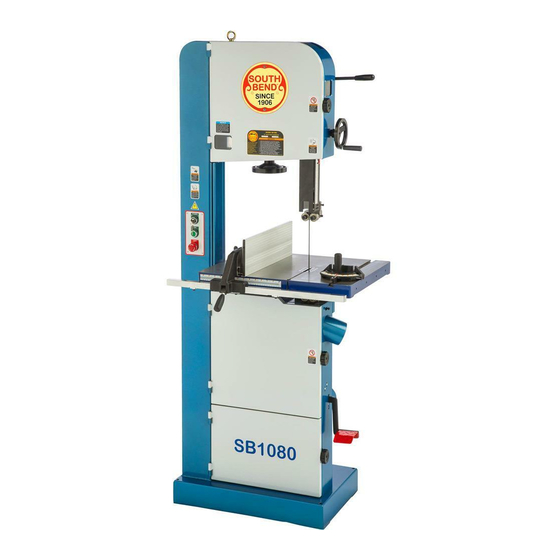
I N T R O D U C T I O N Model SB1080 For Machines Mfd. Since 5/20 Introduction Identification Quick- Upper Release Wheel Blade Cover Blade Tension Tracking Lever Window Blade Tracking Tension Control Window & Guide Post... -
Page 5: Description Of Controls & Components
I N T R O D U C T I O N For Machines Mfd. Since 5/20 Model SB1080 Description of Controls Fence & Miter Gauge & Components To reduce the risk of serious injury when using this machine, read and... - Page 6 I N T R O D U C T I O N Model SB1080 For Machines Mfd. Since 5/20 Guide Post Blade Tension & Tracking Figure 6. Blade tension handwheel, tension scale, and tracking window. Figure 4. Guide post controls.
- Page 7 I N T R O D U C T I O N For Machines Mfd. Since 5/20 Model SB1080 Table Tilt Lower Wheel Adjustment Figure 9. Lower wheel adjustment controls. Figure 8. Table tilt controls. W. Lower Wheel Adjustment Hub: Adjusts Table Tilt Indicator: Shows table tilt angle.
-
Page 8: Product Specifications
I N T R O D U C T I O N Model SB1080 For Machines Mfd. Since 5/20 Product Specifications Model SB1080 16" 3HP Bandsaw Product Dimensions Weight................................476 lbs. Width (side-to-side) x Depth (front-to-back) x Height............... 33 x 36 x 79-1/2 in. - Page 9 Micro-Adjusting Rack & Pinion Table Tilt Cast-Iron Fence with 2-Position Extruded Aluminum Resaw Fence Storage Area for Extra Blades and Miter Gauge (When Not In Use) Computer-Balanced Cast-Iron Wheels with South Bend Initials Blade Tension Indicator Cast-Iron Table Trunnion Model SB1080...
-
Page 10: Safety
S A F E T Y Model SB1080 For Machines Mfd. Since 5/20 SAFETY Understanding Risks of Machinery Operating all machinery and machining equipment can be dangerous or relatively safe depending on how it is installed and maintained, and the operator's experience, common sense, risk awareness, working conditions, and use of personal protective equipment (safety glasses, respirators, etc.). - Page 11 S A F E T Y For Machines Mfd. Since 5/20 Model SB1080 Entanglement: Loose clothing, gloves, neckties, Chuck Keys or Adjusting Tools: Tools used to jewelry or long hair may get caught in adjust spindles, chucks, or any moving/...
-
Page 12: Additional Bandsaw Safety
S A F E T Y Model SB1080 For Machines Mfd. Since 5/20 Additional Bandsaw Safety Serious cuts, amputation, or death can occur from contact with the moving saw blade during operation or if blade breakage occurs. Serious injury or death can also occur from getting fingers, hair, or clothing entangled in moving parts if the machine is operated while the doors are open. -
Page 13: Preparation
P R E P A R A T I O N For Machines Mfd. Since 5/20 Model SB1080 PREPARATION Preparation Overview Required for Setup The purpose of the preparation section is to help The items listed below are required to you prepare your machine for operation. -
Page 14: Power Supply Requirements
P R E P A R A T I O N Model SB1080 For Machines Mfd. Since 5/20 Power Supply Requirements Serious injury could occur if you connect the machine to power before completing the setup process. DO NOT connect to power until Availability instructed later in this manual. - Page 15 P R E P A R A T I O N For Machines Mfd. Since 5/20 Model SB1080 Grounding Requirements Improper connection of the equipment-grounding wire can result in a risk of electric shock. The This machine must be grounded! In the event...
-
Page 16: Unpacking
P R E P A R A T I O N Model SB1080 For Machines Mfd. Since 5/20 Unpacking This item was carefully packaged to prevent damage during transport. If you discover any damage, please immediately call Customer Service at (360) 734-1540 for advice. You may... -
Page 17: Cleaning & Protecting
P R E P A R A T I O N For Machines Mfd. Since 5/20 Model SB1080 Cleaning & Protecting Avoid chlorine-based solvents, such as The unpainted surfaces are coated at the factory acetone or brake parts cleaner that may with a heavy-duty rust preventative that damage painted surfaces. -
Page 18: Location
P R E P A R A T I O N Model SB1080 For Machines Mfd. Since 5/20 Location Weight Load Refer to the Machine Specifications for the Physical Environment weight of your machine. Make sure that the surface upon which the machine is placed will... -
Page 19: Lifting & Moving
P R E P A R A T I O N For Machines Mfd. Since 5/20 Model SB1080 Lifting & Moving Using Forklift & Wood Blocks Use forklift to move crate to prepared location, then remove crate from shipping pallet. -
Page 20: Anchoring To Floor
P R E P A R A T I O N Model SB1080 For Machines Mfd. Since 5/20 Anchoring to Floor Assembly Number of Mounting Holes ..........4 The machine must be fully assembled before it Diameter of Mounting Hardware ...... -
Page 21: Dust Collection
P R E P A R A T I O N For Machines Mfd. Since 5/20 Model SB1080 Dust Collection To connect dust collection system to machine: Fit a 4" dust hose over each dust port, and secure them in place with hose clamps (see Figure 19). -
Page 22: Adjustment Overview
P R E P A R A T I O N Model SB1080 For Machines Mfd. Since 5/20 Adjustment Overview Bandsaw wheels are either flat or crowned and both shapes track differently. This bandsaw has crowned wheels. As the wheels spin, a properly... - Page 23 P R E P A R A T I O N For Machines Mfd. Since 5/20 Model SB1080 To adjust blade tracking: Loosen tracking control lock lever on back of bandsaw (see Figure 23). DISCONNECT MACHINE FROM POWER! Rotate upper wheel by hand several times...
-
Page 24: Test Run
P R E P A R A T I O N Model SB1080 For Machines Mfd. Since 5/20 Test Run Insert key into Master Power Key Switch, then rotate switch to "1" position (see Figure 24). This turns incoming power ON. -
Page 25: Tensioning Blade
P R E P A R A T I O N For Machines Mfd. Since 5/20 Model SB1080 Tensioning Blade Repeat Steps 5–6 to turn machine ON. 10. Allow motor to reach full speed, then step A properly tensioned blade is essential for on foot brake pedal (see Figure 25). - Page 26 P R E P A R A T I O N Model SB1080 For Machines Mfd. Since 5/20 The Flutter Method The Deflection Method Using the flutter method, you intentionally The deflection method is much more subjective loosen the blade until it just passes the point of than the flutter method.
-
Page 27: Fine-Tune Tracking
P R E P A R A T I O N For Machines Mfd. Since 5/20 Model SB1080 Fine-Tune Tracking Adjusting Blade Support Bearings During setup, the blade was tracked without the machine connected to power (refer to Page 20). -
Page 28: Adjusting Blade Guide Bearings
P R E P A R A T I O N Model SB1080 For Machines Mfd. Since 5/20 Adjusting Blade Guide 3. Position support bearing approximately 0.016" away from back of blade, as illustrated in Figure 29. Bearings Note: The main purpose of this adjustment... - Page 29 P R E P A R A T I O N For Machines Mfd. Since 5/20 Model SB1080 Loosen both guide bearing adjustment cap screws (see Figure 33), then position guide bearings so they are close to —but not quite Approximately touching—sides of blade.
-
Page 30: Aligning Table
P R E P A R A T I O N Model SB1080 For Machines Mfd. Since 5/20 Aligning Table Loosen trunnion bolts that secure table (see Figure 36). To ensure cutting accuracy, the table should be aligned so that the miter slot is parallel to the bandsaw blade, and that the table is perpendicular (front to back) to the blade. -
Page 31: Aligning Fence
P R E P A R A T I O N For Machines Mfd. Since 5/20 Model SB1080 Determine which trunnion is on low side of Mount fence on right side of blade and even with the miter slot, as shown in Figure 38. -
Page 32: Calibrating Fence Pointer
P R E P A R A T I O N Model SB1080 For Machines Mfd. Since 5/20 Calibrating Fence Loosen pointer adjustment screw shown in Figure 41, set pointer in line with "0" mark on scale, then re-tighten screw. -
Page 33: Aligning Miter Gauge
P R E P A R A T I O N For Machines Mfd. Since 5/20 Model SB1080 Aligning Miter Gauge Note: Make sure square does not go across a blade tooth when performing this step. The miter gauge needs to be calibrated to the —... -
Page 34: Operation
O P E R A T I O N Model SB1080 For Machines Mfd. Since 5/20 Operation Overview To complete a typical operation, the operator OPERATION does the following: The purpose of this overview is to provide Examines the workpiece to make sure it is the novice machine operator with a basic suitable for cutting. -
Page 35: Workpiece Inspection
O P E R A T I O N For Machines Mfd. Since 5/20 Model SB1080 Workpiece Inspection Basic Functions of a Bandsaw A properly adjusted bandsaw can be safer to Some workpieces are not safe to cut or may operate than most other saws and performs require modification before they are safe to cut. -
Page 36: Setting Upper Blade Guide Height
O P E R A T I O N Model SB1080 For Machines Mfd. Since 5/20 Setting Upper Blade Blade Selection Guide Height Selecting the right blade requires a knowledge of the various blade characteristics to match the blade with the particular cutting operation. - Page 37 Blades will vary slightly even in the same length because of how they are welded. Refer to the Accessories section later in this manual for blade replacements from South Bend. Blade Width Measured from the back of the blade to the tip...
- Page 38 O P E R A T I O N Model SB1080 For Machines Mfd. Since 5/20 Tooth Pitch Blade Material Measured as TPI (teeth per inch), tooth pitch Bandsaw blades must meet two requirements: determines the number of teeth. More teeth per flexibility and hardness.
-
Page 39: Blade Selection Chart
O P E R A T I O N For Machines Mfd. Since 5/20 Model SB1080 Blade Selection Chart Use the blade selection chart below as a general guide when selecting a blade for your operation. Blade Width Cutting Operation Narrow ( ⁄... -
Page 40: Blade Care & Break-In
O P E R A T I O N Model SB1080 For Machines Mfd. Since 5/20 Blade Care & Break-In Blade Breakage Blade Care Many conditions may cause a bandsaw blade to break. Blade breakage is unavoidable in some A bandsaw blade is a thin piece of steel that is cases, since it is the natural result of the peculiar subjected to tremendous strain. -
Page 41: Changing Blade
O P E R A T I O N For Machines Mfd. Since 5/20 Model SB1080 Changing Blade Open upper and lower wheel covers and blade cover on guide post, then with gloved hands, slide blade off of both wheels. -
Page 42: Tilting Table
O P E R A T I O N Model SB1080 For Machines Mfd. Since 5/20 Tilting Table Using Positive Stop The positive stop allows you to quickly return the The table can be tilted from 5° left–45° right to table to 0 from a right-tilt setting. - Page 43 O P E R A T I O N For Machines Mfd. Since 5/20 Model SB1080 Checking/Calibrating Positive Stop Lower table and place a machinist's square flat on table against the side of the blade, as Tools Needed illustrated in Figure 56.
-
Page 44: Ripping
O P E R A T I O N Model SB1080 For Machines Mfd. Since 5/20 Ripping Crosscutting "Ripping" means cutting with the grain of the Crosscutting is the process of cutting across the wood stock. For plywood and other processed grain of wood. -
Page 45: Resawing
O P E R A T I O N For Machines Mfd. Since 5/20 Model SB1080 Resawing Cutting Curves "Resawing" means cutting the thickness of a When cutting curves, simultaneously feed and board into two or more thinner boards (see turn the stock carefully so the blade follows the Figure 60 for an example). -
Page 46: Stacked Cuts
O P E R A T I O N Model SB1080 For Machines Mfd. Since 5/20 Stacked Cuts Make relief cuts perpendicular to outline of your intended shape in areas where changes in blade direction could strain woodgrain or One of the benefits of a bandsaw is its ability cause blade to bind. -
Page 47: Accessories
The accessories available for your lathe, which may G0852 breathes easy thanks to the two-stage be available through your local South Bend filtration system with 0.3-micron pleated filter. Lathe Co. dealer. If you do not have a dealer in... - Page 48 A C C E S S O R I E S Model SB1080 For Machines Mfd. Since 5/20 T26544—LED Light with 30 lb. Mag Base and D2272—Tilting Roller Stand Flexible Arm Adjusts from 26" to 44", 0º-45º. 150 lb. capacity.
-
Page 49: Maintenance
M A I N T E N A N C E For Machines Mfd. Since 5/20 Model SB1080 MAINTENANCE Maintenance Schedule Cleaning & Protecting Cleaning the bandsaw is relatively easy. Vacuum excess wood chips and sawdust, and wipe off the remaining dust with a dry cloth. - Page 50 M A I N T E N A N C E Model SB1080 For Machines Mfd. Since 5/20 Guide Post Rack Blade Tension Adjustment Assembly Lubrication Type ... NLGI#2 Grease or Equivalent Amount ........... Thin Coat Lubrication Type ... NLGI#2 Grease or Equivalent Frequency ..........
- Page 51 M A I N T E N A N C E For Machines Mfd. Since 5/20 Model SB1080 Table Tilt Rack and Pinion Trunnions Assembly The cast-iron trunnions (see Figure 73) produce a fine graphite powder over time that acts as a Lubrication Type ...
-
Page 52: Service
S E R V I C E Model SB1080 For Machines Mfd. Since 5/20 SERVICE Tensioning/Replacing Check V-belt tension by applying moderate pressure between pulleys (see Figure 74). V-Belt — If V-belt deflection is approximately ⁄ ", belt is correctly tensioned and no adjustment is necessary. - Page 53 S E R V I C E For Machines Mfd. Since 5/20 Model SB1080 Replacing V-Belt Loosen motor mount cap screw and lock lever (see Figure 77). To replace the V-belt, you must remove the blade and the lower wheel. After re-installation, you Use motor mount handle (see Figure 77) must properly re-tension the V-belt.
-
Page 54: Blade Lead
S E R V I C E Model SB1080 For Machines Mfd. Since 5/20 Blade Lead To skew fence: Cut a straight and parallel wood board Bandsaw blades may wander off of the layout approximately ⁄ " thick x 3" wide x 16" long. -
Page 55: Adjusting Wheel Brushes
S E R V I C E For Machines Mfd. Since 5/20 Model SB1080 Adjusting Wheel Adjusting Quick- Brushes Release Lever The lower wheel has brushes (see Figure 80) The blade tension quick-release lever was adjusted at the factory for use with the pre- that are designed to sweep sawdust off the installed blade. -
Page 56: Adjusting Guide Post Parallelism
S E R V I C E Model SB1080 For Machines Mfd. Since 5/20 Adjusting Guide Post Loosen (4) hex bolts on stop collars (see Figure 82). Parallelism Turn blade tension handwheel until blade tension matches mark on blade tension scale... - Page 57 S E R V I C E For Machines Mfd. Since 5/20 Model SB1080 Checking/Adjusting Guide Post — If there is no gap between square and guide post along its full length, no Parallel with Blade Front to Back adjustments need to be made. Proceed to next procedure.
- Page 58 S E R V I C E Model SB1080 For Machines Mfd. Since 5/20 Loosen four cap screws shown in Figure 88. Measure distance "A" between upper front face of guide post rack back of blade (see Figure 87). — If guide post to blade distance is greater at bottom than at top, tighten two upper Measure distance "B"...
-
Page 59: Aligning Wheels
S E R V I C E For Machines Mfd. Since 5/20 Model SB1080 Aligning Wheels Bringing the wheel into alignment may require a combination of shimming a wheel and adjusting the position of the lower wheel shaft. The following adjustment was performed at the... - Page 60 S E R V I C E Model SB1080 For Machines Mfd. Since 5/20 DISCONNECT MACHINE FROM POWER! Check wheel alignment and adjust tracking knob to bring both wheels into alignment Remove blade (refer to Changing Blade on as much as possible. If wheels cannot...
- Page 61 S E R V I C E For Machines Mfd. Since 5/20 Model SB1080 Shimming a Wheel Perform previous Checking Wheel Alignment procedure, beginning on Page When the wheels are parallel but not coplanar, 57, and adjust wheels as necessary make one of the wheels must be shimmed out to bring them parallel and coplanar.
-
Page 62: Calibrating Table Tilt Scale Pointer
S E R V I C E Model SB1080 For Machines Mfd. Since 5/20 Calibrating Table Tilt To adjust lower wheel shaft position: DISCONNECT MACHINE FROM POWER! Scale Pointer Loosen jam nuts on lower wheel adjustment hub (see Figure 95). -
Page 63: Replacing Brake Shoe
S E R V I C E For Machines Mfd. Since 5/20 Model SB1080 Adjust table tilt (refer to Tilting Table, Remove cap screws, lock washers, and beginning on Page 40 for more information) bushings that secure brake shoe to... -
Page 64: Troubleshooting
TROU B LESHOOTI NG Model SB1080 For Machines Mfd. Since 5/20 TROUBLESHOOTING If you need replacement parts, or if you are unsure how to do any of the solutions given here, feel free to call us at (360) 734-1540. Motor & Electrical... - Page 65 TROU B LESHOOTI NG For Machines Mfd. Since 5/20 Model SB1080 Motor & Electrical (Cont.) Symptom Possible Cause Possible Solution Machine has 1. Motor or component loose. 1. Inspect/replace damaged bolts/nuts, and retighten vibration or noisy with thread locking fluid.
- Page 66 TROU B LESHOOTI NG Model SB1080 For Machines Mfd. Since 5/20 Operating Machine (Cont.) Symptom Possible Cause Possible Solution Finished 1. Blade is overloaded and twists. 1. Decrease feed rate; ensure proper TPI (Page 34). workpieces are 2. Blade TPI is too coarse.
- Page 67 TROU B LESHOOTI NG For Machines Mfd. Since 5/20 Model SB1080 Operating Machine (Cont.) Symptom Possible Cause Possible Solution Blade dulls 1. Excessive feed rate/pressure. 1. Reduce feed rate/pressure. prematurely. 2. Wrong blade tooth type or TPI. 2. Use blade with correct tooth type and TPI. (Page 34).
-
Page 68: Electrical
E L E C T R I C A L Model SB1080 For Machines Mfd. Since 5/20 ELECTRICAL Electrical Safety Instructions These pages are accurate at the time of printing. In the constant effort to improve, however, we may make changes to the electrical systems of future machines. Study this section carefully. If you see differences between your machine and what is shown in this section, call Technical Support at (360) 734-1540 for assistance BEFORE making any changes to the wiring on your machine. -
Page 69: Wiring Diagram
E L E C T R I C A L For Machines Mfd. Since 5/20 Model SB1080 Wiring Diagram Ground 230 VAC 6-20 Plug MAGNETIC SWITCH ASSEMBLY CONTROL PANEL KEY SWITCH YIAN KUANG YS-K1 L1/1 L2/3 L3/5 NO13 CONTACTOR SDE MA-18... -
Page 70: Electrical Component Pictures
E L E C T R I C A L Model SB1080 For Machines Mfd. Since 5/20 Electrical Component Pictures Figure 99. Motor capacitor wiring. Figure 102. Control panel wiring. Figure 100. Motor junction box wiring. Figure 101. Foot brake limit switch. -
Page 71: Parts
P A R T S For Machines Mfd. Since 5/20 Model SB1080 PARTS Main 10-17 130-4 10-11 10-10 10-1 130-1 10-18 10-2 130-3 10-19 10-3 10-20 10-14 10-4 10-21 10-22 10-5 130-2 10-23 10-6 10-29 10-24 10-7 130-5 130-6 10-25... - Page 72 P A R T S Model SB1080 For Machines Mfd. Since 5/20 Main Parts List PART # DESCRIPTION REF PART # DESCRIPTION PSB1080001 DOOR SEAL 10 X 760 X 1MM PSB1080024 LOCK WASHER 8MM PSB1080002 CAP SCREW M6-1 X 25...
- Page 73 P A R T S For Machines Mfd. Since 5/20 Model SB1080 Main Parts List (Cont.) PART # DESCRIPTION PART # DESCRIPTION PSB1080082 MOTOR 3HP 230V 1-PH PSB1080092 MOTOR PULLEY 82-1 PSB1080082-1 MOTOR FAN COVER PSB1080093 POLY-V BELT 290J5 82-2...
- Page 74 P A R T S Model SB1080 For Machines Mfd. Since 5/20 Table, Tilt, Trunnion & Fence 18-2 18-1 18-4 18-21 18-3 18-23 18-20 18-22 18-13 18-5 18-12 18-7 18-6 18-17 18-11 18-8 18-16 18-10 18-9 18-18 18-19 18-15 18-14...
- Page 75 P A R T S For Machines Mfd. Since 5/20 Model SB1080 Table, Tilt, Trunnion & Fence Parts List PART # DESCRIPTION PART # DESCRIPTION PSB1080018 TABLE TILT ASSEMBLY 121-10 PSB1080121-10 SET SCREW M7-1 X 10 PLASTIC 18-1 PSB1080018-1 GUIDE BRACKET...
-
Page 76: Brake, Guides & Guide Post
P A R T S Model SB1080 For Machines Mfd. Since 5/20 Brake, Guides & Guide Post 133-25 133-17 133-18 133-19 133-16 133-24 133-15 133-20 133-14 133-21 133-13 133-12 133-22 133-11 133-10 133-23 133-9 133-8 133-1 133-7 133-2 133-6 133-4... - Page 77 P A R T S For Machines Mfd. Since 5/20 Model SB1080 Brake, Guides & Guide Post Parts List PART # DESCRIPTION PART # DESCRIPTION PSB1080003 HEX BOLT M5-.8 X 12 133-14 PSB1080133-14 HEX BOLT M10-1.5 X 20 PSB1080006 LOCK WASHER 5MM...
-
Page 78: Machine Labels
The owner of this machine MUST maintain the original location and readability of these safety labels. If any label is removed or becomes unreadable, REPLACE that label before using the machine again. Contact South Bend Lathe Co. at (360) 734-1540 or www.southbendlathe.com to order new labels. -
Page 79: Warranty
WARRANTY Warranty This quality product is warranted by South Bend Lathe Company to the original buyer for one year from the date of purchase. This warranty does not apply to consumable parts, or defects due to any kind of misuse, abuse, negligence, accidents, repairs, alterations or lack of maintenance. We do not reimburse for third party repairs. - Page 80 Printed In Taiwan #MN21047...
Need help?
Do you have a question about the SB1080 and is the answer not in the manual?
Questions and answers