Table of Contents
Advertisement
Advertisement
Table of Contents

Subscribe to Our Youtube Channel
Related Manuals for Amano MTX-30F


Summary of Contents for Amano MTX-30F
- Page 1 MTX-30F PUSH INSTALLATION & OPERATION GUIDE...
- Page 2 Proprietary Notice This document contains proprietary information and such information may not be reproduced in whole or part without the written permission from Amano Cincinnati, Inc. 140 Harrison Ave., Roseland, New Jersey 07068. Amano Cincinnati, Inc. reserves the right to make equipment changes and improvements, which may not be reflected in this document.
-
Page 3: Table Of Contents
CONTENTS MTX-30F PUSH INTRODUCTION………………………………………………5 What’s In the Box BASIC INSTALLATION FOR TIME GUARDIAN MTX-30F PUSH…….……6 - 9 Wall Mounting Installation Understanding the MTX-30F Push Front Panel STARTUP……………………………………………………………….…...10 MTX-30F Push Startup Screen (Power On) Normal Punch IN/OUT Display OPERATION………………………………………………………………………11 - 12... - Page 4 Delete Data Backup Data Restore Data MORE OPTIONS………………………………………………………..……..21 AUTOTEST…………………………………………………………………..…..22 - 24 Test All Test LCD Test Voice Test Keyboard Test Fingerprint Test Clock RTC SYSTEM INFORMATION…………………………………………………….….25 - 26 Device Capacity Device Info Firmware Info SPECIFICATIONS……………………………………………………………..27 MTX-30F Push Installation & Operation Guide...
-
Page 5: Mtx-30F Push Introduction
MTX-30F Push Introduction The MTX-30F Push is a sophisticated data collection terminal for use directly with Amano Time Guardian to provide a complete PC or cloud based time and attendance solution for small business. The MTX-30F Push terminal with Amano Time Guardian provides a system that automatically calculates and accumulates hours worked based on the company's payroll policies. -
Page 6: Basic Installation For Time Guardian Mtx-30F Push
Amano recommends the following wall mounting procedure: 1. Set the MTX-30F Push terminal face up on a flat surface to avoid scratches on display. 2. Using the mounting bracket as a guide, mark the location of the upper and lower mounting holes on the wall. - Page 7 Your terminal is now mounted to the wall and ready to connect the power supply to the outlet. MTX-30F Push Installation & Operation Guide Page 7...
-
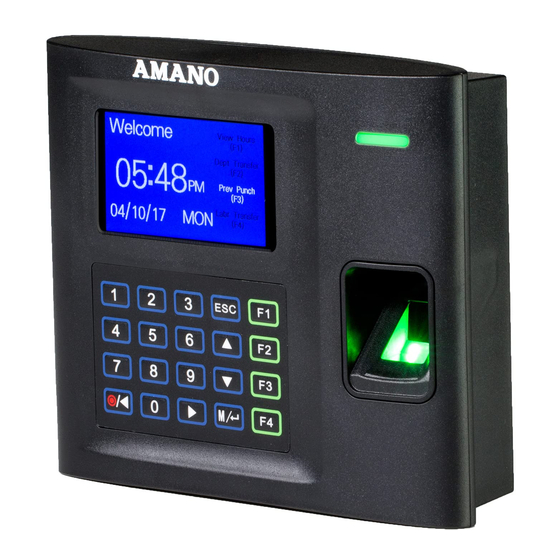
Page 8: Understanding The Mtx-30F Push Front Panel
Understanding the MTX-30F Push Terminal Front Panel Front/Side Panel Features The front panel of the MTX-30F Push terminal contains the following controls: • LED Indicator: During normal standby operation (power on), the Green LED will flash once per second. When a user successfully verifies the Green LED will stay solid for three seconds. - Page 9 F3 – View Previous Punch ESC – to perform exit, cancel, ignore when using the Menus. Escape Numeric Keypad Prev. Punch Power On/Off Up & Down Arrows Left Arrow Right Arrow Menu and OK MTX-30F Push Installation & Operation Guide Page 9...
-
Page 10: Startup
Normal Punch IN/OUT Display The system is ready to use after the MTX-30F Push terminal and the host PC with Time Guardian software or cloud based software are connected and setup. Upon user recognition at the terminal, the terminal will display his/her name - the first 8 characters of the first and last name combined, followed by the User ID and validation status. -
Page 11: Operation
User ID, Name and the confirmation "Verified" with the voice prompt "Thank you". Note: The name, assignments, and current pay period information can be downloaded from Time Guardian to the MTX-30F Push. An invalid finger entry will flash the error message, "FP Verify fail “. The Red LED will momentarily stay on. -
Page 12: Punching With A Fingerprint (Fp) Or Password (Pwd)
Press the F3 key to view Previous Punch. The terminal will ask for Badge No. or Fingerprint. Select Date and press Ok to display previous punches. Note: Previous punches are reset (cleared) every time the clock is polled. MTX-30F Push Installation & Operation Guide Page 12... -
Page 13: Enrolling Users
Enrolling Users Three Ways to Enroll After installing the MTX-30F Push Fingerprint terminal and powering on, you may begin enrolling users. If this is the first enrollment in a new or empty clock system, everyone will be able to enroll. -
Page 14: User Management
Welcome screen using the ESC button. From the Welcome screen place your enrolled finger on the fingerprint scanner. Once the verification is complete you will hear the terminal say “Thank You”. MTX-30F Push Installation & Operation Guide Page 14... -
Page 15: All Users
If you would like to delete all users select “Delete” and the user will be deleted. Display Style Select your desired Display Style from the following: • Single line • Multiple line • Mixed line MTX-30F Push Installation & Operation Guide Page 15... -
Page 16: User Role
3. Click on Registrar – From here you can select rights from the following options: • User Mgt. • Comm. • System • Personalize • Data Mgt. • USB Manager • Attendance Search • Short Message • Labor 1-6 • Autotest • System Info MTX-30F Push Installation & Operation Guide Page 16... -
Page 17: Communication
3. After highlighting your WiFi network press OK. 4. Enter numeric password and then press OK to connect to WiFi or choose “Upload WiFi Password”. (USB with password must be inserted prior to clicking on the Wireless Network option. MTX-30F Push Installation & Operation Guide Page 17... -
Page 18: Personalize
Select Voice. Voice prompt: This parameter defines whether to play voice prompts during the operation of the MTX-30F Push terminal or not. Select ON to enable the voice prompt, and select OFF to mute. Keyboard prompt: This parameter defines whether to generate a beep sound in response to every keyboard touch or not. -
Page 19: Data Management
Device”. If the USB is not properly inserted the screen will read “Error – Failed to Read USB Disk”. If this happens change the USB or try to reinsert it properly. MTX-30F Push Installation & Operation Guide Page 19... -
Page 20: Restore Data
“Restore from Device”. If the USB is not properly inserted the screen will read “Error – Failed to Read USB Disk”. If this happens change the USB or try to reinsert it properly. MTX-30F Push Installation & Operation Guide Page 20... -
Page 21: More Options
From this screen the following options are available: Download • Attendance Data • User Data • User Portal • Short Message Download Options • Encrypt Attendance Data ON/OFF • Delete ATT Data ON/OFF MTX-30F Push Installation & Operation Guide Page 21... -
Page 22: Autotest
The terminal automatically tests the LCD, voice, keyboard fingerprint sensor, keyboard and clock. Click OK to test each item in order or click ESC at any time to return to the Autotest main screen. MTX-30F Push Installation & Operation Guide Page 22... -
Page 23: Test Lcd
Here you can test the ten different voice wav files. Click OK to go through all ten sounds or press ESC at any time to return to the Autotest main screen. Test Keyboard Highlight Test Keyboard and press OK. MTX-30F Push Installation & Operation Guide Page 23... -
Page 24: Test Fingerprint
Press OK to start the stopwatch counting, and press OK again to stop the clock and check whether the counting is accurate. Press ESC to exit the test and return to the Autotest main screen. MTX-30F Push Installation & Operation Guide Page 24... -
Page 25: System Information
• Number of Admin Users • Number of Passwords • Total Fingerprint storage capacity/occupied capacity (used/max) • Number of Badges/ID cards (used/max) • Attendance capacity (used/max) • Number of User Photos (used/max) MTX-30F Push Installation & Operation Guide Page 25... -
Page 26: Device Info
MCU version are displayed here along with the manufacturer name and manufacture date. Firmware Info Highlight Firmware Info and press OK. Here the Firmware version, Bio Service, Push Service, Standalone Service, Dev Service and System Version are displayed. MTX-30F Push Installation & Operation Guide Page 26... -
Page 27: Specifications
OUTPUT: Power Supply: 12V DC, 1.A KEYPAD 3x2 keypad (0~9, M/┘, ESC) + 4 function keys INTEGRATION CAPABILITIES Payroll system integration MEMORY BACKUP Up to 3 years continuous memory backup without AC power UNIT SERIAL # __________________________ MTX-30F Push Installation & Operation Guide Page 27... - Page 28 MTX-30F Push ● Copyright © 2021 Amano Cincinnati, Inc. ● Printed in U.S.A. ● 4/13/2021...
Need help?
Do you have a question about the MTX-30F and is the answer not in the manual?
Questions and answers