Table of Contents
Advertisement
Available languages
Available languages
Quick Links
Advertisement
Table of Contents

Related Manuals for Maximus DLS24-06C27D1E-WH-F1


Summary of Contents for Maximus DLS24-06C27D1E-WH-F1
- Page 1 DLS24-06C27D1E-WH-F1 MDO0212K30MPWC1 MDO0212K40MPWC1 MDO0212K50MPWC1 INSTRUCTION MANUAL LED RETROFIT DOWNLIGHT Questions, problems, or missing parts? Before returning to the store, call customer service at 1-866-897-2098, Monday-Friday, 9:30am−6:30pm EST, or visit www.maximuslighting.com.
-
Page 2: Package Contents
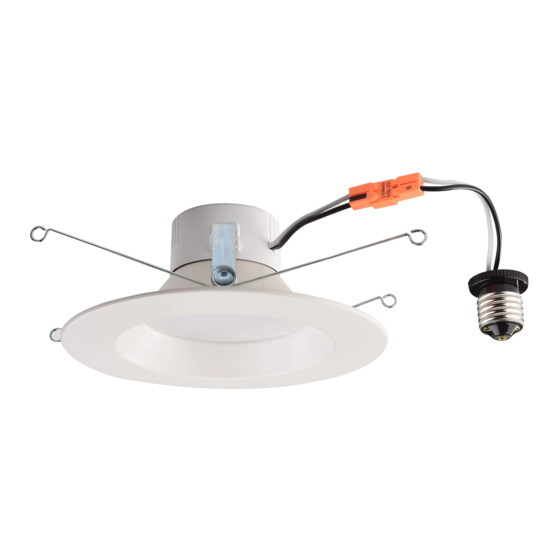
PACKAGE CONTENTS Part Description Quantity Lamp Adapter Friction Clip Spring Clip SAFETY INFORMATION WARNING • Disconnect power at fuse or circuit breaker before inspecting, installing, removing, or servicing. • Risk of fire or electric shock: LED retrofit installation requires knowledge of electrical systems of luminaires. If not qualified, do not attempt to install. -
Page 3: Installation
PREPARATION This lamp can be installed into 5 in. and 6 in. housings. Before beginning assembly of product, make sure all parts are present. Compare parts with package contents list. If any part is missing or damaged, do not attempt to assemble the product. NOTE: Product is shipped in the 6” installation configuration. If installing in a 6”... - Page 4 Fig. 6 Step 2 (Fig. 6) Move spring clips to the 5” holes. Tighten the screws. Step 3 (Fig. 1) Screw adapter (B) into socket in recessed housing. Step 4 (Fig. 2) Plug base cable connector into lamp (A). 5” POSITION Step 5 (Fig.
-
Page 5: Warranty
WARRANTY If this product fails due to a defect in material or workmanship within five (5) years from the date of purchase, return it along with proof of purchase to the store and it will be replaced with the same or comparable model, free of charge. This warranty gives you specific legal rights and you may have other rights that vary from state to state. - Page 6 DLS24-06C27D1E-WH-F1 MDO0212K30MPWC1 MDO0212K40MPWC1 MDO0212K50MPWC1 MANUAL DE INSTRUCCIONES LUZ EMPOTRADA DE LED ¿Preguntas, problemas o piezas faltantes? Antes de volver a la tienda, llama a servicio a 1-866-897-2098, lunes a viernes de 9:30am–6:30pm EST o visite www.maximuslighting.com...
-
Page 7: Contenido Del Paquete
CONTENIDO DEL PAQUETE Parte Descripción Cantidad Parte Descripción Cantidad Lámpara Gancho de fricción Adaptador Gancho de resorte INFORMACIÓN DE SEGURIDAD ADVERTENCIA • Desconecta la energía en el fusible o en el interruptor antes de una inspección, ininstalar, eliminación o dar mantenimiento. •... -
Page 8: Instalación
PREPARACIÓN Esta lámpara puede instalarse en bastidores de 5 y 6 pulg. Antes de comenzar con el armado del producto, verifique que se encuentren presentes todas las piezas. Compare las piezas con las listas de contenido del empaque. Si falta una pieza o se encuentra dañada, no intente armar el producto. NOTA: El producto se envía con una configuración de instalación de 6 pulg. - Page 9 Fig. 6 Paso 2 (Fig. 6) Mueva los ganchos de resorte hacia los orificios de 5 pulg. Ajuste los tornillos. Paso 3 (Fig. 1) Atornille el adaptador (B) en el conector del bastidor a ras con la superficie. Paso 4 (Fig. 2) POSICIÓN DE 5”...
- Page 10 GARANTÍA Si este producto falla debido a un defecto del material o fabricación durante los primeros cinco (5) años a partir de la fecha de compra, devuélvelo junto con el comprobante de compra a la tienda y será reemplazado por el mismo modelo o por uno de características y precio similares, de manera gratuita.
- Page 11 DLS24-06C27D1E-WH-F1 MDO0212K30MPWC1 MDO0212K40MPWC1 MDO0212K50MPWC1 MODE D’EMPLOI PLAFONNIER INTENSIF À DEL POUR RÉAMÉNAGEMENT Questions, problèmes ou des pièces manquantes? Avant de retourner au magasin, appelez le service à la clientèle au 1-866- 897-2098, du lundi au vendredi, entre 9 h 30 et 18 h30 (HNE), ou visitez le www.maximuslighting.com.
-
Page 12: Contenu De L'emballage
CONTENU DE L’EMBALLAGE Pièce Description Quantité Pièce Description Quantité Lampe Attache à friction Adaptateur Pince à ressort INFORMATIONS RELATIVES À LA SÉCURITÉ AVERTISSEMENT • Débranchez l’alimentation au niveau du fusible ou du disjoncteur avant de procéder à l’inspection, à l’installation, au retrait ou à l’entretien. - Page 13 PRÉPARATION Avant de commencer l’assemblage du produit, assurez-vous qu’aucune pièce n’est manquante. Comparez les pièces avec la liste Tournevis Phillips INSTALLATION oreilles Fig. 1 Fig. 2 Étape 1 (Fig. 1) Retirez la garniture existante et les ampoules LFC ou incandescentes. Vissez l’adaptateur (B) dans la douille située dans le boîtier encastré.
- Page 14 Fig. 6 Étape 2 (Fig. 6) Déplacez les pinces à ressort vers les trous du boîtier. Serrez les vis. Étape 3 (Fig. 1) Vissez l’adaptateur (B) dans la douille située dans le boîtier encastré. Étape 4 (Fig. 2) POSITION 5 PO Branchez le connecteur du câble de la base dans la lampe (A).
-
Page 15: Garantie
GARANTIE Si, dans un délai de cinq (5) ans à compter de la date d’achat, ce produit connaît une quelconque défaillance due à un défaut de matériau ou de fabrication, retournez-le au magasin avec une preuve d’achat et il sera remplacé par le même modèle ou un modèle comparable, et ce, gratuitement.
Need help?
Do you have a question about the DLS24-06C27D1E-WH-F1 and is the answer not in the manual?
Questions and answers