
Subscribe to Our Youtube Channel
Related Manuals for LEI accessories HS-WS

Summary of Contents for LEI accessories HS-WS
- Page 1 INSTALLATION INSTRUCTIONS MANUAL HS-WS, HS-WSPC, TRANSDUCERS TRANSDUCERS TRANSDUCERS TRANSDUCERS TRANSDUCERS MODELS HS-WSBK...
-
Page 2: Tools You Will Need
TOOLS YOU WILL NEED: TRANSOM MOUNT: 3/8" DRILL with a variety of small bits Two (2) #12 stainless steel screws (to attach bracket to the transom.) Marine grade caulking compound (to seal screws) SHOOT-THRU-HULL MOUNT: 100 grit sandpaper One package of the either of the following epoxies: ®... - Page 3 The HS-WS is a transom mount transducer with a gray connector. It can be installed on any outboard or stern-drive (inboard\outboard) powered boat. It can also be permanently installed inside the boat to "shoot- through" the hull on some fiberglass boats. The HS-WSPC is the same as the HS-WS, however it has a power cable attached for sonar units that have only one connector for both the power and transducer.
-
Page 4: Shoot-Thru-Hull Vs. Transom Mounting
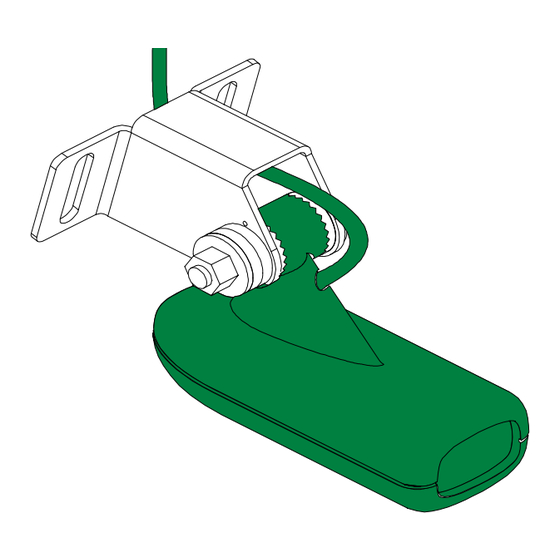
Shoot-thru-hull v.s. Transom Mounting Typically, shoot-thru-hull installations give excellent high speed opera- tion and good to excellent depth capability. There is no possibility of damage from floating objects. It can't be knocked off when docking or loading on the trailer. However, the shoot-thru-hull installation does have its drawbacks. - Page 5 2. Slide the transducer between the two ratchets. Temporally slide the bolt though the transducer assembly and hold it against the transom. Looking at the transducer from the side, check to see if it will adjust so that its face is parallel to the ground. If it does, then the “A” position is correct for your hull.
- Page 6 CAUTION! CAUTION! CAUTION! CAUTION! CAUTION! CLAMP THE TRANSDUCER CABLE TO CLAMP THE TRANSDUCER CABLE TO CLAMP THE TRANSDUCER CABLE TO CLAMP THE TRANSDUCER CABLE TO CLAMP THE TRANSDUCER CABLE TO TRANSOM NEAR THE TRANSDUCER. THIS TRANSOM NEAR THE TRANSDUCER. THIS TRANSOM NEAR THE TRANSDUCER.
- Page 7 5. Remove the transducer from the bracket and re-assemble it with the cable passing through the bracket over the bolt as shown above. At- tach the transducer to the transom. Slide the transducer up or down until it’s aligned properly on the transom as shown above. Tighten the bracket’s mounting screws.
- Page 8 SHOOT-THRU-HULL The transducer installation inside a fiberglass hull must be in an area that does not have air bubbles in the resin or separated fiberglass layers. The sonar signal must pass through solid fiberglass. A success- ful transducer installation can be made on hulls with flotation materials (such as plywood, balsa wood, or foam) between layers of fiberglass if the material is removed from the chosen area.
-
Page 9: Shoot-Thru-Hull Installation
TRANSDUCER LOCATION TRANSDUCER LOCATION (HIGH SPEED) (TROLLING SPEED) Shoot-thru-hull Installation 1. Make certain the area is clean, dry, and free of oil or grease, then sand both the inside surface of the hull and the face of the transducer with 100 grit sandpaper. The surface of the hull must be flat so the entire transducer face is in contact with the hull prior to bonding. -
Page 10: Fish Arches
hull. Place the transducer into the epoxy, twisting and turning it to force any air bubbles out from under the transducer face. The face of the transducer should be parallel with the hull, with a minimum amount of epoxy between the hull and transducer. After the epoxy dries, route the cable to the sonar unit. - Page 11 POWER CONNECTIONS - HS-WSPC ONLY NOTE! INSTALL THE TRANSDUCER BEFORE MAKING THE POWER CONNECTIONS! The sonar unit works from a 12 volt DC system only. For the best results, run the power cable directly to the boat’s battery. Keep the power cable away from other boat wiring, especially the engine’s wires.
- Page 12 If you installed the transducer on the transom, periodically wash the transducer’s face with soap and water to remove any oil film that may collect. Oil and dirt on the face will reduce the sensitivity or may even prevent operation. LITHO IN U.S.A.
Need help?
Do you have a question about the HS-WS and is the answer not in the manual?
Questions and answers