GE PVM9005 Owner's Manual
Hide thumbs
Also See for PVM9005:
- Installation instructions manual (52 pages) ,
- Owner's manual (68 pages) ,
- Installation instructions manual (52 pages)
Table of Contents
Advertisement
Available languages
Available languages
SAFETY INFORMATION
OPERATING INSTRUCTIONS
Controls . . . . . . . . . . . . . . . . . . . . . . . . . . . . . .6
Features . . . . . . . . . . . . . . . . . . . . . . . . . . . . . .8
Power Levels . . . . . . . . . . . . . . . . . . . . . . . . . .8
Time Features . . . . . . . . . . . . . . . . . . . . . . . . .8
Sensor Features . . . . . . . . . . . . . . . . . . . . . . 12
Other Features . . . . . . . . . . . . . . . . . . . . . . . 14
Microwave Terms . . . . . . . . . . . . . . . . . . . . . 16
CARE AND CLEANING
Care and Cleaning . . . . . . . . . . . . . . . . . . . . 17
TROUBLESHOOTING
Things that are Normal . . . . . . . . . . . . . . . 20
CONSUMER SUPPORT
Limited Warranty . . . . . . . . . . . . . . . . . . . . . 21
Optional Kits . . . . . . . . . . . . . . . . . . . . . . . . .22
Consumer Support . . . . . . . . . . . . . . . . . . . 24
Write the model and serial
numbers here:
Model # _________________
Serial # _________________
You can find them on a label inside
the oven.
GE is a trademark of the General Electric Company. Manufactured under trademark license.
OWNER'S MANUAL
. . . . . . . . . .3
instrucciones, visite nuestro sitio de
49-7000118 Rev. 0 04-20 GEA
PVM9005
ESPAÑOL
Para consultar una version en
español de este manual de
internet GEAppliances.com.
Advertisement
Chapters
Table of Contents

Related Manuals for GE PVM9005


Summary of Contents for GE PVM9005
-
Page 1: Table Of Contents
Model # _________________ instrucciones, visite nuestro sitio de internet GEAppliances.com. Serial # _________________ You can find them on a label inside the oven. GE is a trademark of the General Electric Company. Manufactured under trademark license. 49-7000118 Rev. 0 04-20 GEA... - Page 2 THANK YOU FOR MAKING GE APPLIANCES A PART OF YOUR HOME. Whether you grew up with GE Appliances, or this is your first, we’re happy to have you in the family. We take pride in the craftsmanship, innovation and design that goes into every GE Appliances product, and we think you will too.
- Page 3 IMPORTANT SAFETY INSTRUCTIONS READ ALL INSTRUCTIONS BEFORE USING THE APPLIANCE WARNING To reduce the risk of burns, electric shock, fire, injury to persons, or exposure to excessive microwave energy: When using electrical appliances, basic safety precautions should be followed, including the following: TO REDUCE THE RISK OF FIRE IN THE CAVITY: Do not overcook food.
- Page 4 IMPORTANT SAFETY INSTRUCTIONS READ ALL INSTRUCTIONS BEFORE USING THE APPLIANCE WARNING Continued OPERATING CLEANING place. The turntable must be unrestricted so it can turn. burn off the pad and touch electrical parts involving risk of electric shock. oven is suitable for microwaving. Most glass casseroles, cooking dishes, measuring cups, custard come together on closing the door, use only mild, cups, pottery, or china dinnerware, which does not...
- Page 5 IMPORTANT SAFETY INSTRUCTIONS READ ALL INSTRUCTIONS BEFORE USING THE APPLIANCE PRECAUTIONS TO AVOID POSSIBLE EXPOSURE TO EXCESSIVE MICROWAVE ENERGY (a) Do Not Attempt to operate this oven with the (c) Do Not Operate the oven if it is damaged. door open since open-door operation can result It is particularly important that the oven door close in harmful exposure to microwave energy.
-
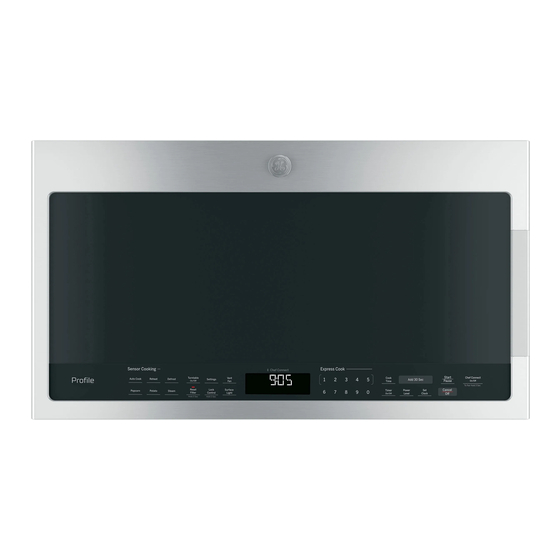
Page 6: Controls
Controls Throughout this manual, features and appearance may vary from your model. 1. Door Handle. 4. Removable Turntable. Do not operate the oven in the microwave mode 2. Door Latches. without the turntable and turntable support seated and 3. Window with Metal Shield. in place. -
Page 7: Features
Controls You can microwave by time or with the sensor features. Not all features on all models. Cook Start Chef Connect Add 30 Sec Time Pause On/Off To Pair Hold 3 Sec Timer Power Cancel On/Off Level Clock Sensor Cooking - Auto Reheat Defrost... -
Page 8: Time Features
Features Changing the Power Level Variable power levels add flexibility to microwave cooking. The power levels on the microwave oven can be compared Power Level to the surface units on a range. Each power level gives you microwave energy a certain percent of the time. Power Express Cook stirring, rotating or turning over. - Page 9 Time Features Express Cook Press one of the Express Cook pads (from 1 to 5) for 1 Express Cook press the 2 pad for 2 minutes of cooking time. The power level can be changed as time is counting down. Press POWER LEVEL and enter 1-10. Add 30 Sec You can use this feature two ways: Add 30 Sec...
- Page 10 Time Features Weight Defrost • Remove meat from package and place on microwave- Defrost safe dish. • When the oven signals, turn the food over. Remove Express Cook defrosted meat or shield warm areas with small pieces of foil. • After defrosting, most meats need to stand 5 minutes to complete defrosting.
- Page 11 Time Features Defrosting Guide Food Time Comments Breads, Cakes Bread, buns or rolls (1 1/4 min. piece) Sweet rolls (approx. 12 oz.) 2 to 4 min. Rearrange after half of time. Fish and Seafood Fruit Plastic pouch—1 or 2 1 to 5 min. Meat Bacon (1 lb.) 2 to 5 min.
-
Page 12: Sensor Features
Sensor Features Humidity Sensor released during cooking. The oven automatically adjusts the cooking time to various types and amounts of food. Covered Vented same food portion—it may result in severely overcooked minutes before starting the next sensor cook. If food is under cooked after the countdown, use Cook Time for additional cooking time. - Page 13 Sensor Features Potato beeps are emitted while the display will Scroll & Cycle “SENSOR ERROR “ until CANCEL is pressed. The sensor cook will be cancelled as well. If the Door is opened during the counting down, close it and press START immediately.
-
Page 14: Other Features
Other Features Cooking Complete Reminder To remind you that you have food in the oven, the oven until you either open the oven door or press Cancel/Off. Set Clock Control Lock-Out You may lock the control panel To change the time of day. Lock to prevent the oven from being 1. - Page 15 Other Features Vent Fan Automatic Fan The vent fan removes steam and An automatic fan feature protects the microwave from Vent other vapors from surface cooking. too much heat rising from the cooktop below it. It automatically turns on at low speed if it senses too much heat.
-
Page 16: Microwave Terms
HIGH level automatically when the paired range’s cooktop burner turns 4. Select 1 to sync the vent fan to your GE range. This allows the Microwave terms Arcing Arcing is the microwave term for sparks in the Covering Covers hold in moisture, allow for more even oven. -
Page 17: Care And Cleaning
Care and Cleaning Helpful Hints An occasional thorough wiping with a solution of baking soda and water keeps the inside fresh. Be sure the power is off before cleaning any part of this oven. How to Clean the Inside Walls, Floor, Inside Window, Metal and Plastic Parts Removable Turntable and Turntable Support on the Door To prevent breakage, do not place the turntable into... - Page 18 Care and Cleaning Cooktop Light/Nite Light Replace with a 120 volt, 50 watt (max.) halogen bulb. See back cover for ordering online at GEAppliances.com. 1. To replace the cooktop light/nite light, first disconnect the power at the main fuse or circuit breaker panel, or pull the plug.
- Page 19 Bluetooth Power interruption may disrupt bluetooth connection connection not paired CONNECT process on the GE Appliances button for 3 seconds on the microwave. This will restart the pairing process. If this does not work, unplug unit or reset the circuit breaker to reset the control.
-
Page 20: Things That Are Normal
Troubleshooting Tips Things That Are Normal With Your Microwave Oven Steam or vapor escaping from around the door. Dimming oven light and change in the blower sound at power levels other than high. Light reflection around door or outer case. Dull thumping sound while oven is operating. -
Page 21: Limited Warranty
This limited warranty is extended to the original purchaser and any succeeding owner for products purchased for home use within the USA. If the product is located in an area where service by a GE Appliances Authorized Servicer is not Appliances Service location for service. -
Page 22: Optional Kits
Each kit contains two 3” wide filler panels. Recirculating Charcoal Filter Kit vented to the outside. 15” Cabinet Installation Kit JX15BUMPBB - Black JX15BUMPWW - White Available at extra cost from your GE Appliances supplier. See back cover for ordering online at GEAppliances.com. 49-7000118 Rev. 0... - Page 23 Notes 49-7000118 Rev. 0...
-
Page 24: Consumer Support
Caution must be exercised, since improper servicing may cause unsafe operation. Contact Us If you are not satisfied with the service you receive from GE Appliances, contact us on our Website with all the details including your phone number, or write to: General Manager, GEAppliances.com/contact Printed in China 49-7000118 Rev. - Page 25 Nº de Modelo ______________ Nº de Serie ________________ Los encontrará en una etiqueta dentro del horno. GE Appliances es una marca de General Electric Company. Fabricado bajo licencia de la marca. 49-7000118 Rev. 0 04-20 GEA...
- Page 26 GRACIAS POR HACER QUE GE APPLIANCES SEA PARTE DE SU HOGAR. Ya sea que haya crecido usando GE Appliances, o que ésta es su primera vez, nos complace tenerlo en la familia. Sentimos orgullo por el nivel de arte, innovación y diseño de cada uno de los electrodomésticos de GE Appliances, y creemos que usted también.
- Page 27 INFORMACIÓN IMPORTANTE DE SEGURIDAD LEA TODAS LAS INSTRUCCIONES ANTES DE USAR ADVERTENCIA Para reducir el riesgo de quemaduras, descargas eléctricas, incendio, lesiones o exposición a energía de microondas excesiva: Cuando utilice aparatos eléctricos, se deben seguir las precauciones de seguridad básicas, entre las que se incluyen las siguientes: PARA REDUCIR EL RIESGO DE INCENDIO DENTRO DEL HORNO:...
- Page 28 INFORMACIÓN IMPORTANTE DE SEGURIDAD LEA TODAS LAS INSTRUCCIONES ANTES DE USAR ADVERTENCIA LIMPIEZA plato giratorio no deberá tener restricciones, de modo que pueda girar. piezas podrán quemar la almohadilla y tener contacto con partes eléctricas y producir riesgos de descargas eléctricas. microondas sean para uso en el mismo.
- Page 29 INFORMACIÓN IMPORTANTE DE SEGURIDAD LEA TODAS LAS INSTRUCCIONES ANTES DE USAR PRECAUCIONES PARA EVITAR LA POSIBLE EXPOSICIÓN A ENERGÍA DE MICROONDAS EXCESIVA (a) No intente hacer funcionar el horno con (c) No haga funcionar el horno si se encuentra dañado. Es la compuerta abierta ya que ésto puede provocar particularmente importante cerrar bien la compuerta exposición peligrosa a la energía de microondas.
-
Page 30: Funciones Del Horno
Funciones Es posible que las funciones y apariencias varíen con relación a su modelo a lo largo del manual. Funciones del Horno 1. Manija de la Puerta 5. Soporte Extraíble del Plato Giratorio. No utilice el horno en el modo de microondas sin el plato giratorio 2. - Page 31 Funciones Puede usar el horno microondas por tiempo o con funciones sensor. No todos los modelos cuentan con todas las funciones. Cook Start Chef Connect Add 30 Sec Time Pause On/Off To Pair Hold 3 Sec Timer Power Cancel On/Off Level Clock Sensor Cooking -...
-
Page 32: Funciones Del Temporizador
Funciones Cómo Modificar el Nivel de Potencia Power Level comparar con las unidades de superficie de una cocina. Cada nivel de potencia le brinda energía de microondas un cierto porcentaje Express Cook del tiempo. El Nivel de Potencia 7 es energía de microondas el 70% rotar o dar vuelta la comida con mayor frecuencia. - Page 33 Funciones del temporizador Cocción Express Ésta es una forma rápida de configurar el tiempo de cocción entre 1 y 6 minutos. Express Cook para un tiempo de cocción de 2 minutos. El nivel de potencia se puede modificar mientras se está Agregar 30 segundos Puede usar esta función de dos formas: Add 30 Sec...
- Page 34 Funciones del temporizador Descongelación por Peso • Retire la carne del paquete y coloque la misma en el plato de cocción Defrost segura en el microondas. • Cuando el horno dé la señal, dé vuelta la comida. Retire la carne descongelada o cubra las partes calientes con trozos pequeños de Express Cook papel de aluminio.
- Page 35 Funciones del temporizador Guía de Descongelación Comida Tiempo Comentarios Panes, Tortas Panes, buñuelos o 2 a 4 min. Reordene luego de la mitad del tiempo. Pescado y Mariscos 6 a 9 min. Fruta 1 a 5 min. Carne 2 a 5 min. Coloque el paquete cerrado en el horno.
-
Page 36: Funciones Del Sensor
Funciones del sensor Sensor de Humedad creciente liberada durante la cocción. El horno ajusta de forma automática el tiempo de cocción a diferentes tipos y cantidades de comida. Cubierto Ventilado seguidas en la misma porción de comida; esto podrá hacer que la comida se sobrecaliente de forma excesiva o que se queme. - Page 37 Funciones del sensor Papa No abra la puerta del horno hasta que se esté realizando la cuenta regresiva. Si la puerta es abierta antes de finalizada la cuenta regresiva, serán emitidos 4 pitidos mientras en cocción con sensor también será cancelada. Si la puerta es abierta durante la cuenta regresiva, cierre la misma y presione 1.
-
Page 38: Otras Funciones
Otras funciones Recordatorio de Cocción Completa Para recordarle que colocó comida en el horno, este último hasta que abra el horno o presione el botón Cancel/ Off Set Clock (Configurar el Reloj) Bloqueo del Control Puede bloquear el panel de control para Para cambiar la hora del día. - Page 39 Otras funciones Vent Fan (Ventilador Extractor) Ventilador Automático El ventilador extractor elimina el vapor y otros vapores de la cocción sobre la superficie. una elevación de calor excesivo proveniente de la cocina debajo de éste. Se enciende de forma automática en baja velocidad si el sensor Presione Vent Fan una vez para aumentar la detecta demasiado calor.
-
Page 40: Términos Del Microondas
Use la función Chef Connect para conectar su horno microondas a las unidades regresarán al modo de suspensión. una Cocina de GE, a fin de sincronizar el ventilador, las luces de la anteriores, el ventilador extractor de su horno microondas y 1. -
Page 41: Cuidado Y Limpieza
Cuidado y limpieza Consejos Útiles Una limpieza completa de forma ocasional con una solución de bicarbonato y agua mantiene el interior fresco. Desenchufe el cable antes de limpiar cualquier parte del horno. Cómo Limpiar el Interior Paredes, Piso, Ventana Interior, Partes Metálicas y Plato Giratorio y Soporte Giratorio Extraíbles Plásticas de la Puerta Para evitar roturas, no coloque el plato giratorio en agua luego... - Page 42 Cuidado y limpieza Luz de la Cocina/ Luz Nocturna Reemplace por lámparas halógenas de 120 voltios y 50 Enrosque la nueva lámpara, luego levante la tapa de watts (máximo). Vea la contraportada para ordenar en línea la luz y vuelva a colocar el tornillo. Conecte el cable de en GEAppliances.com.
-
Page 43: Resolución De Problemas
Un corte de corriente puede interrumpir la • emparejada CONNECT en la Cocina GE Appliances, luego manteniendo en el microondas. Esto reiniciará el proceso de emparejami ento. Si esto no funciona, desenchufe o reinicie el disyuntor para reiniciar el control. - Page 44 Resolución de Problemas Cosas que son Normales de su Horno Microondas niveles de potencia que no son altos. Reflejo de luz alrededor de la puerta o la cubierta exterior. Ruido de golpes secos mientras el horno está en funcionamiento. DECLARACIÓN DE INTERFERENCIA POR RADIOFRECUENCIA DE LA FEDERAL COMMUNICATIONS COMMISSION (COMISIÓN FEDERAL DE COMUNICACIONES) (EE.UU.
-
Page 45: Garantía Limitada
EE.UU. Si el producto está en un área donde no se encuentra disponible un Proveedor Autorizado del Servicio Técnico de GE Appliances, usted será responsable por el costo de un viaje o se podrá requerir que traiga el producto a una ubicación del Servicio Técnico de GE Appliances autorizado para recibir el servicio. -
Page 46: Kits Opcionales
JX15BAMPW - Blanco Para uso al instalar con gabinetes de 15” de profundidad. Disponible por un costo adicional a través de su proveedor de GE Appliances. Consulte la contraportada para realizar pedidos por teléfono o en GEAppliances.com. 49-7000118 Rev. 0... - Page 47 Notas 49-7000118 Rev. 0...
- Page 48 Servicio Programado El servicio de reparación de expertos de GE Appliances está a sólo un paso de su puerta. Conéctese a través de Internet y programe su servicio a su conveniencia cualquier día del año. En EE.UU.: GEappliances.com/service o comuníquese al 800.432.2737 durante el horario de atención comercial.