
Related Manuals for Logicube OmniWIPE


Summary of Contents for Logicube OmniWIPE
- Page 1 Logicube OmniWIPE™ User’s Manual Version: 1.2 MAN-OMNIWIPE-2 Date: 12/08/14 Logicube OmniWIPE-2™ User’s Manual...
-
Page 3: Limitation Of Liability And Warranty Information
Logicube Disclaimer LOGICUBE IS NOT LIABLE FOR ANY INCIDENTAL OR CONSEQUENTIAL DAMAGES, INCLUDING, BUT NOT LIMITED TO PROPERTY DAMAGE, LOSS OF TIME OR DATA FROM USE OF A LOGICUBE PRODUCT, OR ANY OTHER DAMAGES RESULTING FROM PRODUCT MALFUNCTION OR FAILURE... -
Page 4: Table Of Contents
MUCH DETAIL AS POSSIBLE. AT LOGICUBE’S SOLE AND ABSOLUTE DISCRETION, REASONABLE TELEPHONE AND EMAIL SUPPORT MAY ALSO BE AVAILABLE FOR THE LIFE OF THE PRODUCT AS DEFINED BY LOGICUBE. EXCEPT AS OTHERWISE SPECIFICALLY PROVIDED IN THIS AGREEMENT, LOGICUBE PRODUCTS ARE... - Page 5 LEGAL RIGHTS, AND YOU MAY HAVE OTHER RIGHTS WHICH VARY FROM JURISDICTION TO JURISDICTION. RoHS Certificate of Compliance LOGICUBE PRODUCTS COMPLY WITH THE EUROPEAN UNION RESTRICTION OF THE USE OF CERTAIN HAZARDOUS SUBSTANCES IN ELECTRONIC EQUIPMENT, ROHS DIRECTIVE (2002/95/EC). THE ROHS DIRECTIVE PROHIBITS THE SALE OF CERTAIN ELECTRONIC EQUIPMENT CONTAINING SOME HAZARDOUS SUBSTANCES SUCH AS MERCURY, LEAD, CADMIUM, HEXAVALENT CHROMIUM AND CERTAIN FLAME-RETARDANTS IN THE EUROPEAN UNION.
-
Page 6: Table Of Contents
LIMITATION OF LIABILITY AND WARRANTY INFORMATION ....I Logicube Disclaimer ....... Error! Bookmark not defined. Warranty ........... Error! Bookmark not defined. TABLE OF CONTENTS................IV 1. INTRODUCTION TO THE LOGICUBE OMNIWIPE ......1 Introduction ..................1 Features ..................2 Using this guide ................2 System description ................. - Page 7 Connecting Through the Software Setup Menu ......15 Removing USB Devices ............... 16 5. SOFTWARE LOADING INSTRUCTIONS ........... 17 Logicube OmniWIPE Software Updating Procedures ....17 Loading Software Using the Compact Flash Card ....... 17 Loading Software through the Parallel Port ........18 Host PC preparation ..............
-
Page 9: Introduction To The Logicube Omniwipe
1. Introduction to the Logicube OmniWIPE Introduction Congratulations on your purchase of the Logicube OmniWIPE. You are now the proud owner of a state-of-the-art IDE/SATA drive data wiping device. The OmniWIPE is designed to be easy enough to be used by a novice, yet offers many professional features that are not available anywhere else. -
Page 10: Features
Getting Started before attempting a drive wiping session. It is recommended that you practice with a scratch drive to fully appreciate all of the features. System description The complete Logicube OmniWIPE-2 system includes the following: The Logicube OmniWIPE-2 Three (3) 5” 80-conductor flat ribbon cables Three (3) 5”... - Page 11 Caution: Avoid dropping the Logicube OmniWIPE-2 or subjecting it to sharp jolts. When in use, place it on a flat surface. Caution: Keep the unit dry. If you need to clean your Logicube OmniWIPE-2, use a lightly damp, lint free cloth. Avoid using soap or other cleaning agents particularly those containing bleach, ammonia, alcohol or other harsh chemicals.
-
Page 12: Getting Started (Fast Start)
4. Follow steps 1 – 3 to attach drives to the other drive positions of the OmniWIPE. 5. Connect the AC Power adapter to the back of the OmniWIPE to power up the unit. In 2-3 seconds the main screen should appear. Connecting Serial ATA (SATA) Drives 1. -
Page 13: Connecting Other Types Of Drives
4. Follow steps 1 – 3 to attach drives to the other drive positions of the OmniWIPE. 5. Connect the AC Power adapter to the back of the OmniWIPE to power up the unit. In 2-3 seconds the main screen should appear. Connecting other types of drives... -
Page 14: Omniwipe Overview
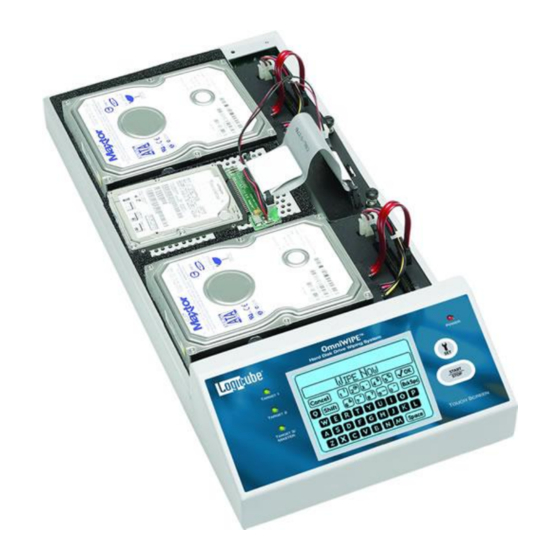
Please refer to Figure 1 below. Figure 1. OmniWIPE Overview Reset button Looking at the back of the OmniWIPE the reset button is below the CompactFlash card and next to the USB port. When the unit needs to be soft-booted (or power cycled), press the reset button and hold it in momentarily. -
Page 15: The User Interface
Figure 2. Buttons and Interface Touch Screen The OmniWIPE features an LCD touch screen that allows the user to quickly input commands. This screen replaces many of the buttons that were present on older Logicube products. The screen is bright and easy to read. -
Page 16: Buttons
Settings screen where you can change the wipe modes and other settings of the unit. Indicator Lights The OmniWIPE has four indicator lights (LEDs) that are located on the User Interface panel. One LED is for power while the other three are drive status lights. -
Page 17: Wiping Modes And Settings
3. Wiping Modes and Settings Main Menu Screen The Main Menu Screen appears when the Logicube OmniWIPE is first powered up. It displays the Title Screen and the Time/Date. It also displays two menu options: About and Drives. Time/Date Settings The OmniWIPE has a real-time clock that keeps track of the correct time and date. -
Page 18: Drives
WipeOut Mode writes a pattern over the whole Target drive 2 X n+1 times, where n is the selected number of iterations of all 0’s and all 1’s. The last pass then writes the chosen pattern to every byte of the drive. Logicube OmniWIPE-2™ User’s Manual... -
Page 19: Wipeout Settings
Speed – The speed can be manually set from UDMA 5 to PIO-SLOW. IMPORTANT NOTE: The Logicube OmniWIPE-2 will run at the fastest possible speed as long as a “scratch” drive is attached to the Master position. This should not be an actual Master drive as a pattern will be written to part of the drive data may be lost. -
Page 20: Security Erase Mode
“No”. 10. If “Yes” is chosen, the WipeOut Target operation will begin and a status screen will appear. 11. The Logicube OmniWIPE will notify you when erasing is complete. Tap the “Back” icon to return to the main menu. -
Page 21: Security Erase Settings
The following settings are used in configuring Security Erase Mode: Passes – Determines how many times that the OmniWIPE will write to the drive. The default is 1. Unlike WipeOut mode, there is no formula for the number of passes. - Page 22 It contains both a progress bar and a “time elapsed” field. 10. The Logicube OmniWIPE will notify you when erasing is complete. Press the Back button to return to the main menu...
-
Page 23: Compact Flash (Cf) Card
Compact Flash Card” which is found in Section 5: Software Loading Instructions. Inserting and Removing the Compact Flash Card 1. At the back of the Logicube OmniWIPE is a Compact Flash (CF) slot. Make sure that it is empty. 2. Hold the CF card with the Logicube label facing up. -
Page 24: Removing Usb Devices
CF card. Removing USB Devices Before physically disconnecting the USB cable and/or shutting down power to the Logicube OmniWIPE the unit has to be properly removed from Windows. 1. Locate the USB icon in the System Tray (typically at the bottom right of the screen). -
Page 25: Software Loading Instructions
5. Software Loading Instructions Logicube OmniWIPE Software Updating Procedures New and improved software will appear from time to time on our web site at www.logicube.com. It is possible to update the operating software in the field by a user. There are two methods to update the software:... -
Page 26: Loading Software Through The Parallel Port
This is a legacy method to load software, and should only be used in situations where the CF method cannot be used. To successfully load new software on to the Logicube OmniWIPE with the parallel port connection, you need the following: •... -
Page 27: Host Pc Preparation
Update screen will appear. Logicube OmniWIPE Software Update Note: Make sure the update is running on the PC and the Logicube OmniWIPE is connected to the host PC via the supplied parallel cable. 1. Press and hold the START/STOP button on... -
Page 28: Frequently Asked Questions And Answers
Q. Can the OmniWIPE erase dissimilar drives simultaneously? A. Yes. The OmniWIPE is able to determine the size of every drive that is attached. It will then adjust its “Time Remaining” display to account for the largest drive. - Page 29 A. Yes, WipeOut only writes the pattern to a small part of the Master drive so the size of the Target drive does not matter. Q. The OmniWIPE does not recognize my Master (or Target) drive? What can be done? A. On IDE drives, make sure that the drive jumpers are set as a Single Master. If needed, drive jumper settings can be found at the drive manufacturer web site.
-
Page 30: Index
7. Index OmniWIPE™, Logicube, 1, 2, 3, 4, 5, 9, 14, 17, Alphanumeric Keypad, 14 Bad sectors, 20 20, 21 BIOS, 12 Partition, Partitions, 10, 21 Button, BACK, 14 Position, Master, 11, 13 Position, Target, 4, 13 Button, Power, 6...
Need help?
Do you have a question about the OmniWIPE and is the answer not in the manual?
Questions and answers