Table of Contents
Advertisement
Quick Links
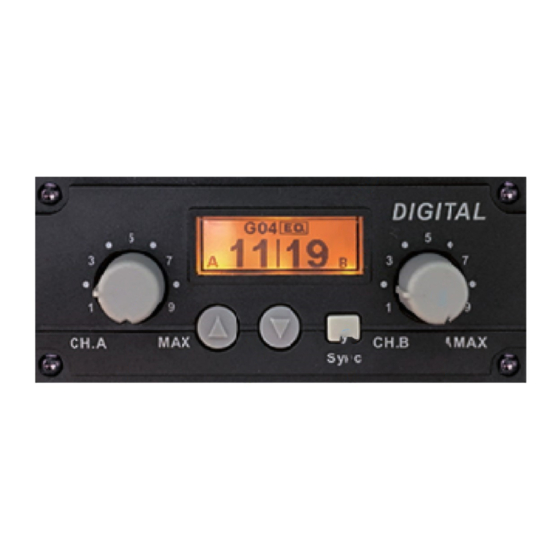
Wireless receiver DLR-9
Interface
Power and volume knob of channel A
(Up) / (Down) button
Sync button
Power and volume knob of channel A
Display, figure 1
a. Talk/Mute status of channel A
b. Battery status of channel A
c. Signal status of channel A
d. Channel number of channel A
e. Channel number of channel B
f. Signal status of channel B
g. Battery status of channel B
h. Talk/Mute status of channel B
i. Sound quality preset
Operation
1. Switch on the module with the knob of channel A first. Then, follow same operation to switch on
channel B, if necessary. Adjust volume of channel properly with same knob.
2. Previously selected channel number shows up. To change the channel, press and hold the button
for 1 second to until backlit screen turns to white and number of channel A flashes. Then, press
button or to select another preferred number of channel A. The newly selected channel will
automatically be confirmed after being idled for 2 seconds. Then, flashing indication will come to
channel B. Follow same operation to have preferred number of channel B.
3. To check specific frequency of channel A or B, simply short press button (A) or (B). The receiver
module will come back to home screen after being idled for 2 seconds.
4. Switch off the module counterclockwise with the knob of channel A.
Channel sync
1. Press button SYNC when the module is on.
2. shows up on channel A and the module starts to look for a clean channel A (appr. 10 seconds)
until number shows up. For the time being, turn 1
st
3. After 1
transmitter is paired, will then show up on channel B. Now, repeat step 2 and 3 to get
nd
2
transmitter paired.
4. When 2 transmitters finish the pairing, the module will return to home screen automatically.
Setting menu
1. Press and hold both buttons and power simultaneously to turn the receiver module on.
2. "Setting" mode will be entered successfully for custom adjustments.
b
c
st
transmitter on within 20 seconds for pairing.
Figure 1
a
i
h
g
f
d
e
Advertisement
Table of Contents

Related Manuals for Okayo DLR-9


Summary of Contents for Okayo DLR-9
- Page 1 Wireless receiver DLR-9 Figure 1 a i h g b c f d e Interface Power and volume knob of channel A (Up) / (Down) button Sync button Power and volume knob of channel A Display, figure 1 a. Talk/Mute status of channel A b. Battery status of channel A c. Signal status of channel A ...
- Page 2 Wireless receiver DLR-9 3. Press button or to scroll options. See setting menu below. Quality: This refers to sound quality of the receiver and channel quantity will vary upon different quality. HQ: Higher Q (default): Regular Squelch: This refers to signal quality of the receiver. The better the signal quality, the shorter the operation range. Hi: Operation range will be shorter. Lo (default): Operation range will be greater. Pair mode: Only Sync (default) is available. Exit 4. Press the button SYNC again to confirm the selection and leave the setting. 5. To leave the SETTING mode, find “EXIT” on the menu and press the button SYNC. Manufacturer’s Declaration This product meets the following standards: Federal Communications Commission Interference Statement ...
- Page 3 Wireless receiver DLR-9 Europe – EU Declaration of Conformity This device complies with Directive 2014/53/EU issued by the Commission of the European Community. WEEE Statement Electrical and electronic equipment must be disposed of at the end of their lifespan separately from household waste. Please dispose of this equipment at your local waste collection Or recycling center. Please help to protect our environment. Safety and Electromagnetic Emissions Certificates Standard Compliance RoHs compliant European Directive 2011/65/EU Certificates CE FCC ...
Need help?
Do you have a question about the DLR-9 and is the answer not in the manual?
Questions and answers