Table of Contents
Advertisement
Quick Links
Advertisement
Table of Contents

Related Manuals for De La Rosa Research 14012A

Summary of Contents for De La Rosa Research 14012A
- Page 1 DEPTH PERCEPTION APPARATUS USER´S GUIDE Model 14012A...
- Page 2 There you will find all related information for correct handling and usage of this product. We hope that you enjoy using this equipment as much as we did creating it. De la Rosa Research Team.
-
Page 3: Specification
Pag. Details Pag. Specification Pag. Applications Pag. Features Pag. Procedure... - Page 4 DETAILS The Depth Perception Apparatus tests depth perception acuity. Depth perception is the ability to see the world in three dimensions and to perceive distance (the ability to judge which of several objects is closer or farther away from you, or to judge the distance between you and an object).
-
Page 5: Specifications
SPECIFICATIONS Line Voltage: 110/220 V AC - 50/60 Hz. Current: 10 Amps. Heigh: 11” // Wide: 10” // Depth: 27” Weight: 11 kg Aprox. Accuracy: 1mm-0.5mm Supplied with User Guide. - Page 6 APPLICATIONS Good depth perception is critical among people engaged in certain occupations, trades, or professions is essential, e.g., airplane and helicopter pilots, crane operators, bus drivers, athletes etc. Since good depth perception is so important to these professions, testing devices that can determine the quality of an individual’s depth perception are essential for use in the employment selection process.
- Page 7 FEATURES Recyclable materials...
-
Page 8: Joy Stick Control
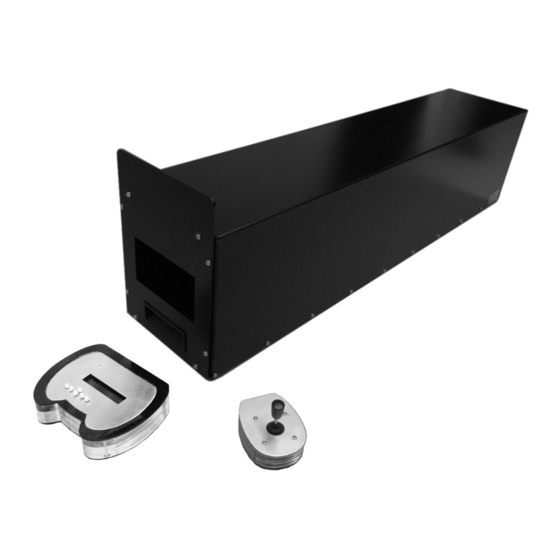
FEATURES BODY Aluminum - stainless steel, HDPE and acrylic body for sturdy usage. High resistance (and 100% recyclable) polymer base, easy to clean. JOY STICK CONTROL Digital joystick for controlling displacement. LED LIGHT High intensity calibrated white LED. HANDLE Ergonomic handle for easy carrying. -
Page 9: Lcd Control
FEATURES LCD CONTROL LCD and key pad control Easy to read LCD display POWER SUPPLY Allows RPM and time measurements. Available for 110 V and 220V 255 step motor control. countries. MATERIALS Built from high-quality components USB PORT manufactured in USA, Japan, USB port for serial communication (the software Germany, Italy, etc. - Page 10 PROCEDURE General recommendations Initial settings Operating...
- Page 11 PROCEDURE // GENERAL RECOMMENDATIONS WARNING Avoid using sharp objects Always ensure the proper with the product. power input. Before you plug in the equipment be sure that the electric supply of your country or region is the right one to operate the equipment.
- Page 12 PROCEDURE Place the LCD control away from the // GENERAL RECOMMENDATIONS Locate the test subject at a subject to prevent him/her to see the distance of 4 meters away information displayed. from the equipment window. Be sure the support points are in contact with the supporting surface.
- Page 13 PROCEDURE WHAT SHOULD // INITIAL SETTINGS BE INCLUDED IN THE PACKAGE? Depending on the geographical area, you will be given one of these AC cables (one per package). a. Depth Perception Apparatus body X1 // b. Joy Stick Control x 1 // c. LCD control x 1 // d. DIN 5 cable x 1 e.
- Page 14 PROCEDURE HOW TO ASSEMBLE IT? // INITIAL SETTINGS POWER VOLTAGE SELECTOR USB CABLE BEFORE start, select the proper Power Input Voltage. If don’t the equipment could suffer USE ONLY IF USING CONTROL SOFTWARE. serious damage and it will not work again. The smallest end B of the USB cable (f) should Choose between 110 or 220 by sliding right or be connected to this port.
-
Page 15: What Does It Mean
PROCEDURE WHAT DOES IT MEAN? // INITIAL SETTINGS S means STATUS and makes reference to the TEST STATUS. Makes reference to the trial number. System is ready to save a maximum of 10 trials. Each trial saves position and time. FAMILIARIZE T means TIME and make reference to WITH STATUS CODES... - Page 16 PROCEDURE SELECT THE KIND OF TEST. SELECT THE TRIAL MEMORY // OPERATING LOCATION Manual Test // Automatic Test Once the device has been plugged and Once test mode has been selected, you turned ON, follow these steps. should select the position to store the data of each test.
-
Page 17: Manual Mode
PROCEDURE MANUAL MODE // OPERATING Calibration. Selection moving rod position. This has to be done at the beginning of each test trial . If the rod is not at zero position (0) or if not aligned with the fixed rod indicator, the system will need a self-calibration to zero position (0). - Page 18 MANUAL MODE PROCEDURE // OPERATING Starting a test. Ending a test. Once the desire position has been selected, evaluator Once the desire position has been selected, evaluator Once evaluated subject has announce that shoul give the JoyStick control to the subject. shoul give the JoyStick control to the subject.
-
Page 19: Automatic Mode
AUTOMATIC MODE PROCEDURE // OPERATING Starting a test // Calibrating Starting a test If the rod is not at zero position (0) or if not aligned with the fixed rod indicator, the system will need a self-calibration to zero position (0). S:CAl Ts:A Tr:4... - Page 20 (+57 1) 6275686 the selected position. (+57) 3003642343 Cll 147 A # 48 - 08. Bogotá, Colombia 2550NW 72nd Ave. Suite 115. Miami, Fl. 33122. S:STP De la Rosa Research Team. Ts:a Tr:4 D:-80.5 T:5582 After this steps you will...
- Page 21 support@delarosaresearch.com (+57 1) 6275686 (+57) 3003642343 Cll 147 A # 48 - 08. Bogotá, Colombia 2550NW 72nd Ave. Suite 115. Miami, Fl. 33122.
Need help?
Do you have a question about the 14012A and is the answer not in the manual?
Questions and answers