Table of Contents
Advertisement
Quick Links
Advertisement
Table of Contents

Related Manuals for PEAKnx Controlpro PNX11-20001


Summary of Contents for PEAKnx Controlpro PNX11-20001
- Page 1 Controlpro User manual V 2.1.1...
- Page 2 The product names mentioned in this document may be brands or registered trademarks of their respective owners. These are not explicitly labeled with “™” or “®”. © PEAKnx GmbH Otto-Röhm-Strasse 69 64293 Darmstadt Germany www.peaknx.com...
-
Page 3: Warning Symbols And Signal Words Used In This Manual
Warning symbols and signal words used in this manual Warning symbols and signal words used in this manual Warning Obey warning to avoid death or serious injury Caution Obey instructions to avoid personal injury or damage to property Note Instructions and facts to be followed Additional, useful hints Important safety instructions, please read before installation! Warning... -
Page 4: Table Of Contents
1 Target audience 2 Intended use 3 Product description 3.1 Software 3.1.1 Operating system 3.1.2 Operation with the PEAKnx Software YOUVI 3.1.3 Operation with third-party software 3.2 Variant overview 3.3 Components 3.4 Touch panel, front view 3.5 Touch panel, rear view 3.6 Touch panel, top view... - Page 5 Table of Contents 9.1.1 Turning the panel off and back on 9.1.2 Disconnecting the panel from the power supply 9.2 Windows has unrecoverable problems 9.3 Technical support 10 Technical data Subject to change without notice Conformity Disposal notes Declaration of conformity...
-
Page 6: Target Audience
▪ − A list of all compatible door stations can be found in our FAQ: www.peaknx.com/FAQ under the topic “compatibility”. Indoor operation, note the ambient conditions, see chapter 10 ▪ The following applications are not part of the intended use: Operation in systems requiring special monitoring, in safety-relevant areas or in hazardous ▪... -
Page 7: Product Description
Other programs for the visualization of building information and for building control can be installed later. PEAKnx provides no service and no warranty for software products from other companies as well as in case of OS driver updates. -
Page 8: Operation With Third-Party Software
FAQs: www.peaknx.com/en/FAQ, topic “compatibility”. Note: PEAKnx does not guarantee the function of third-party software on the panel. Further instructions for setting up the panel can be found in the download area: www.peaknx.com/downloads#controlpro 3.2 Variant overview... -
Page 9: Components
3 Product description 3.3 Components Position Description Dimensions (H x W x D) Flush-mounted box 312 x 528 x 65 mm Panel with touchscreen 320 x 535 x 50 mm Glass cover 330 x 560 x 1.8 mm... -
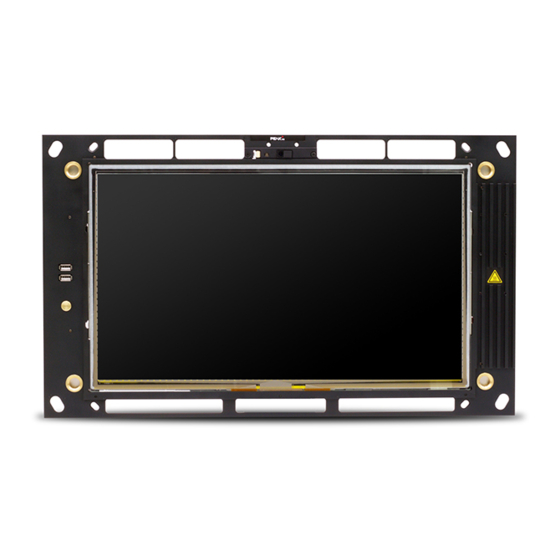
Page 10: Touch Panel, Front View
3 Product description 3.4 Touch panel, front view Position Description 4 x screw holes for fixing the panel 4 x intake for glass cover Microphone Camera Ventilation openings Touchscreen 2 x USB 2.0, status LED Cooling element On/Off button... -
Page 11: Touch Panel, Rear View
3 Product description 3.5 Touch panel, rear view Position Description Power supply 15 - 20 V DC Power supply GND KNX terminals (KNX WAGO 243 211, conductor diameter: 0.6 - 0.8 mm) 3.6 Touch panel, top view... -
Page 12: Product Features
A terminal of the following specification is used for the KNX connection: KNX WAGO 243 211, conductor diameter: 0.6 - 0.8 mm. Note: The de vice cannot be used as a line coupler for KNX lines! Note: The KNX fieldbus can only be used with PEAKnx software. -
Page 13: Ethernet Port
3 Product description 3.8.2 Ethernet port Note: Make sure to install the correct cabling standard to fully use the 1 GB LAN (at least Cat 3.8.3 Power supply The plug-in terminal for the voltage supply has a usable wire cross-section of 0.75 to 1.31 mm². Note: The supply voltage of the device may only lie within the specified range of 15 to 20 V DC! Higher voltages (also 24 V DC) will damage the device. -
Page 14: Scope Of Delivery
4 Scope of delivery Caution Avoid damage to front glass and display! Do not use the touch screen with sharp or pointed objects. ▪ 4 Scope of delivery Controlpro panel incl. YOUVI software package Basic (on USB flash drive) ▪ Controlpro user manual (this document) ▪... -
Page 15: Important Safety And Handling Information
5 Important safety and handling information 5 Important safety and handling information Warning The Controlpro may only be installed and commissioned by qualified electricians! Warning Observe the national regulations applicable in your country regarding installation, func- tional testing, repair and maintenance of electrical products! Observe the „Five Safety Rules“... -
Page 16: Installation And Start-Up
A slightly lower screen prevents fatigue of the arms during operation. Tip: If you have ordered a PEAKnx flush-mounted box for the panel you can use the sup- plied template to mark the recess. 6.2.1 Installing the flush mounted box in brickwork Mark a 312 x 528 mm recess on the wall, but leave bevels in the corners. -
Page 17: Installing The Flush Mounted Box In A Cavity Wall
6 Installation and start-up Insert the flush-mounted box and lead the Ethernet, KNX and power ▪ supply cables through the holes in the flush-mounted box. Screw the flush-mounted box to the wall. ▪ Tip: During the filling of the edges, the template can be used as a splash guard. 6.2.2 Installing the flush mounted box in a cavity wall Mark a recess of 312 x 528 mm on the wall. -
Page 18: Prepare The Voltage Source For The Din Rail
6 Installation and start-up 6.3.1 Prepare the voltage source for the DIN rail Use a power source of the following specification: ▪ − 15 - 20 V DC for the control cabinet, Item number: PNX11-20007 − Max. current: during operation: 4 A, during the PC boot process: 4.5 A (at 15 V) Disconnect the pluggable screw terminal (C1;2) from the Controlpro. -
Page 19: Connecting And Fastening The Panel
6 Installation and start-up Now connect the 15-20 V side. Disconnect the pluggable screw terminal (C1,2) ▪ from the Controlpro. Connect it to the cable wires of the power supply ▪ unit. Pay attention to the correct polarity, as ▪ indicated on the power supply unit: red (+) and black (-). -
Page 20: Initial Commissioning And Operation
▪ Tip: After commissioning and setting up the panel, we recommend that you create a back- up using the optionally available recovery USB flash drive from PEAKnx. Further instructions can be found in the corresponding Quick Start Guide. Caution Avoid damage to the panel! The touch-sensitive surface can easily be damaged! Use only your fingers or a touch- ▪... -
Page 21: Activate Keyboard Input
8 Maintenance Tap the Windows logo on the Windows Start screen and select the On/Off icon and select the ▪ option “Shut down”. The operating system will shut down and switch off the computer. Note: In normal operating conditions, it is not necessary to switch off the Controlpro. 7.2 Activate keyboard input To automatically display the keyboard when tapping on a text input field, do the following: Swipe into the screen from the right and select “All settings”. -
Page 22: Troubleshooting
9 Troubleshooting Removing the glass cover Use both hands to take the glass cover on both sides. ▪ Carefully pull the glass cover away from the panel towards yourself. ▪ Switching on the cleaning mode If you are using the supplied YOUVI visualization, switch on the cleaning mode for cleaning. Therefore, proceed as follows: In the YOUVI visualization, switch to the settings. -
Page 23: Disconnecting The Panel From The Power Supply
If the Windows user interface shows unrecoverable problems, the operating system can be re- set to factory settings. If you have created an image with the PEAKnx Recovery USB flash drive after commissioning, you will find further instructions for restoring the image in the quick start guide of the recovery USB flash drive. - Page 24 10 Technical data Computer system Processor Intel Dual-Core or Intel Quad-Core fanless cooling by convection Memory (RAM) 4, 8 or 16 GB Hard drive SSD with 250 or 500 GB Operating system Windows 10 IoT Enterprise 2019 LTSC Display Type TFT color screen Backlighting Color resolution...
- Page 25 10 Technical data Weight Computer with panel with- 4540 g out glass cover Glass cover 860 g Ports 2 x USB 2.0 (Front) 4 x USB 3.0 Ethernet Gigabit Ethernet External screen HDMI out, VGA out Fieldbus 2 x KNX Audio 1 x Line out, phone jack, 3.5 mm 1 x Mic In, phone jack, 3.5 mm...
-
Page 26: Subject To Change Without Notice
Subject to change without notice Subject to change without notice Content changes in this documentation, which serve the technical progress, are made without prior notice. This documentation has been prepared with great care and will be revised at regular intervals. Nevertheless, we cannot guarantee complete accuracy. All known errors are eliminated in new editions. -
Page 27: Declaration Of Conformity
Declaration of conformity... - Page 28 www.peaknx.com...
Need help?
Do you have a question about the Controlpro PNX11-20001 and is the answer not in the manual?
Questions and answers