Table of Contents
Advertisement
HORIZON Seafari Contained
Single Membrane (-1)
• HRO Seafari SFC-450-1
• HRO Seafari SFC-700-1
• HRO Seafari SFC-900-1
Double Membrane (-2)
• HRO Seafari SFC-900-2
• HRO Seafari SFC-1400-2
• HRO Seafari SFC-1800-2
Tel: 1-310-631-6300 • Fax: 1-310-631-6395
Initial Copy: March 1,2001 • Rev: Nov 1, 2001 • Mar 1, 2002 • May 1, 2002
HRO Systems, HRO, and the Horizon Seafari logos are trademarks of HRO Systems and are the sole property of HRO Systems.
Installation, Operation, Maintenance, & Repair
P.O. Box 5463, Carson, California 90745-5463, U.S.A.
•
Email: sales@hrosystems.com • Web: www.hrosystems.com
Copyright 2001 HRO Systems
All Rights Reserved 2007.
Seafari
450 -1800
Owner's Manual
HORIZON Seafari Modular
Single Membrane (-1)
• HRO Seafari SFM-450-1
• HRO Seafari SFM-700-1
• HRO Seafari SFM-900-1
Double Membrane (-2)
• HRO Seafari SFM-900-2
• HRO Seafari SFM-1400-2
• HRO Seafari SFM-1800-2
Advertisement
Table of Contents

Related Manuals for Horizon Reverse Osmosis HRO Seafari SFC-450-1


Summary of Contents for Horizon Reverse Osmosis HRO Seafari SFC-450-1
- Page 1 Installation, Operation, Maintenance, & Repair HORIZON Seafari Contained HORIZON Seafari Modular Single Membrane (-1) Single Membrane (-1) • HRO Seafari SFC-450-1 • HRO Seafari SFM-450-1 • HRO Seafari SFC-700-1 • HRO Seafari SFM-700-1 • HRO Seafari SFC-900-1 • HRO Seafari SFM-900-1...
- Page 2 HROSystems Horizon Seafari Self Contained and Modular Style INTRODUCTION Thank you for purchasing an HRO Systems Reverse Osmosis Desalination System. Please read this manual carefully before attempting installation or operation. A better understanding of the system ensures optimum performance and longer service life from the system. All HRO reverse osmosis desalination systems are designed and engineered to function as a complete working unit.
- Page 3 HROSystems Horizon Seafari Self Contained and Modular Style HRO Systems ™ SYSTEM IDENTIFICATION INFORMATION INSTRUCTIONS: Please complete the following information at the time of purchase of the Horizon Seafari R.O. Desalinator. This information will be requested to provide better service by the HRO Systems Service Department whenever contacting HRO Systems for technical assistance or by the HRO Systems Marketing Department whenever ordering parts.
-
Page 4: Warranty Registration Information
HROSystems Horizon Seafari Self Contained and Modular Style HRO Systems ™ WARRANTY REGISTRATION INFORMATION INSTRUCTIONS: At the time of purchase of the Horizon Seafari R.O. Desalinator, please complete the warranty information listed below. After completing this form please mail it, in the provided envelope, to HRO Systems. - Page 5 HROSystems Horizon Seafari Self Contained and Modular Style Fill Out the front side of this page and Mail it to: HRO Systems ™ P.O. BOX 5463 CARSON, CALIFORNIA 90745-5463 U.S.A. Attn: Warranty Registration or visit our World Wide Web Site at http://www.hrosystems.com and e-mail the Warranty Registration Information to us at hrosystems @ hrosystems.com...
-
Page 6: Quick Reference Index
HROSystems Horizon Seafari Self Contained and Modular Style TABLE OF CONTENTS SECTION DESCRIPTION INTRODUCTION SPECIFICATIONS INTRODUCTION TO THE REVERSE OSMOSIS PROCESS SYSTEM SCHEMATIC & COMPONENT DESCRIPTIONS INCLUDING ILLUSTRATED P&IDs (Piping and Interconnect Diagrams) SYSTEM INSTALLATION ON SITE STORAGE & PREPARATION INSTALLATION PROCEDURES COMMISSIONING / INITIAL START UP INITIAL START UP... - Page 7 HROSystems Horizon Seafari Self Contained and Modular Style NOTES:...
-
Page 8: Warranty
SECTION “A” WARRANTY... -
Page 9: Limited Warranty
HRO Systems Horizon Seafari “Section A” Warranty LIMITED WARRANTY HRO Systems warrants that the Horizon Seafari Desalination System performs according to the specifications for a period of twelve (12) months and specifically listed components are warranted for up to 5 years from the date of shipment. HRO Systems, under no circumstances, is liable for damages arising out of or in any way connected with the failure of the system to perform as set forth herein. - Page 10 HRO Systems Horizon Seafari Self Contained and Modular Style NOTES: Page A - 2...
-
Page 11: Specifications
SECTION “B” SPECIFICATIONS... - Page 12 HROSystems Horizon Seafari Specifications SPECIFICATIONS Single Membrane (-1) Single Membrane (-1) • • HRO Seafari SFC-450-1 HRO Seafari SFM-450-1 • • HRO Seafari SFC-700-1 HRO Seafari SFM-700-1 • • HRO Seafari SFC-900-1 HRO Seafari SFM-900-1 Double Membrane (-2) Double Membrane (-2) •...
- Page 13 HROSystems Horizon Seafari Self Contained and Modular Style SPECIFICATIONS: SALINITY MONITORING: Automatic computer controlled electronic monitoring. Temperature compensated with the Water Quality Indicator. The salinity monitoring components of the system give a continuous readout in micromhos per cubic centimeter, are temperature compensated and of a fail-safe design. SALINITY RANGE OF FEED WATER: Seawater up to 50,000 ppm TDS (NaCl) (typical seawater salinity is 35,000 ppm) TEMPERATURE RANGE: Max.
-
Page 14: Dimensions And Weight
HROSystems Horizon Seafari Specifications DIMENSIONS & WEIGHT: MODEL WEIGHT MODEL WEIGHT HRO SFC 450-1 147 lbs / 67 kg HRO SFM 450-1 113 lbs / 51 kg HRO SFC 900-2 159 lbs / 72 kg HRO SFM 900-2 125 lbs / 57 kg HRO SFC 700-1 150 lbs / 68 kg HRO SFM 700-1... -
Page 15: Electrical Motor Specifications
HROSystems Horizon Seafari Self Contained and Modular Style ELECTRICAL MOTOR SPECIFICATIONS: (H.P. = Horse Power; FLA = Full Load Amperes; LRA = Locked Rotor Amperes @ Start Up) HIGH PRESSURE PUMP MOTOR: 450-1 & 900-2 SYSTEMS 50 Hz H.P. 60 Hz H.P. - Page 16 HROSystems Horizon Seafari Specifications HIGH PRESSURE PUMP ELECTRICAL MOTOR SPECIFICATIONS WITH SOFT MOTOR STARTER (SINGLE PHASE ONLY): (H.P. = Horse Power; FLA = Full Load Amperes; LRA = Locked Rotor Amperes @ Start Up) 450-1 & 900-2 SYSTEMS 50 Hz H.P.
- Page 17 HROSystems Horizon Seafari Self Contained and Modular Style NOTES: Page B - 6...
- Page 18 SECTION “C” INTRODUCTIONS...
- Page 19 HROSystems Horizon Seafari “Section C” Introduction C. INTRODUCTION "Horizon Seafari" Series 450-1800 U.S. GPD Brine The Obstacle: Reverse Osmosis Desalination System Illustrated with All Options scharge Osmosis is the naturally occurring diffusion of two miscible (mixable) Control M anifold solutions through a semipermeable R.O.
- Page 20 HROSystems Horizon Seafari Self Contained and Modular Style 1. ANATOMY OF A REVERSE OSMOSIS MEMBRANE ELEMENT: Page C - 2...
- Page 21 HROSystems Horizon Seafari “Section C” Introduction 2. PRINCIPLES OF REVERSE OSMOSIS: E. BOUNDARY LAYER CONCENTRATION POLARIZATION: When water permeates through the membrane, nearly all the salt is left A. OSMOSIS: Osmosis can be defined as the behind in the brine channel. In any dynamic spontaneous passage of a liquid from a dilute to a hydraulic system the fluid adjacent to the wall of more concentrated solution across an ideal semi-...
- Page 22 HROSystems Horizon Seafari Self Contained and Modular Style NOTES: Page C - 4...
-
Page 23: Component Identifications
SECTION “D” SYSTEM SCHEMATIC WITH COMPONENT IDENTIFICATIONS & COMPONENT DESCRIPTIONS... -
Page 24: Component Descriptions
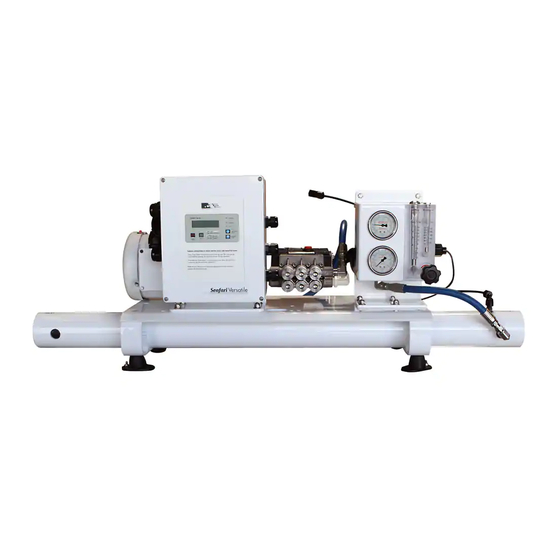
HROSystems Horizon Seafari “Section D” System Schematic with Component Identification & Descriptions COMPONENT DESCRIPTIONS water into the Booster Pump from either the raw water feed line or the Rinse/Clean Tank. All components supplied by HRO, both standard and 5. Booster Pump supplies a positive pressure to the Pre- optional, are described below along with items required filters, and through to the High Pressure Pump. - Page 25 HROSystems Horizon Seafari Self Contained and Modular Style "Horizon Seafari"Series 450-1800 U.S. GPD [36] Osmosis Desalination System The "Cube"Contains: [35] [32] High Press. Switch [19] [34] Brine Flowmeter [29] [41] Salinity Probe [42] Product Flowmeter r [31] [33] [43] Diversion Valve [28] [27] [26]...
-
Page 26: Pressurization Subsystem
HROSystems Horizon Seafari “Section D” System Schematic with Component Identification & Descriptions 14. Commercial Pre-Filter***provides extended B. PRESSURIZATION SUBSYSTEM: periods between filter element changes. The Proper pressure and proper flow across the HROSystems Commercial Pre-filter contains a filter element Membrane Element are two basic requirements of with 50 square feet of filtering area. - Page 27 HROSystems Horizon Seafari Self Contained and Modular Style C. BRINE DISCHARGE SUBSYSTEM: the normally open position. The normally open position diverts the un-potable Product Water to discharge. This section of the System carries the Brine Discharge expelled from the R.O. Membrane Element back to the 44.
-
Page 28: Electronic Subsystem
HROSystems Horizon Seafari “Section D” System Schematic with Component Identification & Descriptions 54. Fresh Water Flush Check Valve Assembly*** This check valve assembly isolates the Fresh Water Flush system, preventing seawater from flowing in the reverse direction through the Charcoal Filter. F. - Page 29 HROSystems Horizon Seafari Self Contained and Modular Style TOUCH PAD CONTROL DESCRIPTIONS: 1. SWITCHES The Touch Pad contains all of the system control switches. The system switches are identified and described below. START: This switch initiates the start cycle. The Booster Pump [5] starts first and after a short delay, the High Pressure Pump Motor [25] starts.
-
Page 30: Optional Equipment
HROSystems Horizon Seafari “Section D” System Schematic with Component Identification & Descriptions 2. INDICATOR LAMPS Above and to the left of the switches on the Touch Pad are the indicator lamps. These lamps either indicate the operation of the corresponding equipment or a fault condition. The following are descriptions of the indicator lamps. - Page 31 HROSystems Horizon Seafari Self Contained and Modular Style NOTES: Page D - 8...
-
Page 32: System Installation Procedure
SECTION “E” SYSTEM INSTALLATION PROCEDURE... -
Page 33: Storage Prior To Uncrating
HROSystems Horizon Seafari “Section E” Installation 2. Brine Thru Hull Fitting [36] E. INSTALLATION OF HORIZON SEAFARI SYSTEMS - A minimum ½” size with a ½” MNPT connection. ON SITE STORAGE & PREPARATION FOR INSTALLATION: - Must be located above water level. A. -
Page 34: Tools Required For Installation
HROSystems Horizon Seafari Self Contained and Modular Style 4. ACCESS FOR MAINTENANCE D. TOOLS REQUIRED FOR INSTALLATION: • Give careful consideration to access to items for 1. Of course, not all installations are typical. For this maintenance purposes. reason, it is recommended to have a full set of mechanic’s electrician’s tools available. - Page 35 HROSystems Horizon Seafari “Section E” Installation SELF-CONTAINED SYSTEMS PACKAGED COMPONENTS Keep the product water tubing as straight and short (NO OPTIONS SHOWN) as possible. Do Not Install Any Valves in this line. Blockage INSTALLATION of the Product Water Line causes extensive damage to the System and the R.O.
- Page 36 HROSystems Horizon Seafari Self Contained and Modular Style "Horizon Seafari" Series 450-1800 U.S. GPD [36] Reverse Osmosis Desalination System The "Cube"Contains: [35] [32] High Press. Switch [19] [34] Brine Flowmeter [29] [41] Salinity Probe [42] Product Flowmeter [31] [33] [43] Diversion Valve [28] [27] [26]...
- Page 37 HROSystems Horizon Seafari “Section E” Installation FAST-N-TITE TUBING CONNECTIONS: CROSS SECTION OF FAST-N-TITE TUBE FITTING TUBE FITTING ASSEMBLY AND DISASSEMBLY INSTRUCTIONS STEP 1 STEP 2 STEP 3 STEP 4 ASSEMBLY: Step 1 Cut tube end square and clean Step 2 Loosen nut on fitting three turns.
- Page 40 HROSystems Horizon Seafari Self Contained and Modular Style Component Dimensions Standard Pre-filters (Leave 4” Below for Element Removal) Booster Pump High Pressure Pump Page E - 8...
- Page 41 HROSystems Horizon Seafari “Section E” Installation Charcoal Filter Sea Strainer (Add 4” Below for Element Removal) (Add 4” Below for Screen Removal) Fresh Water Flush (Add 4” Below for Element Removal) Page E - 9...
- Page 42 HROSystems Horizon Seafari Self Contained and Modular Style Plankton Filter Multi-Media Filter (Add 4” Below for Element Removal) (15” Deep) Clean & Rinse Panel Commercial Prefilter – Oil/Water Separator (Add 12” Below for Tubing & Hose) (Add 12” above for filter removal) Page E - 10...
- Page 43 HROSystems Horizon Seafari “Section E” Installation I. COMPONENT INSTALLATION: 1. Inlet Thru Hull Fitting [1] with Inlet Sea Cock Valve [2] INSTALLATION CAUTIONS: The Sea Cock Valve [2] must be fitted with 3/4" MNPT (Male National Pipe Taper, i.e. American Do not over tighten PVC fittings.
- Page 44 HROSystems Horizon Seafari Self Contained and Modular Style It must be of a forward facing scoop type. The Sea 4. Clean/Rinse Panel (optional) with Inlet Cock Valve, ¼” turn ball valve, normally attached to Clean/Rinse Valve [4], Outlet Clean/Rinse Valve the Thru Hull Fitting must be accessible for daily [35], and Garden Hose Valve for Pressurized Fresh and emergency closure.
- Page 45 HROSystems Horizon Seafari “Section E” Installation (common) port to the Inlet of the Booster Pump 7. Fresh Water Flush Assembly [5]. [53 & 54]*** 6. Booster Pump [5] From Pressurized Fresh Water System The Booster Pump is a centrifugal pump and it is not self-priming.
- Page 46 HROSystems Horizon Seafari Self Contained and Modular Style 9. Multi Media Filter [7] (optional) is supplied pre- 10. Standard Pre-filter [12]: mounted to its own base. Mount the Multi Media Filter base onto a flat horizontal surface and secure Must be mounted against a flat vertical surface the base in place using the supplied mounting using the supplied hardware.
- Page 47 HROSystems Horizon Seafari “Section E” Installation Connect the Booster Pump Outlet (or Plankton 12. Oil/Water Separator [17] follows the Filter Outlet if used or Multi Media Filter Outlet Commercial Pre-filter. Outlet Pressure if used) to the Pre-filter Inlet. Pick-Up Plumb to Pigtail on If the Oil/Water Separator is not used then rear of control connect the Standard Pre-filters Outlet to the...
- Page 48 HROSystems Horizon Seafari Self Contained and Modular Style Keep the system within close proximity to the Ensure easy access to pump crankcase oil changes Pre-filtration Components and High Pressure and motor bearing grease fittings. Pump to ensure minimal line loss. Use the supplied Rubber Isolation Mounts and 14.
- Page 49 HROSystems Horizon Seafari “Section E” Installation 20. U.V. Sterilizer [45]: (optional) is the last Product 23. Clean/Rinse Outlet Valve [35] This optional valve is Water component prior to the Product Water Storage used with the Inlet Clean/Rinse Valve #4 to assist in Tank.
- Page 50 HROSystems Horizon Seafari Self Contained and Modular Style Remote: Often, the Remote Control Touch Pad is mounted in a recessed hole. After measuring the Remote Control Panel, routing out the indent and cutting the Cable hole, place the Touch Pad into the indent and check for sizing. Clean up the indent as required for a good fit.
-
Page 51: System Commissioning
SECTION “F” SYSTEM COMMISSIONING & INITIAL START UP OF A NEW HORIZON SEAFARI SYSTEM WITH INITIAL NEW SYSTEM READINGS FORM... - Page 52 HROSystems Horizon Seafari “Section F” System Commissioning & Initial Startup procedures, refer to Section "G" "Start-Up Procedure" of F. SYSTEM COMMISSIONING this manual. INITIAL START-UP PROCEDURE OF A NEW Failure to follow these instructions exactly leads to HRO Systems Horizon Seafari. system failure, and causes damage to the components.
- Page 53 HROSystems Horizon Seafari Self Contained and Modular Style "Horizon Seafari" S eries 450-1800 U.S. GPD [36] Reverse Osmosis Desalination System The "Cube"Contains: [35] [32] High Press. Switch [19] [34] Brine Flowmeter [29] [41] Salinity Probe [42] Product Flowmeter [31] [33] [43] Diversion Valve [28] [27]...
- Page 56 HROSystems Horizon Seafari “Section F” System Commissioning & Initial Startup 1. Ensure that all Tube Plugs and shipping caps have been 11. Close the air bleed valve located on top of the removed prior to commissioning. Failure to remove Oil/Water Separator [17], if installed. Open the these caps could cause damage to the system.
- Page 57 HROSystems Horizon Seafari Self Contained and Modular Style 15. Open the Back Pressure Regulator Valve [33] FULL HIGH PRESSURE PUMP & MOTOR: OPEN by turning counter clockwise. CAUTION: The Back Pressure Regulator Valve [33] must be full open when starting the Horizon Seafari System.
- Page 58 HROSystems Horizon Seafari “Section F” System Commissioning & Initial Startup 19. To start the system press the “Start” Switch, or HIGH/LOW PRESSURE FAULT LAMP press the “Booster Pump” Switch and then the EXPLANATION: “Start” switch. a. Low Pressure Fault: The System is equipped If the system automatically shuts off after several with a Low Pressure Switch.
- Page 59 HROSystems Horizon Seafari Self Contained and Modular Style The person commissioning the New Horizon Seafari system should, at this time, fill out the two INITIAL SYSTEM READINGS forms located on Pages F – 9 and F –11. Retain in this Manual the form on page F – 9 for the owner and future operator’s reference.
-
Page 60: Water Quality
HROSystems Horizon Seafari “Section F” System Commissioning & Initial Startup HROSystems Horizon Seafari NEW SYSTEM INITIAL READINGS ™ KEEP THIS COPY IN THE OWNER’S MANUAL. Record the following information at the time of system shutdown. Maintain a log of the completed forms with the Systems Owner’s Manual for future reference and troubleshooting. - Page 61 HROSystems Horizon Seafari Self Contained and Modular Style NOTES: Page F - 10...
- Page 62 HROSystems Horizon Seafari “Section F” System Commissioning & Initial Startup HROSystems Horizon Seafari NEW SYSTEM INITIAL READINGS ™ THIS COPY IS FOR THE INSTALLER, DEALER, OR COMMISSIONER. Record the following information at the time of system shutdown. Maintain a log of the completed forms with the Systems Owner’s Manual for future reference and troubleshooting.
- Page 63 HROSystems Horizon Seafari Self Contained and Modular Style NOTES: Page F - 12...
-
Page 64: System Start Up Procedure
SECTION “G” SYSTEM START UP PROCEDURE... -
Page 65: Startup Procedure
HROSystems Horizon Seafari “Section G” System Start Up Procedure If the System automatically shuts off after several G. STARTUP PROCEDURE seconds of operation, look at the Touch Pad to determine whether a fault has occurred. If so, correct Main Power fault and repeat Step 11. - Page 66 HROSystems Horizon Seafari Self Contained and Modular Style HIGH/LOW PRESSURE FAULT LAMP SOFT START OPERATION: EXPLANATION: The Horizon Seafari system may have a Soft Start installed. This Soft Start reduces the current (amps) a. Low Pressure Fault: The System is equipped with a required at startup for single-phase systems.
- Page 67 HROSystems Horizon Seafari “Section G” System Start Up Procedure "Horizon Seafari" Series 450-1800 U.S. GPD Reverse Osmosis Desalination System Illustrated with All Options Shown during first 5 minutesof operation without pressureapplied. The System Illustrated in the 3 separate stages of Start Up Operation. The System is shown with Rinse/Clean Valves and Plankton Filter Optional Equipment.
- Page 68 HROSystems Horizon Seafari Self Contained and Modular Style "Horizon Seafari" Series 450-1800 U.S. GPD Reverse Osmosis Desalination System Illustrated with All Options Shown during first 5 minutesof operation without pressureapplied. The System Illustrated in the 3 separate stages of Start Up Operation. The System is shown with All Optional Equipment except the Plankton Filter.
- Page 69 HROSystems Horizon Seafari “Section G” System Start Up Procedure Page G - 5...
-
Page 70: Shutdown Procedure
SECTION “H” SHUTDOWN PROCEDURE... -
Page 71: Shutdown Procedures
HROSystems Horizon Seafari “Section H” Shutdown Procedure SHUTDOWN SEQUENCE H. SHUTDOWN PROCEDURES: 1. Open the Back Pressure Regulator Valve [33] SHUTDOWN CAUTIONS fully. Prior to system shutdown, it is strongly recommended 2. Momentarily depress the “Stop” switch on the that the operator observe and compare the performance System’s front panel Touch Pad. - Page 72 HROSystems Horizon Seafari Self Contained and Modular Style HROSystems Horizon Seafari DAILY OPERATIONAL LOG RECORD ™ KEEP THIS COPY IN THE OWNER’S MANUAL UNTOUCHED AS A MASTER FOR ADDITIONAL COPIES Record the following information at the time of system shutdown. Maintain a log of the completed forms with the Systems Owner’s Manual for future reference and troubleshooting.
- Page 73 HROSystems Horizon Seafari “Section H” Shutdown Procedure HROSystems Horizon Seafari DAILY OPERATIONAL LOG RECORD ™ KEEP THIS COPY IN THE OWNER’S MANUAL UNTOUCHED AS A MASTER FOR ADDITIONAL COPIES Record the following information at the time of system shutdown. Maintain a log of the completed forms with the Systems Owner’s Manual for future reference and troubleshooting.
- Page 74 SECTION “I” SYSTEM TROUBLESHOOTING GUIDE...
- Page 75 HROSystems Horizon Seafari “Section I” System Troubleshooting Guide I. SYSTEM TROUBLESHOOTING GUIDE Some system problems have possible causes located in more than one subsystem, and are categorized here according to the subsystem in which they are indicated or most likely to be located. Where two or more possible causes are listed for a problem, it is advised that they be checked in the order listed.
- Page 76 HROSystems Horizon Seafari Self Contained and Modular Style HIGH PRESSURE CAUSES: This may be due to pressurizing the System above 950 psi. The High/Low Pressure Fault Lamp illuminates immediately when the High Pressure Switch is OPEN and the system shuts off immediately. Follow the Brine Discharge Line and ensure that there is no kink or blockage in this line.
- Page 77 HROSystems Horizon Seafari “Section I” System Troubleshooting Guide D. HIGH PRESSURE GAUGE READING: Use caution in diagnosing the reading of the High Pressure Gauge. If the gauge is reading low it may simply be that the Back Pressure Regulator requires adjustment. However, there may be a problem with the High Pressure Pump or the High Pressure Pump Electric Motor, Back Pressure Regulator Valve, the High Pressure Gauge, or the R.O.
- Page 78 HROSystems Horizon Seafari Self Contained and Modular Style E. FLOW METER READINGS: In diagnosing flow meter readings always correlate the reading with both the Brine Discharge Flow Meter reading and the Product Water Flow Meter reading. Consider the Pressure Gauge readings as well. Prior to diagnosing flow meter readings, always check first to ensure that the pressure gauge readings are normal.
- Page 79 HROSystems Horizon Seafari “Section I” System Troubleshooting Guide If the operating pressure of 850 psi produces a Product Flow Meter reading below normal this indicates one or more of the following causes: The system Feed Water is at a low temperature; The salinity of the Feed Water is greater than 35,000 ppm (typical Sea Water);...
- Page 80 HROSystems Horizon Seafari Self Contained and Modular Style F. PRODUCT WATER QUANTITY AND QUALITY: The R.O. Membrane Element requires a specified amount of Feed Water flow in order to reject impurities. Less than required Feed Water flow causes the R.O. Membrane Element to recover a high percentage of Product Water (ratio of Feed Water to Product Water) and causes the R.O.
-
Page 81: High Pressure Pump
HROSystems Horizon Seafari “Section I” System Troubleshooting Guide G. HIGH PRESSURE PUMP: The high-pressure pump is a positive displacement triplex plunger pump. The pump always delivers the normal amount of water flow unless a problem develops within the pump, the pump is being subjected to an extreme vacuum at its inlet, or the RPM from the Electric Motor has changed due to low or high Cycles from the Power Source. -
Page 82: Pressure Switches
HROSystems Horizon Seafari Self Contained and Modular Style Replace the High and Low Pressure Seals and associated O-Rings together as a set. Change these seals every 2,000 - 4,000 hrs depending upon age and operating conditions. H. PRESSURE SWITCHES: High Pressure Switch The High Pressure Switch shuts the System down as the System Pressure into the Back Pressure Regulator reaches 950 psi ±... - Page 83 HROSystems Horizon Seafari “Section I” System Troubleshooting Guide I. POST FILTRATION SUBSYSTEM: Product water leaks from Product Water Tubing when 3 Way Product Diversion Valve energizes to direct water to Post Filtration: There is a blockage in the product water line from the system. Locate the blockage and correct it so that the Product Water Line is free and clear from the system to the product water storage tank.
- Page 84 HROSystems Horizon Seafari Self Contained and Modular Style J. ELECTRONIC SUBSYSTEM:& TROUBLESHOOTING GUIDE HRO Control Touchpad. Water Quality Indicator remains Red (Un-potable Water) for Extended Period. The R.O. Membrane Element is fouled or has been attacked by chemicals. The R.O. Membrane Element has a broken product water tube caused by a restriction in the Product Water Line.
- Page 85 HROSystems Horizon Seafari “Section I” System Troubleshooting Guide 4. If the voltage measured in the step 3 matches the system voltage, then problems may be in the motor wiring or the motor itself. 5. If low or no voltage present in the step 3 above, then check for proper operation of the Booster Pump Contactor.
- Page 86 HROSystems Horizon Seafari Self Contained and Modular Style If the valve is silent, measure the continuity of its solenoid coil as shown below. Measure the DC resistance between pins 1 & 2. It is approx. 12 to 15 Ω. If the resistance value is abnormal (shorted or open), then replace the Valve. If resistance value is OK, then measure the DC voltage at the connector, pins between 1 &...
- Page 87 HROSystems Horizon Seafari “Section I” System Troubleshooting Guide Adjust “FRESH WATER FLUSH DURATION” control (shown below) to obtain a desired length of operation. Full counter clockwise position is approximately 6 minutes and full clockwise position gives approximately 14 minutes. To time the duration, repeat the step 2 above. This completes the adjustment.
- Page 88 HROSystems Horizon Seafari Self Contained and Modular Style Salinity Meter registers potable water, but the product water has a definite salt taste. There is a blockage in the Brine Discharge Line causing Brine Discharge Water intrusion into the 3-way Product Water Diversion Valve. The 3-way Product Water Diversion Valve Seats have been tampered with and require proper adjustment.
- Page 89 HROSystems Horizon Seafari “Section I” System Troubleshooting Guide “Start” switch is depressed but the system does not attempt to start: Fault LED lamp is illuminated and requires resetting by pressing Fault Reset Switch at the touch pad. Power Source Line is switched off, reset the Power Source Circuit Breaker. Blown fuse in the controller, check fuse condition.
- Page 90 HROSystems Horizon Seafari Self Contained and Modular Style Page I - 16...
-
Page 91: Cleaning Procedure
SECTION “J” SYSTEM & R.O. MEMBRANE ELEMENT STORAGE PROCEDURE WINTERIZING & FREEZING TEMPERATURE STORAGE & CLEANING PROCEDURE... - Page 92 HROSystems Horizon Seafari “Section J” System & R.O. Membrane Element Storage Procedure NEW SYSTEM STORAGE CAUTION: The Horizon J. SYSTEM & RO MEMBRANE Seafari system has been tested at the factory and rinsed ELEMENT STORAGE PROCEDURE with a mild mixture of storage chemical. This allows the system to be stored for up to 3 months if kept in a cool R.O.
- Page 93 HROSystems Horizon Seafari Self Contained and Modular Style "Horizon S eafari" Series450-1800 U.S. GPD [36] ReverseOsmosis DesalinationSystem Shown in Open-Loop Cleaning/R inse Operation The "Cube" Contains: [35] [32] High Press. Switch [19] [34] BrineFlowmeter [29] [41] Salinity Probe [42] Product Flowmeter [31] [33] [43] Diversion Valve...
- Page 94 HROSystems Horizon Seafari “Section J” System & R.O. Membrane Element Storage Procedure "Horizon Seafari" Series 450-1800 U.S. GPD [36] ReverseOsmosis DesalinationSystem S hown in Closed-Loop Cleaning/Ri n se Operati o n The "Cube" Contains: [35] [32] High Press. Switch [19] [34] BrineFlowmeter [29] [41] Salinity Probe...
-
Page 95: Short-Term Shutdown
HROSystems Horizon Seafari Self Contained and Modular Style A. SHORT-TERM SHUTDOWN: 7. Operate the system by pressing the “Start” switch. The fresh water rinses the entire Horizon Seafari system and discharges out to waste. A short-term shutdown is defined as a period of time in which the Horizon Seafari system is not 8. - Page 96 HROSystems Horizon Seafari “Section J” System & R.O. Membrane Element Storage Procedure 5. Fill the Rinse/Clean Tank [50] full with non- chlorinated product water. The cleaning tank must contain enough product water to displace all of the feed water. This requires approximately 10 - 20 gallons (38 - 75 liters).
- Page 97 HROSystems Horizon Seafari Self Contained and Modular Style WINTERIZING AND FREEZING TEMPERATURE STORAGE NOTE: If the system is exposed to freezing temperatures, 2 - 4 gal. (8 to 15 liters) of food grade glycerin (propylene glycol) is also added to the final storage chemical mixture to prevent the water in the system from freezing.
- Page 98 HROSystems Horizon Seafari “Section J” System & R.O. Membrane Element Storage Procedure C. HRO R.O. MEMBRANE ELEMENT D. R.O. MEMBRANE ELEMENT CLEANING CLEANING PROCEDURES CAUTIONS AND INFORMATION: Do not arbitrarily clean a New System. Low product The Horizon Seafari R.O. system must be rinsed with water production and or High Salinity Product Water fresh water before beginning any cleaning procedure.
-
Page 99: Membrane Element Cleaning Instructions
HROSystems Horizon Seafari Self Contained and Modular Style HRO CC-1, Cleaning Compound "# 1" is an E. R.O. MEMBRANE ELEMENT CLEANING alkaline cleaner designed to clean biological fouling INSTRUCTIONS: and slight oil fouling from the R.O. Membrane Element. Biological fouling is usually the first 1. - Page 100 HROSystems Horizon Seafari “Section J” System & R.O. Membrane Element Storage Procedure 11. Fill a separate plastic bucket or container (1/2 to 20. Press the “Start” switch to re-circulate the water 2 gallons) 1/2 full with product water. Add the from the Rinse/Clean Tank, through the system, full contents of the HRO CC-1, CC-2, or CC-3 and back into the Rinse/Clean Tank.
- Page 101 SECTION “K” MAINTENANCE TIME CHART OPERATOR’S PREVENTATIVE MAINTENANCE COMPONENT MAINTENANCE & REPAIR...
-
Page 102: Maintenance And Repair
HROSystems Horizon Seafari “Section K” Maintenance and Repair K. MAINTENANCE AND REPAIR CAUTION: Make sure that the System Feed Water Sea Cock Valve [2] is closed prior to performing OPERATORS PREVENTIVE MAINTENANCE maintenance on the Horizon Seafari system. Also, make sure that the system main electrical disconnect Weekly or approximately every 50 hours of use, the switch is switched "OFF", LOCKED, and TAGGED Horizon Seafari system should be inspected as part of a... - Page 103 HROSystems Horizon Seafari Self Contained and Modular Style "Horizon Seafari" Series 450-1800 U.S. GPD [36] Reverse Osmosis Desalination System The "Cube"Contains: [35] [32] High Press. Switch [19] [34] Brine Flowmeter [29] [41] Salinity Probe [42] Product Flowmeter [31] [33] [43] Diversion Valve [28] [27] [26]...
-
Page 104: Maintenance
HROSystems Horizon Seafari “Section K” Maintenance and Repair OPERATOR MAINTENANCE TIMETABLE The frequency of required maintenance is dependent on the regularity of usage, the condition of the intake water (the location of use), the length of time the system is exposed to water, the total running time and, in some cases, the manner in which the System is installed. -
Page 105: Component Maintenance & Repair
HROSystems Horizon Seafari Self Contained and Modular Style COMPONENT MAINTENANCE & 4. Booster Pump [5]: Replace the ceramic seal approximately every 2000 hours, or at the sign of REPAIR leakage. (P/N HRO BPSK-5): 1. Inlet Thru Hull Fitting [1]: Keep the Inlet Thru Hull Fitting free and clear of debris and marine growth. - Page 106 HROSystems Horizon Seafari “Section K” Maintenance and Repair the top of the bowl and take care to not damage it. slightly below 6 PSI the Low Pressure Switch shuts Clean the mesh screen filter element with a bristle the System off. The standard Pre-filters and the brush and water spray.
- Page 107 HROSystems Horizon Seafari Self Contained and Modular Style a. Standard Pre-filters [12]: 8. Oil/Water Separator [17] Element Replacement: Element Replacement: To replace each Element Replacement: Open the air release valve on individual element, unscrew the blue bowl by hand. top of the housing. Open the drain valve located near Take care not to spill the feed water from the bowl.
- Page 108 HROSystems Horizon Seafari “Section K” Maintenance and Repair 11. High Pressure Pump [26]: refer to page L – 10 High Pressure Pump Drive End Disassembly for Servicing and L – 11 in the Users Manual: & Trouble Shooting Problem or Failure Signs and possible causes a.
- Page 109 HROSystems Horizon Seafari Self Contained and Modular Style 3) Normally the seal assemblies remain in the 1) Inspect the plunger for any sign of damage manifold, however part of the assembly may (Surface scuffing/ scoring, cracks, or pitting). remain on the plunger. CAREFULLY side The surface must be absolutely smooth.
- Page 110 HROSystems Horizon Seafari “Section K” Maintenance and Repair 5) Push the plungers onto the rods with a twisting turn (90°) to obtain a metal-on-metal seal. Never motion until they are seated completely on the use Teflon tape or pipe sealant on the flare rods.
- Page 111 HROSystems Horizon Seafari Self Contained and Modular Style a. Removal of the Reverse Osmosis Membrane sealing surface, which isolates the Product Water from the Feed Water. The surface of the Product Element: Water Tube must be scratch free. Never use pliers NOTE: It is highly recommended to replace all or other grabbing tools on or near the Product Water O-Rings within the High Pressure Vessel...
- Page 112 HROSystems Horizon Seafari “Section K” Maintenance and Repair Insert the End Plug with new attached O-Rings into calibration screw. Using a 3/16” hex wrench, gently the High Pressure Vessel while aligning the High adjust the calibration screw, maximum 1/8th turn Pressure Port and Product Water Port to the (45 degrees) at a time.
- Page 113 HROSystems Horizon Seafari Self Contained and Modular Style To replace the element, unscrew the blue bowl counter clockwise by hand. Avoid spilling the Reassembly: product water from the bowl. Remove the Insert the quartz tube into the Bottom End Plug and Charcoal Filter Element from the bowl and discard.
-
Page 114: Exploded Parts Views
SECTION “L” EXPLODED PARTS VIEWS WITH DESCRIPTION & PART NUMBERS... - Page 124 HROSystems Horizon Seafari Self Contained and Modular Style ITEM PART NUMBER DESCRIPTION 1 – 52 12180511CO HP PUMP-GP/ 3.0 GPM SS LEFTHAND 12180512CO HP PUMP-GP/ 4.2 GPM SS LEFTHAND 1 – 29 12180511CO-CCAL HP PUMP-GP/ 3.0 GPM CRANKCASE ASSY 12180512CO-CCAL HP PUMP-GP/ 4.2 GPM CRANKCASE ASSY 30 –...
- Page 125 HROSystems Horizon Seafari “Section L” Exploded Parts Views HIGH PRESSURE PUMP HORIZON SEAFARI LEFT ORIENTATION Capacities available in 3.0 GPM and 4.2 GPM Page L - 11...
-
Page 135: Wiring Information
APPENDIX “A” WIRING INFORMATION & DIAGRAMS... -
Page 136: Electrical Requirements
HROSystems Horizon Seafari Appendix A System Wiring Information and Diagrams ELECTRICAL REQUIREMENTS The Electric Motors within the Horizon Seafari systems start in series with time delay between each motor starting. First, the Booster Pump starts, then the main High Pressure Pump Electric Motor starts. For a normal Marine Ship installation, the current surges with the Booster Pump starting, then drop down to Booster Pump Electric Motor running Amperes. - Page 137 HROSystems Horizon Seafari Self Contained and Modular Style RECOMMENDED CIRCUIT BREAKER: The Booster Pump Motor rotation is controlled by interchanging two specific wires at the HORIZON SEAFARI SYSTEMS Electric Motors wiring box. Operating Voltage 115 VAC, Single Phase Three Phase Systems Circuit Breaker Size 30 Amperes The High Pressure Pump and Booster Pump Operating Voltage 230 VAC, Single Phase...
- Page 138 HROSystems Horizon Seafari Appendix A System Wiring Information and Diagrams APPENDIX A.3...
- Page 139 HROSystems Horizon Seafari Self Contained and Modular Style APPENDIX A.4...
- Page 140 HROSystems Horizon Seafari Appendix A System Wiring Information and Diagrams APPENDIX A.5...
- Page 141 HROSystems Horizon Seafari Self Contained and Modular Style APPENDIX A.6...
- Page 142 HROSystems Horizon Seafari Appendix A System Wiring Information and Diagrams HORIZON Seafari Self-Contained Booster Pump & High Pressure Pump Single Phase 50/ 60 HZ HIGH PRESSURE PUMP MOTOR WIRING HIGH PRESSURE PUMP MOTOR WINDING NUMBER: CD0615A01 SPEC NUMBER: 35M821T427G1 2.1 HORSE POWER 50/ 60 Hz SINGLE PHASE, 110-115 / 220-230 VAC SPEC NUMBER: 35M940T426G1 2.5 HORSE POWER...
- Page 143 HROSystems Horizon Seafari Self Contained and Modular Style HORIZON Seafari Self-Contained Booster Pump & High Pressure Pump Three-Phase 50 HZ Booster Pump, High Pressure Pump, Wiring Wiring BOOSTER PUMP MOTOR WINDING NUMBER: CD0005 WINDING NUMBER: CD0022 SPEC NUMBER: J M3460-SPW SPECIFICATIONS: .5 HORSE POWER 3 HORSE POWER...
- Page 144 HROSystems Horizon Seafari Appendix A System Wiring Information and Diagrams HORIZON Seafari Self-Contained Booster Pump & High Pressure Pump Three Phase, 60 Hz HIGH PRESSURE PUMP MOTOR HIGH PRESSURE PUMP MOTOR WINDING NUMBER: CD0005 WINDING NUMBER: CD0005 SPEC NUMBER: J M3460-SPW SPEC NUMBER: 35A012Y334G2 .5 HORSE POWER 3 HORSE POWER...
- Page 145 HROSystems Horizon Seafari Self Contained and Modular Style HORIZON Seafari Modular Booster Pump & High Pressure Pump Single Phase 50/ 60 HZ HIGH PRESSURE PUMP MOTOR WIRING HIGH PRESSURE PUMP MOTOR WINDING NUMBER: CD0615A01 SPEC NUMBER: 35M821T427G1 2.1 HORSE POWER 50/ 60 Hz SINGLE PHASE, LINE LINE...
- Page 146 HROSystems Horizon Seafari Appendix A System Wiring Information and Diagrams HORIZON Seafari Modular Booster Pump and High Pressure Pump Three-Phase, 50 HZ High Pressure Pump Booster Pump Wiring Wiring BOOSTER PUMP MOTOR HIGH PRESSURE PUM P MOTOR WINDING NUMBER: CD0005 SPEC NUMBER: J M3460-SPW WINDING NUMBER: CD0022 .5 HORSE POWER...
- Page 147 HROSystems Horizon Seafari Self Contained and Modular Style HORIZON Seafari Modular Booster Pump & High Pressure Pump Three Phase, 60 Hz BOOSTER PUMP MOTOR HIGH PRESSURE PUMP MOTOR WINDING NUMBER: CD0005 WINDING NUMBER: CD0005 SPEC NUMBER: J M3460-SPW SPEC NUMBER: 35A012Y334G2 .5 HORSE POWER 3 HORSE POWER 50/ 60 Hz, THREE PHASE,...
- Page 148 APPENDIX “B”...
-
Page 149: Conversion Chart
HROSystems Horizon Seafari Appendix B Conversion Charts MICRON / INCH / MESH COMPARISON MEASUREMENTS MICRON INCH INCH MESH (opening) .00003937 .0070 .00019685 .0075 .00039370 .0075 .00059055 .0078 .00078740 .011 .00098425 .013 .00118110 .018 .00157480 .026 .00196850 .041 .00295275 .085 .0039370 .177 .0078740 .937... - Page 150 HROSystems Horizon Seafari Self Contained and Modular Style TEMPERATURE EFFECT COMPARISON CHART (At 850 psi & 35,000 ppm feedwater TDS conditions) The Temperature Effect Chart on this page illustrates the loss or gain of productivity across the R.O. Membrane. To determine what normal (in spec.) flow of the system is at 77° F / 25° C, follow these directions: Determine feed source temperature.
- Page 151 HROSystems Horizon Seafari Appendix B Conversion Charts SEAWATER TEMPERATURE & PRESSURE EFFECTS CHART (Do not use this chart for Brackish water systems & applications) As the seawater temperature increases, the Horizon Seafari system pressure must be adjusted so that the system achieves no greater than 100% of rated product water flow.
- Page 152 HROSystems Horizon Seafari Self Contained and Modular Style APPENDIX B.4...
- Page 153 HROSystems Horizon Seafari Appendix B Conversion Charts WATER COMPARISON CHART GALLONS / VOLUME / WEIGHT U.S. CUBIC CUBIC CUBIC GALLON FEET YARD METER SHORT METRIC .005 .004 .004 .004 .025 .019 .021 .019 1.34 .050 .038 .041 .038 3.34 .129 .104 .094 6.68...
- Page 154 HROSystems Horizon Seafari Self Contained and Modular Style PPM CONVERSION CHART SPECIFIC SPECIFIC DISSOLVED CONDUCTANCE RESISTANCE SOLIDS RESISTANCE* IN MICROMHOS IN OHMS P.P.M. MHOS OHMS P.P.M. .0385 26,000,000 NONE 250.0 4,000 .0556 18,000,000 .02777 256.4 3,900 .0625 16,000,000 .03125 263.2 3,800 .0714 14,000,000...
- Page 155 HROSystems Horizon Seafari Appendix B Conversion Charts PRESSURE Kg/cm “Hg atmosphere 0.0704 2.036 0.0689 6.895 0.0681 14.22 28.96 0.981 98.07 0.968 0.4912 0.0345 0.0339 3.386 0.03342 14.504 1.02 29.53 0.987 0.14504 0.0102 0.295 0.01 0.00987 14.7 1.033 29.92 1.013 101.3 PRESSURE Kg/cm “Hg...
- Page 156 HROSystems Horizon Seafari Self Contained and Modular Style NOTES: NOTES: APPENDIX B.8...
- Page 157 HROSystems Horizon Seafari Quick Reference Index Clean/Rinse Outlet Valve [35] See Also Clean & Rinse Panel Description D – 4 Backpressure Regulator Valve Installation E – 17 Operation F – 6, F – 7, G – 1 Operation w/Soft Start G – 2 Clean &...
- Page 158 HROSystems Horizon Seafari Self Contained and Modular Style Electrical (cont.) Fresh Water Flush (Optional) Description D – 4, D – 5 Main Power Enclosure Dimensions E – 9 Descriptions D – 5 Exploded Parts Views L – 26 Exploded Parts View L – 25 Indicator Lamp D –...
- Page 159 HROSystems Horizon Seafari Quick Reference Index Motors Rotation F – 6, Appendix A – 1, Appendix A – 2 INSTALLATION, SECTION E Specifications B – 4, B – 5 Cautions E – 11 Troubleshooting Booster Pump I – 10, I – 11 INTRODUCTION, SECTION C High Pressure Pump I –...
- Page 160 HROSystems Horizon Seafari Self Contained and Modular Style Pre-filters (cont.) Commercial Pre-filters Qua rtz Tube See Ultra-Violet Sterilizer, Lamp Air Bleed F – 7 Replacement Connections E – 15 Description D – 3 Dimensions E – 10 Element Replacement K – 6 Element Replacement Interval K –...
- Page 161 HROSystems Horizon Seafari Quick Reference Index Tanks, Potable Water E – 1 Tools For Installation E – 2 Thru-Hull Fitting Description D – 1 Installation E – 2 TROUBLESHOOTING, SECTION J Ultraviolet Sterilizer Description D – 4 Exploded Parts Views L – 23 Installation E –...
- Page 162 Contact Horizon Reverse Osmosis at Horizon Reverse Osmosis PO Box 5463 Carson, California 90745-5463 Telephone: +1 310 631 6300 Website: http://www.hrosystems.com Fascimile: +1 310 631 6395 Email: sales@hrosystems.com...
Need help?
Do you have a question about the HRO Seafari SFC-450-1 and is the answer not in the manual?
Questions and answers