Table of Contents
Advertisement
Advertisement
Table of Contents

Related Manuals for intensity RM12F


Summary of Contents for intensity RM12F
- Page 1 REMOTE CONTROLLER MODEL: RM12F 2nd Generation VRF Remote Controller OPERATION AND INSTALLATION MANUAL Thank you for purchasing the remote controller. This manual describes the safety precaution requirement of using this product. MAN-OIM-RM12F-1120 intensity.mx *imágenes con fines ilustrativos...
- Page 3 Thank you for purchasing this remote controller. Carefully read this OPERATION AND INSTALLATION MANUAL before using the controller. It will tell you how to use the controller properly and help you if any trouble occurs. After reading the manual, please keep it for future reference.
-
Page 5: Table Of Contents
Contents Installation ..............1 1. Installation Precautions ........1 2. Installation Accessories ........3 3. Dimensions of Remote Controller and Bracket 4. Installation and Fixing ........4 5. Replace the Batteries ........5 Operating the Remote Controller ......7 1. Using Precautions ..........7 2. -
Page 6: Installation
Installation 1. Installation Precautions Safety Considerations Please read this "Safety Considerations" carefully before installing Controller and be sure to install it correctly. After completing the installation, make sure the controller operates properly. Please instruct the customer how to operate the controller and how to perform maintenance. - Page 7 Installation WARNING Precautions in handling remote controller the air conditioner. If something blocks the transmitting and receiving path of the indoor unit and the remote controller as curtains, it will not operate. Transmitting distance is approximately 7 m. 1 short beeps from the receiver indicates that the transmission is properly done.
-
Page 8: Installation Accessories
Installation 2. Installation Accessories Please check that you have all the following parts. Schematic Name Remote controller bracket Screw lid Philips head screw (M2.0*4.5) AAA battery Remote controller manual 3. Dimensions of Remote Controller and Bracket 25 mm 47 mm Figure 2.1 Dimensions of remote controller... -
Page 9: Installation And Fixing
Installation Installation 25 mm 72 mm Figure 2.2 Dimensions of remote controller bracket 4. Installation and Fixing 1) Use the screws (accessories) to fix and secure the remote controller bracket in a stable position (see Figure 2.3); Make sure you refer to "1. Installation Precautions" to determine the location. -
Page 10: Replace The Batteries
Installation Figure 2.4 3) Slide the remote controller vertically down into the remote controller bracket (see Figure 2.5). Figure 2.5 5. Replace the Batteries 1) Slide to move the battery cover at the back of the remote controller in the direction indicated by the arrow (Figure 2.6);... - Page 11 Installation Figure 2.6 2) Lift up from the lower left end of the battery cover to open it (see Figure 2.7); Figure 2.7 3) Take out the old batteries. Install two new AAA batteries according to the positive and negative polarities indicated (see Figure 2.8). Close the battery cover.
-
Page 12: Operating The Remote Controller
Operating the Remote Controller 1. Using Precautions To gain full advantage of the controller's functions and to avoid malfunction due to mishandling, we recommend that you read this instruction manual carefully before use. The precautions described here in are classified as WARNING and CAUTION. -
Page 13: Model And Key Parameters
Insufficient ventilation may result in oxygen deficiency. 2. Model and Key Parameters Product Model RM12F Rated Voltage 3.0 V (AAA battery x 2) Ambient Temperature -5 to 43°C... -
Page 14: Button Names And Functions
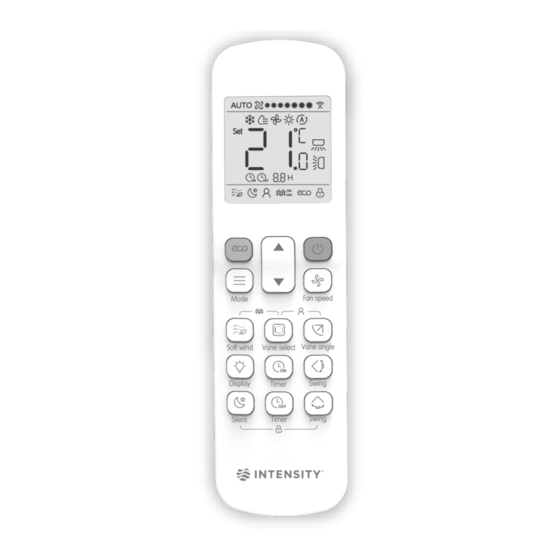
Operating the Remote Controller 3. Button Names and Functions Figure 3.1 External view of remote controller... - Page 15 Operating the Remote Controller Button Function Turn on/off the economic operation function Set operating mode: Cool Mode Heat Adjust the temperature setting Adjust downwards or timer (programmed time) downwards In Cool mode, press this button Soft wind to turn on or off the Soft wind function.
-
Page 16: Name And Function On Display Screen
Operating the Remote Controller Note: The buttons are not available for first generation indoor units. The button is only available for indoor unit with individual vane control function. is only available for indoor unit with soft wind function. 4. Name and Function on Display Screen Figure 3.2 Display screen of remote controller Name Display Function... -
Page 17: Operating Methods
Operating the Remote Controller Displays signal sent to the indoor Signal transmission unit from the remote controller Horizontal swing Shows that Horizontal Swing is on Vertical swing Shows that Vertical Swing is on Shows that the remote controller Lock button is locked Shows that ECO function is on Auxiliary heater Shows that auxiliary heater is on... -
Page 18: Fan Speed Operations
Operating the Remote Controller 2) Press each time to change the operating mode according to the order shown in Figure 3.5; Cool Heat Figure 3.5 0.5°C (default). Long press to change the temperature continuously. Note: 5.3 Fan Speed Operations Every time when you press the button, fan speed is changed in the following order.(see Figure 3.6). -
Page 19: Soft Wind Operations
Operating the Remote Controller 5.4 Soft Wind Operations Press to adjust the direction of the vertical louver (see Figure 3.9). Figure 3.9 In Cool mode, press this button to turn on or off the Soft wind function. In Cool mode, press this button to turn on or off the Soft wind function In Soft wind function, the fan operates at the minimum speed and swings In Soft wind function, the fan operates at the minimum speed and sw at the minimum angle. -
Page 20: Idu Display Operations
Operating the Remote Controller When the vertical swing is on, press to turn off this function. Note: for 15s and then disappears. The indoor unit remains vertical swing operation. 2) Horizontal Swing When the unit is on. Press (see Figure 3.12). Start the horizontal swing function, and will light up, and signal is sent to the indoor unit;... -
Page 21: Silent Mode Operation
Operating the Remote Controller 2) When the display of the indoor unit lights up, press to turn off the light. 5.8 Silent Mode Operation The Silent function is used by the remote controller to send the "Silent" signal to the indoor unit. The indoor unit automatically optimizes the noise it generates when it is in the "Silent"... -
Page 22: Follow Me Operations
Operating the Remote Controller Note: Auto and the temperature is 26°C; in heating mode, when ECO is set up, the Fan Speed is forced to Auto and the temperature does not change. will no longer light up, and the unit will exit the ECO mode. time. - Page 23 Operating the Remote Controller Figure 3.17 Once the adjustment is done, the timer information is sent to the indoor unit. 2) Timer Off Operation: Press (see Figure 3.18), and the remote controller will display "Timer Off", and "0.0H" will appear in timer area. Adjust the Timer Off settings now;...
-
Page 24: Button Lock Operations
Operating the Remote Controller and then confirm the changes. imer Off settings. 5.12 Button Lock Operations Once the buttons on the remote controllers are locked, all the other button operations except for Unlock and IDU Address Setting are invalid. 1) Press at the same time to lock the button (see Figure 3.19), and the screen will display the lock icon 2) Press... -
Page 25: Field Settings
Field Settings Parameter Configuration for Remote Controller 1) Configuration Method: Long press on the remote controller at the same time for 5 seconds to go to the parameter settings status (see Figure 4.4); Figure 4.4 Once the adjustment is done, press or wait for 5 seconds to save the parameter settings. - Page 26 Field Settings Figure 4.5 2) See Table 4.1 for details. Table 4.1 Parameters of remote controller Parameter Parameter Definition 7 fan speeds, temperature adjustment step of 0.5°C 3 fan speeds, temperature adjustment step of 1°C 7 fan speeds, temperature adjustment step of 1°C (default parameter) 3 fan speeds, temperature adjustment step of 0.5°C...
Need help?
Do you have a question about the RM12F and is the answer not in the manual?
Questions and answers