
Related Manuals for Marathon Travel 23


Summary of Contents for Marathon Travel 23
- Page 1 CL030023 INSTRUCTION MANUAL MANUEL D’UTILISATION MANUALE DI ISTRUZIONI MANUAL DE INSTRUCCIONES BENUTZERHANDBUCH...
-
Page 2: Power Source
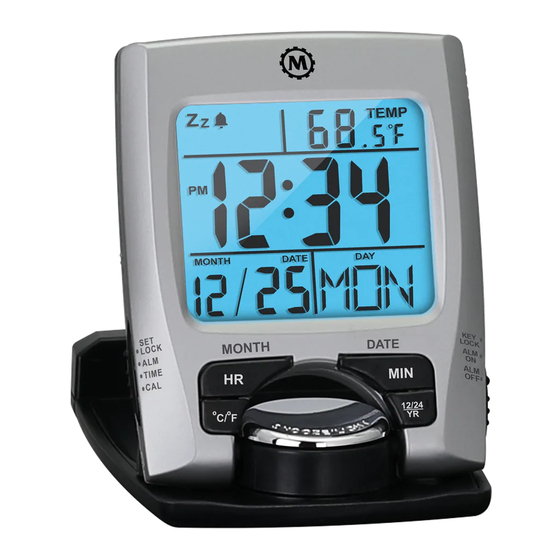
POWER SOURCE This unit uses one (1) AAA battery. LOCATION OF CONTROLS 1. LCD display with Time, Alarm, Calendar, and Temperature 2. SNOOZE / LIGHT button 3. HR (Hour) / MONTH button 4. MIN (Minute) / DATE button 5. °C / °F button 6. -
Page 3: Battery Installation
LOCK LOCK Your clock’s configuration may differ from the illustration. BATTERY INSTALLATION 1. Open the cover of the battery compartment on the bottom of the clock. 2. Insert one (1) AAA battery according to the polarity marks (+ and -) on the inside of the compartment. 3. -
Page 4: Setting The Calendar
OPENING THE FLIP COVER Lift the cover and turn it clockwise to open. Turn clockwise to open. Turn anti-clockwise to close. SETTING THE CALENDAR 1. Slide the left side switch to “CAL” to enter calendar setting mode. 2. Press the MONTH, DATE, and YR buttons to set the desired date. -
Page 5: Setting The Time
Note: An incorrect day of the month will be automatically reset to the first day of that month. SETTING THE TIME 1. Slide the left side switch to “TIME” to enter time setting mode. 2. Press the HR and MIN buttons to set the desired time. - Page 6 4. To activate the alarm, slide the right side switch to “ALM ON”. The icon will appear on the display. 5. When the alarm sounds, press the SNOOZE / LIGHT button to pause it and enter snooze mode. The alarm will sound again after five (5) minutes. Maximum three snoozes. 6.
-
Page 7: Using The Backlight
USING THE BACKLIGHT Press the SNOOZE / LIGHT button once to turn on the backlight. The backlight lasts approximately three (3) seconds. Note: Frequent use of the backlight will shorten the battery life. USING THE KEY LOCK • Slide the right side switch to “KEY LOCK” to lock all buttons functions. - Page 8 IMPORTANT • Do not expose the clock to water, extreme temperatures, or severe shock. • Avoid contact with any corrosive materials such as perfume, alcohol, or cleaning agents. Our Products contain high quality components and are designed to facilitate recycling. Our products or product packaging are marked with the symbol below.
-
Page 9: Source D'alimentation
SOURCE D’ALIMENTATION Cet appareil utilise une (1) pile AAA. EMPLACEMENT DES CONTRÔLES 1. Écran LCD avec heure, alarme, calendrier et température 2. Touche SNOOZE / LUMIERE 3. Bouton HR (Heure) / MOIS 4. Bouton MIN (Minute) / DATE 5. Touche °C / °F 6. -
Page 10: Installation Des Piles
La configuration de votre horloge peut différer de l’illustration. INSTALLATION DES PILES 1. Ouvrez le couvercle du compartiment des piles au bas de l’horloge. 2. Insérez une (1) pile AAA en respectant les polarités (+ et -) à l’intérieur du compartiment. 3. - Page 11 OUVERTURE DU COUVERCLE RABATTABLE Soulevez le couvercle et tournez-le dans le sens des aiguilles d’une montre pour l’ouvrir. Tournez dans le sens des aiguilles d’une montre pour ouvrir. Tournez dans le sens in- verse des aiguilles d’une montre pour fermer. SETTING THE CALENDAR 1.
-
Page 12: Réglage De L'heure
Remarque : Un jour incorrect du mois sera automatiquement réinitialisé au premier jour de ce mois. RÉGLAGE DE L ’HEURE 1. Faites glisser le commutateur de gauche sur “TIME” pour accéder au mode de réglage de l’heure. 2. Appuyez sur les touches HR et MIN pour régler l’heure souhaitée. - Page 13 2. Appuyez sur les touches HR et MIN pour régler l’heure d’alarme souhaitée. Appuyez sur chaque bouton et maintenez-le enfoncé pour faire avancer rapidement les valeurs. 3. Faites glisser le commutateur de gauche sur “SET LOCK” pour enregistrer l’heure de l’alarme et quitter le mode de réglage de l’alarme.
-
Page 14: Utilisation Du Rétroéclairage
FORMAT DE L ’HEURE ET DE LA TEMPÉRATURE • Appuyez sur la touche 12/24 pour passer de l’affichage de l’heure 12 heures à l’affichage de l’heure 24 heures. • Appuyez sur la touche °C / °F pour commuter entre les relevés de température en °C et les degrés de température en °F. - Page 15 UTILISATION DU VERROUILLAGE - Faites glisser l’interrupteur de droite sur “KEY LOCK” pour verrouiller toutes les fonctions des touches. - L’alarme retentit en mode “KEY LOCK” lorsque l’alarme est activée. Remarque : Lorsque KEY LOCK est sélectionné, tous les boutons, y compris le bouton “SNOOZE”, ne fonctionnent pas.
- Page 16 Nos produits contiennent des composants haute qualité conçus pour en faciliter le recyclage. Le symbole ci-après est apposé sur nos produits ou leurs emballages. Le symbole indique que le produit ne doit pas être traité en tant qu’ordure ménagère. Il doit être mis au rebut séparément, par les systèmes de recyclage et de collecte appropriés et disponibles.
-
Page 17: Posizione Dei Comandi
ALIMENTAZIONE Questa unità utilizza una (1) batteria AAA. POSIZIONE DEI COMANDI 1. Display LCD con ora, sveglia, calendario e temperatura 2. Tasto SNOOZE / LIGHT 3. Pulsante HR (ora) / MONTH 4. Tasto MIN (minuti) / DATA 5. Pulsante °C / °F 6. -
Page 18: Installazione Della Batteria
La configurazione del tuo orologio potrebbe differire dall’illustrazione INSTALLAZIONE DELLA BATTERIA 1. Aprire il coperchio del vano batterie nella parte inferiore dell’orologio. 2. Inserire una (1) batteria AAA secondo i segni di polarità (+ e -) all’interno del vano. 3. Chiudere il coperchio del vano batterie. N.B: prima di utilizzare l’orologio, rimuovere la pelli- cola trasparente che copre il pannello LCD. - Page 19 APRIRE LO SPORTELLINO Sollevare il coperchio e ruotarlo in senso orario per aprirlo. Turn clockwise Girare in senso orario per to open. aprire. Turn anti-clockwise Ruotare in senso antiorario to close. per chiudere. IMPOSTAZIONE DEL CALENDARIO 1. Spostare l’interruttore sul lato sinistro su “CAL” per accedere alla modalità...
-
Page 20: Impostazione Dell'ora
3. Far scorrere l’interruttore sul lato sinistro su “SET LOCK” per salvare la data e uscire dalla modalità di impostazione del calendario. N.B: un giorno errato del mese verrà automatica- mente reimpostato sul primo giorno di quel mese. IMPOSTAZIONE DELL ’ORA 1. - Page 21 2. Premere i pulsanti HR e MIN per impostare l’ora della sveglia desiderata. Tenere premuto ciascun pulsante per avanzare rapidamente tra i valori. 3. Far scorrere l’interruttore sul lato sinistro su “SET LOCK” per salvare l’ora della sveglia e uscire dalla modalità...
- Page 22 FORMATO ORA E TEMPERATURA • Premere il pulsante 12/24 per alternare tra la visualizzazione dell’ora 12 e la visualizzazione dell’ora 24. • Premere il pulsante ° C / ° F per alternare tra letture della temperatura in ° C e gradi della temperatura in °...
- Page 23 NB: quando si seleziona il KEY LOCK, tutti i pulsanti, in- cluso il pulsante “SNOOZE”, non funzioneranno. Disat- tiva il KEY LOCK per riattivare il pulsante “SNOOZE”. Importante: • Non esporre l’orologio all’acqua, a temperature estreme o a forti urti. •...
- Page 24 FUENTE DE ENERGIA Esta unidad necesita una pila AAA. UBICACIÓN DE CONTROLES 1. Panel LCD con Hora, Alarma, Calendario y Temperatura. 2. Botón SNOOZE / LIGHT / STOP ALARM 3. Botón HR (Hour) / MONTH 4. Botón MIN (Minute) / DATE 5.
- Page 25 La configurazione del tuo orologio potrebbe differire dall’illustrazione INSTALACION DE LA PILA 1. Abra la tapa de compartimento de la pila en la parte inferior del reloj. 2. Coloque una pila (1) AAA de acuerdo con las marcas de polaridad (+ y -) dentro del compartimento.
- Page 26 ABRIENDO LA TAPA Levante la tapa y gírela hacia la derecha para abrirla. Sollevare il coperchio e ruotarlo in senso orario per aprirlo. Girare in senso orario per aprire. CONFIGURACION DEL CALENDARIO 1. Deslice el interruptor del lado izquierdo hacia “CAL” para ingresar al modo de configuración del calendario.
-
Page 27: Configuración De La Hora
3.Deslice el interruptor del lado izquierdo a “SET LOCK” para guardar la fecha y salir del modo de configuración del calendario. Nota: Un día incorrecto del mes causará un reinicio automático al primer día de ese mes. CONFIGURACIÓN DE LA HORA 1. Deslice el interruptor del lado izquierdo a “TIME” para ingresar al modo de configuración de la hora. - Page 28 CONFIGURACION DE LA HORA 1. Deslice el interruptor del lado izquierdo hacia “ALM” para entrar al modo de configuración de la alarma. El icono de la “ALARMA” aparecerá en la pantalla. 2. Presione los botones HR y MIN para establecer la hora deseada de la alarma. Mantenga presionado cada uno de los botones para avanzar rápidamente a través de los valores.
- Page 29 6. Para apagar la alarma, deslice en interruptor de la parte derecha a “ALM OFF”. FORMATO DE HORA Y TEMPERATURA • Presione el botón 12/24 para cambiar entre la visualización de la hora de 12 Y 24 horas. • Presione el botón °C /°F para cambiar entre las lecturas de temperatura de °C a °F USANDO LA LUZ DE FONDO Presione una vez el botón SNOOZE/LIGHT por...
- Page 30 USANDO EL BLOQUEO DE TECLAS • Deslice el interruptor del lado derecho hacia “KEY LOCK” para bloquear todas las funciones de las teclas. La alarma sonaráen el modo “KEY LOCK” cuando la alarma esta activada Nota: Cuando se seleccionan las teclas que están bloqueadas, todos los botones, incluyendo el botón “SNOOZE”...
- Page 31 Nuestros productos contienen componentes de alta calidad y están diseñados para facilitar su reciclaje. Nuestros productos o el embalaje de los mismos están marcados con el símbolo siguiente. Este símbolo indica que el producto no se puede tratar como residuo urbano. Se debe desechar por separado a través de los sistemas de evolución y recogida disponibles.
- Page 32 ENERGIEQUELLE Dieses Gerät verwendet eine (1) AAA-Batterie. POSITION DER BEDIENELEMENTE 1. LCD-Anzeige mit Uhrzeit, Alarm, Kalender und Temperatur 2. SNOOZE / LIGHT-Taste 3. HR (Stunde) / MONTH-Taste 4. MIN (Minute) / DATE-Taste 5. °C / °F-Taste 6. 12HR / 24HR / YEAR-Taste 7.
-
Page 33: Einlegen Der Batterie
Die Konfiguration Ihrer Uhr kann von der Abbildung abweichen EINLEGEN DER BATTERIE 1. Öffnen Sie den Batteriefachdeckel auf der Unter seite der Uhr. 2. Legen Sie eine (1) AAA-Batterie gemäß der Polarität (+ und -) auf der Innenseite des Fachs ein. 3. - Page 34 ÖFFNEN DES KLAPPDECKEL Heben Sie die Abdeckung und drehen Sie sie im Uhrzeigersinn, um sie zu öffnen. Zum Öffnen im Uhrzei- gersinn drehen. Zum Schließen gegen den Uhrzeigersinn drehen. SETTING THE CALENDAR 1. Schieben Sie den Schalter auf der linken Seite auf „CAL“, um den Kalendereinstellungsmodus aufzurufen.
-
Page 35: Uhrzeit Einstellen
3. Schieben Sie den linken Schalter auf „SET LOCK“, um das Datum zu speichern und den Kalenderein stellungsmodus zu verlassen. Hinweis: Ein falscher Tag des Monats wird automa- tisch auf den ersten Tag des Monats zurückgesetzt. UHRZEIT EINSTELLEN 1. Schieben Sie den linken Schalter auf „TIME“, um den Zeiteinstellungsmodus aufzurufen. - Page 36 2. Drücken Sie die Tasten HR und MIN, um die gewünschte Weckzeit einzustellen. Drücken und halten Sie jede Taste, um schnell durch die Werte zu blättern. 3. Schieben Sie den linken Schalter auf „SET LOCK“, um die Weckzeit zu speichern und den Weckmo dus zu verlassen.
- Page 37 ZEIT- UND TEMPERATURFORMAT • Drücken Sie die Taste 12/24, um zwischen der 12-Stunden-Anzeige und der 24-Stunden-Anzeige zu wechseln. • Drücken Sie die Taste °C / °F, um zwischen den Temperaturwerten in °C und °F umzuschalten. VERWENDEN DER HINTERGRUNDBELEUCHTUNG Drücken Sie die SNOOZE / LIGHT-Taste einmal, um die Hintergrundbeleuchtung einzuschalten.
- Page 38 VERWENDEN DER TASTENSPERRE • Schieben Sie den rechten Schalter auf “KEY LOCK”, um alle Tastenfunktionen zu sperren. • Der Alarm ertönt im “KEY LOCK”-Modus, wenn der Alarm aktiviert ist. Hinweis: Wenn KEY LOCK ausgewählt ist, funktionie- ren keine Tasten, einschließlich der Taste „SNOOZE“. Schalten Sie das KEY LOCK aus, um die Taste „SNOOZE“...
- Page 39 Unsere Produkte enthalten qualitativ hochwertige Komponenten und sind für einfaches Recycling konzipiert. Unsere Produkte oder Produktverpackungen sind mit folgendem Symbol markiert. Das Symbol zeigt an, dass das Produkt nicht als Hausmüll behandelt werden darf. Es muss separat über die verfügbaren entsprechenden Rücklauf- und Sammlungssysteme entsorgt werden.
- Page 40 Marathon Watch Company Ltd. Customer Service: / Service Clients : / Servizio clienti: / Servicio al cliente: / Kundendienst: +1-800-822-4329 +1-905-764-9420 Designed in Canada / Conçu au Canada / Progettato in Canada / Diseñado en Canadá / Entworfen in Kanada Made in China / Fabriqué...
Need help?
Do you have a question about the Travel 23 and is the answer not in the manual?
Questions and answers