Advertisement
Quick Links
Advertisement

Subscribe to Our Youtube Channel
Related Manuals for DMC HI-CAP 40

Summary of Contents for DMC HI-CAP 40
- Page 1 OWNER’S MANUAL HI-CAP 40 GRAIN CLEANER PNEG-1146 Date: 9-21-06 PNEG-1146...
- Page 3 Hi-Cap 40 Grain Cleaner Safety and Decals SAFETY INFORMATION PLEASE READ WATCH FOR THIS SYMBOL! IT POINTS OUT IMPORTANT SAFETY PRECAUTIONS. IT MEANS ATTENTION -- “BECOME ALERT! YOUR SAFETY IS INVOLVED!” It is recommended that you review the entire contents of this manual, paying particular attention to items preceded by this symbol.
- Page 4 Safety and Decals Hi-Cap 40 Grain Cleaner BE A SAFE OPERATOR 1. Read and understand the Owner’s Manual. 2. Disconnect all electrical power before servicing or opening control box, adjusting or lubricating the equipment. 3. All electrical hook-ups should be in accordance to the National Electrical Code.
- Page 5 Hi-Cap 40 Grain Cleaner Safety and Decals The Decals Show on This Page MUST Be Displayed As Shown Replacements are available upon request. Write to: DMC 1004 E. Illinois St. Assumption, IL 62510 Phone: 217-226-5100 NOTE The decals on this page are NOT actual size.
-
Page 6: Operation
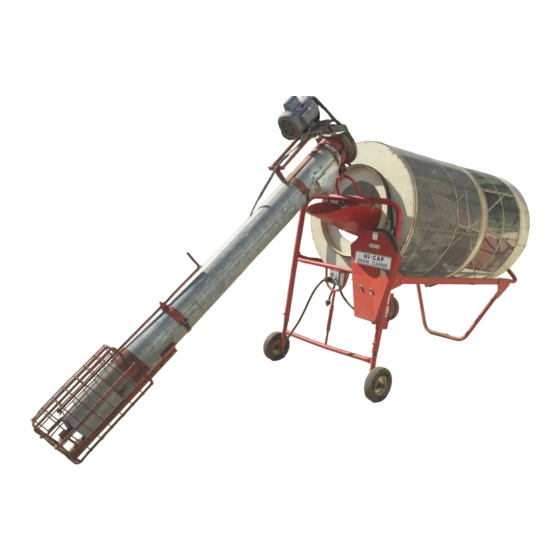
Hi-Cap 40 Grain Cleaner INTRODUCTION Your Hi-Cap Grain Cleaner is a high quality machine built to give years of reliable service. With the wide range of screen sizes available, it will take care of all your screening needs. With its dual screening action it not only removes the “fines”, chaff, etc., but also large trash such as cob particles, stalks and straw. - Page 7 Hi-Cap 40 Grain Cleaner Assembly Assembly Instructions Step1 The component parts necessary for the make-up of the completed scanner are shown in Photo 1. Step 2 Use eight 3/8” x 1” hex head bolts, bolt the side rails to the front and rear frame ends.
- Page 8 Assembly Hi-Cap 40 Grain Cleaner Assembly Instructions (continued) Step 11 Bolt the electric motor on motor mount on front frame, using four 5/16” x 1” bolts, eight ¼” flat washers and four 5/16” lock washers and nuts. Slide motor to upper- most position in the slotted holes.
- Page 9 Hi-Cap 40 Grain Cleaner Assembly Assembly Instructions (continued) Step 19 Place the pan on the cleaner frame and attach to the side rails, using eight ¼” x ¾” hex bolts, flat washers and hex flange lock nuts. See Photos 32 and 33.
- Page 10 Assembly Hi-Cap 40 Grain Cleaner Assembly Instructions (continued) Step 27 Install the belt shield by putting a ½” nut on each shield mounting bolt, then place a ½” flat washer to each bolt and continue by putting the shield into position. Se- cure with another ½”...
- Page 11 Hi-Cap 40 Grain Cleaner Assembly Assembly Instructions (continued) NOTE Before the bolts are tightened, the posts must be inserted into the slots of the brackets on the frame for proper alignment. After the posts are aligned, tighten the bolts. To secure side panel, push down and insert hairpin through hole in the post.
- Page 12 Assembly Hi-Cap 40 Grain Cleaner Assembly Instructions (continued) For 2 HP motor, bolt as in Photo 13. For 1- HP motor, bolt as in Photo 14. Step 8 Using 5/16” carriage bolt, lock washer and nut, bolt the rear of the motor mount base plate to the rear support on the auger head.
- Page 13 Hi-Cap 40 Grain Cleaner Assembly Assembly Instructions (continued) Step 18 Put the flat end of the guide rods into the bushings provided at the back of the hopper. Align the holes in the rod with those in the bushing and secure with ”...
- Page 14 Parts List Hi-Cap 40 Grain Cleaner Bearing Revisions Front Drum Bearing Rear Drum Bearing Double Bearing Reference Part Quantity Number Number Description Needed 103C0025 Extension Spring, Belt Tightener 202B0046 Belt Tightener, Drum Drive 202B0050 Bearing Mount Extension Bracket 202B0051 Pivot Bolt, Belt Tightener Bracket, 3/8"...
- Page 15 Hi-Cap 40 Grain Cleaner Parts List MODEL 40 HI-CAP GRAIN CLEANER PARTS...
- Page 16 Parts List Hi-Cap 40 Grain Cleaner MODEL 40 HI-CAP GRAIN CLEANER PARTS Reference # Part # Description Qty Needed 10C30025 Extension Spring, Belt Tightener 202A0028 Inside Cone Screen Strap, 60-1/4" 202A0029 Inside Cone Screen Strap, 57-1/8" 202A0030 Inside Cone Screen Strap, 88-1/2"...
- Page 17 Hi-Cap 40 Grain Cleaner Parts List 8” x 8’ Auger...
- Page 18 Parts List Hi-Cap 40 Grain Cleaner 8” x 8’ Auger Parts List Reference Part Quantity Number Number Description Needed 202C0137 Auger Tube, 7" 202C0410 7 OD Auger, 8' 202E0006 Power Cord (Specify 115 Volt or 230 Volt) 204C0010 Auger Pivot 205C0002 2"...
- Page 19 Hi-Cap 40 Grain Cleaner Parts List 4” x 15’ Fines Auger...
- Page 20 Parts List Hi-Cap 40 Grain Cleaner...
- Page 21 Hi-Cap 40 Grain Cleaner Parts List Trash Pan Reference Part Quantity Number Number Description Needed 202D0004 Drum side panel support post 202D0005 Side panel frame bracket 202D0008 Discharge auger 202D0009 Belt shield support bracket 202D0010 Lower belt shield 202D0011 Upper belt shield...
- Page 22 Parts List Hi-Cap 40 Grain Cleaner Wiring Diagram 115V. or 230 V.
-
Page 23: Overall Dimensions
Hi-Cap 40 Grain Cleaner Parts List Capacities (Shelled Corn) 15% Moisture Test ......1600 BPH 25% Moisture Test ......1000 BPH 30% Moisture Test .......700 BPH 35% Moisture Test .......400 BPH The capacities listed above can vary with grains, amount of foreign material, and test weights. -
Page 24: Available Screens
Parts List Hi-Cap 40 Grain Cleaner AVAILABLE SCREENS CONE SCREENS OUTSIDE DRUM SCREENS Corn Screens 2 x 2 x 19 GA wire - Small 4-1/2 x 4-1/2 x 21 GA wire Small 5/8 x 5/8 x 17 GA wire - Standard... - Page 25 The GSI Group, Inc. Warranty THE GSI GROUP, INC. (“GSI”) WARRANTS ALL PRODUCTS WHICH IT MANUFACTURES TO BE FREE OF DEFECTS IN MATERIAL AND WORKMANSHIP UNDER NORMAL USAGE AND CONDITIONS FOR A PERIOD OF 12 MONTHS AFTER RETAIL SALE TO THE ORIGINAL END USER.
- Page 26 Authorities having jurisdiction should be consulted before installation occurs. For more information, contact the DMC Distribution Center closest to you. Illiana Distribution Center Clear Lake Distribution Center 1004 E. Illinois St.
Need help?
Do you have a question about the HI-CAP 40 and is the answer not in the manual?
Questions and answers