Table of Contents
Advertisement
Quick Links
Advertisement
Table of Contents

Related Manuals for POSITECTOR SST


Summary of Contents for POSITECTOR SST
- Page 2 Introduction This Reference is a compilation of the On-Gage Help that is available on your PosiTector gage. To view these help items on the gage, enter the gage menu and touch icon or press the button with the desired menu item selected.
-
Page 3: Table Of Contents
Contents Memory ........................Open ........................View ........................Display ........................Annotate ........................ Print ........................New Batch ......................Close ........................Delete ........................Batch Summary ..................... Setup ........................... Patch Volume ......................Set Clock ....................... Reset ........................Units ........................Battery Type ......................Sound ........................Touch ........................ - Page 4 Gage Name ....................Server Enable .................... IP Settings ....................AP Passphrase ..................WiFi Reset ....................WiFi Stream ..................... Auto Sync .net ....................Access Point ....................Enabled ......................Networks ......................WiFi Information ....................Sync .net Now ....................Bluetooth Smart ..................... Send Batches ....................BLE Keyboard ....................
-
Page 5: Memory
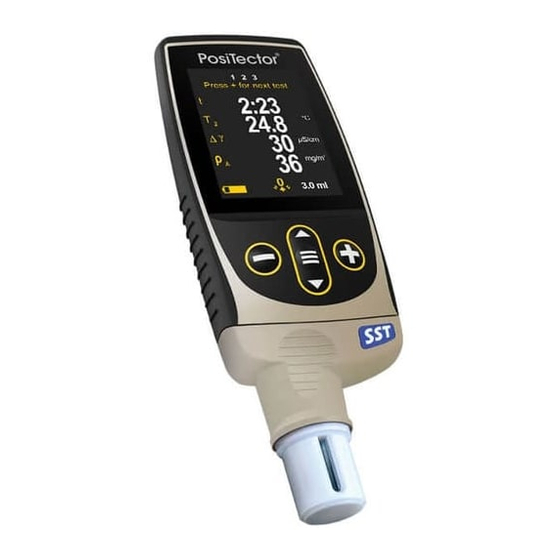
Memory The PosiTector SST Advanced has internal memory storage for recording measurement data. Stored measurements can be reviewed on-screen or accessed via computers, tablets and smart phones. Measurements are date and time-stamped. Store up to 250,000 readings in up to 1,000 batches. -
Page 6: Print
Annotations can be synchronized with PosiSoft.net and the PosiTector App. They are included in PosiSoft USB Drive reports. Print Sends a statistical summary and individual measurements to the optional Bluetooth wireless printer. NOTE: To cancel printing, simultaneously press and hold the (-) and (+) buttons. -
Page 7: Setup
Enables automatic time synchronization with a remote server over WiFi using the NTP (Network Time Protocol). Enter a NTP Server address and TZ (Time Zone) details. The PosiTector uses POSIX format to set the time zone. Eastern Time in the USA is input as the following: EST5EDT4,M3.2.0,M11.1.0... -
Page 8: Reset
Reset Restores factory settings and returns the Gage to a known condition. The following occurs: All batches, stored datasets, batch names and screen captures are erased. Calibration adjustments are returned to factory settings. The last stored background measurement (y1) is erased. Menu settings are returned to the following: Memory = OFF Bresle Mode = ON... -
Page 9: Units
Units Allows the operator to change the displayed units for both Temperature (°C or °F) and Surface Density (mg/m^2 or μg/cm^2). Battery Type Selects the type of batteries used in the Gage from a choice of Alkaline, Lithium or NiMH (nickel-metal hydride rechargeable). The battery state indicator symbol is calibrated for the selected battery type. -
Page 10: Hi Res
ISO 11127-6 and ASTM D4940-15. Calibration Adjustment The PosiTector SST can be adjusted to a known conductivity standard. Use the (-) and (+) buttons to decrease/increase the displayed value to match the known conductivity of the standard. -
Page 11: Connect
Connect Configure communication and connection options for the Gage. Bluetooth Allows readings to be sent to a computer, optional printer or compatible device using Bluetooth wireless technology. Pairing required. See www.defelsko.com/bluetooth Enabled Allows readings to be sent to a computer, optional printer or compatible device using Bluetooth wireless technology. -
Page 12: Sync.net Now
PosiSoft.net. USB Drive When USB Drive is enabled, the PosiTector is recognized as a USB mass storage device which provides a simple interface to retrieve stored data in a manner similar to USB flash drives and digital cameras. USB Drive is also required to import stored measurements into PosiSoft Desktop. -
Page 13: Html Report
PosiSoft Desktop is required when using USB connections to synchronize measurements with PosiSoft.net. USB Keyboard USB Keyboard mode enables PosiTector Advanced instruments to emulate a USB keyboard when connected to a computer. USB Keyboard mode communicates with your computer by emulating keyboard keystrokes. -
Page 14: Wifi
WiFi Allows connection to your local wireless network or mobile hot spot. Ideal for using your network’s internet connection for synchronizing stored measurements with PosiSoft.net. See www.defelsko.com/wifi Setup Options Setup WiFi configuration options for the Gage. AP Channel The access point channel corresponding to a frequency range. (Default Channel: 6) For most users the default channel will not have to be altered. -
Page 15: Ap Passphrase
Access Point. The Passphrase will be required for all devices connecting to the PosiTectors Access Point. The PosiTector is now visible to all WiFi enabled devices. Simply connect your devices WiFi to the new PosiTector Access point. All PosiTectors are uniquely identified by their respective gage body serial numbers or user selected Gage Name. -
Page 16: Enabled
Securing your Access Point To ensure the PosiTector is only accessible to authorized devices, it is important that you enter a passphrase (password) for the Access Point. The default Passphrase is password. In the Connect > WiFi > Setup menu, select AP Passphrase to modify the default passphrase. -
Page 17: Bluetooth Smart
Smart Probes Displays available PosiTector DPM-L and PosiTector CMM-IS Smart Probes within range of the PosiTector gage. Smart Probes must be powered ON to be visible. Shortcut: Check the Shortcut box to add the Smart Probes menu option to the gage’s main menu. -
Page 18: Enabled
PosiTector App via auto-pairing Bluetooth Smart (BLE) wireless technology. Sync Batches Select batches to flag them for synchronization to the PosiTector App. Sync Batches is useful when connecting a new device to a gage with pre-existing batches, since only batches created while Bluetooth Smart is enabled are automatically selected. -
Page 19: Help
Help When a Menu option is highlighted, the (i) icon indicates on-gage help is available. Press (+) or touch the (i) icon to display the help. Update your gage to ensure that you have the latest on-gage help information. A formatted PDF containing all on-gage help items is available at www.defelsko.com/help. -
Page 20: Power Off
Power Off To conserve battery life, the gage will automatically go to sleep after 5 minutes of inactivity and enter Sleep Mode. While in Sleep Mode the gage powers up significantly faster— convenient when moving between parts or locations. The gage will completely power off after 4 hours of inactivity.
Need help?
Do you have a question about the SST and is the answer not in the manual?
Questions and answers