Table of Contents
Advertisement
Quick Links
Advertisement
Table of Contents

Related Manuals for Hochiki FIRElink-100


Summary of Contents for Hochiki FIRElink-100
- Page 1 FIRElink-100 Air Sampling System INSTALLATION MANUAL...
- Page 2 Hochiki Europe (UK) Limited reserves the right to alter the specifications of its products from time to time without notice. Although every effort has been made to ensure the accuracy of the information contained in this document it is not warranted or represented by Hochiki Europe (UK) Limited to be a complete and up-to-date description.
-
Page 3: Table Of Contents
Histogram Screen ......................16 1.14 Chart Recording ........................18 1.15 Load / Save Function Settings ....................18 Design Limitations ........................20 System Design ........................21 EN54-20 Compliance ......................22 Installation............................ 24 Docking Station ........................24 © 2010 Hochiki Europe (UK) Ltd 9-5-0-345/ISS4/OCT10... - Page 4 Signal Connections ......................25 Final installation ........................26 Interfacing .............................28 Setting the Detector Address....................28 Connecting a FIRElink-100 to a SenseNET/RS485 Detector Network........29 Connecting a FIRElink-100 to an addressable Fire Panel ............30 Connecting to a PC .......................31 Event Log ............................32 Commissioning..........................34 Commissioning Checklist ......................34 Maintenance..........................35...
-
Page 5: Introduction
FIRElink-100 – Installation Manual Page 5 of 40 Introduction FIRElink-100 is a highly sophisticated ‘next generation‘ of High Sensitivity Aspirating Smoke Detection product that has been designed to ensure that installation and commissioning is as simple as possible, while optimising performance. -
Page 6: Indicators
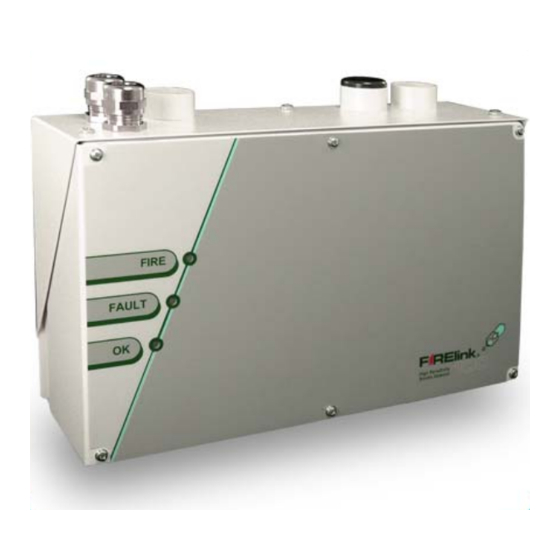
Page 6 of 40 FIRElink-100 – Installation Manual Hochiki Europe has taken every care to ensure that FIRElink-100 is as simple to install as possible but in case of difficulty, please contact our Product Support Department to ensure trouble free installation and operation. -
Page 7: Inside The Detector
FIRElink-100 – Installation Manual Page 7 of 40 1.2 Inside the Detector Fan Relay Board Removable Terminal Filter Blocks Detector Address RS232 Serial Port Addressable Programmable DIP Switch Interface Card (FIRElink-APIC) port © 2010 Hochiki Europe (UK) Ltd 9-5-0-345/ISS4/OCT10... -
Page 8: Detector Terminal Block Connections
(see connections for use in sections 3.1.4and 4.2) Normally Normally open conjunction with Power supply interface card (see closed FAULT FIRE relay connections (see relay contacts contacts sections 3.1.4 and 4.3) section 3.1.3) © 2010 Hochiki Europe (UK) Ltd 9-5-0-345/ISS4/OCT10... -
Page 9: Programming The Detector
1.4 Programming the Detector The FIRElink-100 may be programmed from a PC when connected to the detector via a standard 9-pin serial lead connected to the serial port of the computer and the 9 way socket at the base of the detector (see section 4.4 “Connecting to a PC”... -
Page 10: Alarm Levels And Delays Tab
5 seconds. 1.6.3 ClassiFire® Override This function has no current use on the FIRElink-100 but is reserved for future expansion purposes. 1.6.4 Alarm Factor The detector sensitivity is set with this entry, which will also affect the probability of nuisance alarms. 0 = high sensitivity, higher probability, 8 = low sensitivity, lower probability. -
Page 11: Ldd Enable
If the detector is in FastLearn mode, unticking this box will stop the FastLearn process. Using the function in this way is neither recommended nor supported by Hochiki Europe (UK) Limited). Ticking the box will start a FastLearn at any time. The green “OK” LED on the front of the detector will flash for the fifteen minutes that it takes for the FastLearn process, and will then change to constant illumination to indicate that the FastLearn is complete. -
Page 12: Day/Night Switching Tab
1.8 Alarm Actions Tab 1.8.1 Remote Functions (Remote Input subgroup) These functions have no current use on the FIRElink-100 but are reserved for future expansion purposes. 1.8.2 Programmed Isolate When this function is ticked the controller will not generate alarms and will not indicate a fault condition on any fire panel which is connected, for use during detector maintenance for example. -
Page 13: Device Information Tab
Log” on page 32for further details. 1.9.5 Device Text This function has no current use on the FIRElink-100 but is reserved for future expansion purposes. 1.10 Referencing Tab 1.10.1 Reference Detector A FIRElink detector may use another detector as a fresh air reference. This function is the address of the detector, which will be used as the reference. -
Page 14: Flow Monitoring Tab
This feature requires the Remote Control Software version 3.2 or later, available from the Hochiki Europe Technical Support Department (psupport@hochikieurope.com). The default flow fault thresholds on the FIRElink-100 are set to meet the stringent airflow monitoring requirements of EN54-20, with a default flow fault delay of 30 seconds. This may lead to unwanted flow faults being generated when local conditions cause short-term variations in airflow. -
Page 15: Chart Recording Rate
This function defaults to “--“, which means that a separator fault will only appear when the efficiency decreases to 80% (see 1.12.3, “Separator Condition”). However, a date may be entered into this function © 2010 Hochiki Europe (UK) Ltd 9-5-0-345/ISS4/OCT10... -
Page 16: Factory Default
The histogram screen shows various aspects of the detector function. To enter the histogram screen, either select the menu options View > Histogram Viewer, or click the button on the toolbar as indicated below: The following screen is displayed: © 2010 Hochiki Europe (UK) Ltd 9-5-0-345/ISS4/OCT10... - Page 17 These figures give the position of the various alarm flags in terms of a percentage of full scale deflection. Detector output: This shows the real-time variation in background smoke levels in terms of a percentage of full scale deflection. © 2010 Hochiki Europe (UK) Ltd 9-5-0-345/ISS4/OCT10...
-
Page 18: Chart Recording
> Open or click on the button on the toolbar as indicated below: A file browser window will be displayed, click on the “List files of type” drop-down box and select “Detector settings (*.dfs)” as indicated below: © 2010 Hochiki Europe (UK) Ltd 9-5-0-345/ISS4/OCT10... - Page 19 A list will appear of all detector settings files stored on the current drive. As a special case, if desiring to recall the factory default settings, there is a file named ‘default.dfs’ in the ‘remote2k’ directory. Loading this file will reset the detector to the factory default. © 2010 Hochiki Europe (UK) Ltd 9-5-0-345/ISS4/OCT10...
-
Page 20: Design Limitations
FIRElink products should be used. Maximum length of sampling pipe used with the FIRElink-100 detector is 100 metres in STILL AIR with 20 sampling holes (or Capillary Remote Sampling Points). This will provide a transport time from the end of the sampling pipe within 120 seconds. -
Page 21: System Design
Simple designs with short sampling pipes produce the best results. Complex sampling pipe runs should be avoided with the FIRElink-100 detector. The use of ‘T’ branch-pipes is not recommended. To assist in design and to verify system performance, it is advisable to use the FIRElink PipeCAD® sampling pipe modelling software. -
Page 22: En54-20 Compliance
If it has changed for any reason. the new figure must be re-entered into PipeCAD and the recalculated hole sensitivities must be © 2010 Hochiki Europe (UK) Ltd 9-5-0-345/ISS4/OCT10... - Page 23 *The results should be verified at installation by entering the installed detector's Fire 1 sensitivity (as indicated in the remote software histogram screen) into the PipeCAD “Options/Calculation options/Detector sensitivity” field and recalculating the layout results. © 2010 Hochiki Europe (UK) Ltd 9-5-0-345/ISS4/OCT10...
-
Page 24: Installation
1131 3.1 Docking Station The basic principle behind installation of the FIRElink-100 is that all wiring and pipe-work is installed using a docking station. This is a convenient feature which means that the detector can be dismounted or replaced without disturbing any wiring or installed pipe-work. -
Page 25: Mechanical Installation
3.1.2 Electrical Installation The FIRElink-100 detector is supplied with removable terminal blocks (see illustrations in Section 1.3). These are simply removed from their sockets by lifting them up at right angles to the circuit board. Take note of the orientation of each terminal block and its function before removing it. It may also be beneficial to mark the connection wires with suitable identification labels or coloured rings to aid in the connection process. -
Page 26: Final Installation
NOTE: The detector is designed solely for operation with the front cover securely fitted using all four fixing screws. Removing the detector is simply the reverse of this process, leaving the pipe-work and wiring connections installed in the docking station. © 2010 Hochiki Europe (UK) Ltd 9-5-0-345/ISS4/OCT10... - Page 27 FIRElink-100 – Installation Manual Page 27 of 40 Dock Fixing Screws Cover Fixing Screws x6 © 2010 Hochiki Europe (UK) Ltd 9-5-0-345/ISS4/OCT10...
-
Page 28: Interfacing
FIRElink-100 – Installation Manual Interfacing Because of the flexible nature of the FIRElink-100 detector and the many possible configurations, there are many options for interfacing the detectors to the Fire Panel. These include many third party interfaces available from various manufacturers. Because of this, it is not possible to give a complete list of all interfacing methods but the following pages will give details of the most common methods that are likely to be used. -
Page 29: Connecting A Firelink-100 To A Sensenet/Rs485 Detector Network
Module and a number of FIRElink-400 detectors. It will be noted that whereas the FIRElink-400 units have two input / output buses (1A / 1B and 2A / 2B), the FIRElink-100 has only a single such bus (A / B) and therefore each bus terminal has an input and an output wire, compared with a single wire in each terminal in the FIRElink-400. -
Page 30: Connecting A Firelink-100 To An Addressable Fire Panel
The only settings that need to be made are on the FIRElink-APIC address DIP switches. The start loop address Is entered on SW1 and the end loop address on SW2. In the case of a single FIRElink-100 the start and end addresses will be the same. -
Page 31: Connecting To A Pc
To connect a single stand-alone detector to a PC, connect the PC‘s serial port directly to the detector‘s 9- way RS232 port, which is situated on the bottom surface of the detector case. Connections for this cable are shown below: © 2010 Hochiki Europe (UK) Ltd 9-5-0-345/ISS4/OCT10... -
Page 32: Event Log
This shows the time and date of each event stored in the log along with its general description. The buttons at the bottom of the screen allow control over the input and output of the log. © 2010 Hochiki Europe (UK) Ltd 9-5-0-345/ISS4/OCT10... - Page 33 To do this, click on “None”, which unticks all boxes, and then click on “Alarms”. To tick all the boxes, tick “All”. Any or all of the event categories may be selected or deselected as desired. © 2010 Hochiki Europe (UK) Ltd 9-5-0-345/ISS4/OCT10...
-
Page 34: Commissioning
15 minute FastLearn period, and after this the detector will operate at a reduced sensitivity for 24 hours whilst ClassiFire acclimatises to the protected environment and sets up appropriate day and night sensitivity settings. © 2010 Hochiki Europe (UK) Ltd 9-5-0-345/ISS4/OCT10... -
Page 35: Maintenance
Page 35 of 40 Maintenance FIRElink-100 is a very low maintenance detection system. If required, external cleaning of the unit should be performed using a damp (not wet) cloth. Do not use solvents as these may mar the front panel label. - Page 36 They will therefore open on test. Save As: Saves the summary list of scanned detectors and their status as a text (.txt) file. Print: Prints the summary list to a connected printer. © 2010 Hochiki Europe (UK) Ltd 9-5-0-345/ISS4/OCT10...
-
Page 37: Troubleshooting
(for example, the detector is in a roof space and sampling from an enclosed room), this may lead to flow faults. In this case it would be necessary to lead a pipe from the exhaust to the © 2010 Hochiki Europe (UK) Ltd 9-5-0-345/ISS4/OCT10... -
Page 38: Low Flow" Error Messages
Check that installed pipe-work is fitted with an end-cap. The FIRElink PipeCAD® pipe modelling Open bore pipes are not recommended. software prompts the use of appropriate end-caps. Check that the high flow fault threshold is not set too low (see section 1.11.2) © 2010 Hochiki Europe (UK) Ltd 9-5-0-345/ISS4/OCT10... -
Page 39: Do's And Don'ts
If it is suspected that the laser alignment has shifted (for example, after dropping the detector), it should be returned to Hochiki Europe (UK) Ltd for recalibration. Place the detector near high power RF sources. -
Page 40: Firelink-100 Specification
Data Bus Length 1.2 km IP Rating IP50 NOTE: This equipment is only to be used in accordance with this specification. Failure to operate the equipment as specified may cause damage to the unit. © 2010 Hochiki Europe (UK) Ltd 9-5-0-345/ISS4/OCT10...
Need help?
Do you have a question about the FIRElink-100 and is the answer not in the manual?
Questions and answers