Table of Contents
Advertisement
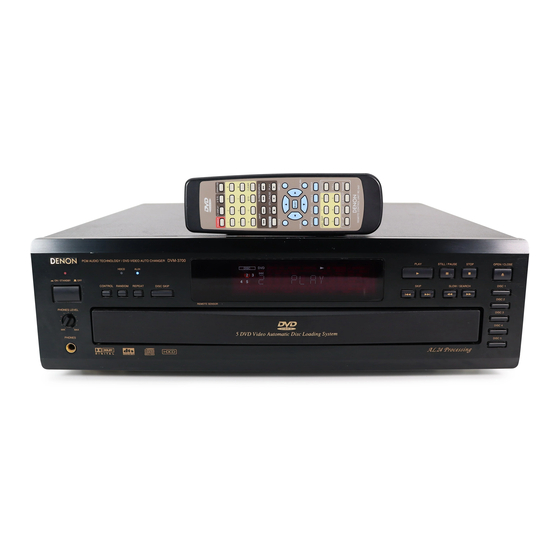
DVD VIDEO AUTO CHANGER
DVM-3700
OPERATING INSTRUCTIONS
MODE D'EMPLOI
B
PCM AUDIO TECHNOLOGY / DVD VIDEO AUTO CHANGER
HDCD
AL24
POWER
¢
ON / STANDBY
£
OFF
CONTROL
RANDOM
REPEAT
DISC SKIP
PHONES LEVEL
MIN
MAX
PHONES
FOR ENGLISH READERS
POUR LES LECTEURS FRANCAIS
DVM-3700
REMOTE SENSOR
5 DVD Video Automatic Disc Loading System
PAGE 06 ~ PAGE 062
PAGE 63 ~ PAGE 119
PLAY
STILL / PAUSE
STOP
OPEN / CLOSE
SKIP
SLOW / SEARCH
DISC 1
DISC 2
DISC 3
DISC 4
DISC 5
POWER
FL DISPLAY
V.S.S.
OPEN/CLOSE
1
2
3
4
5
6
7
8
9
0
10
CLEAR
- SKIP -
SLOW/SEARCH
8
9
6
7
CONTROL
STOP
STILL/PAUSE
PLAY
2
3
1
TITLE
MENU
SELECT
DISPLAY
RETURN
SUBTITLE
AUDIO
ANGLE
MARKER
DISC SKIP
1
2
PROG/DIRECT
3
4
5
CALL
SET UP
REPEAT A-B REPEAT
RANDOM
B
REMOTE CONTROL UNIT RC-542
Advertisement
Table of Contents

Related Manuals for Denon DVM-3700


Summary of Contents for Denon DVM-3700
- Page 1 DVD VIDEO AUTO CHANGER DVM-3700 OPERATING INSTRUCTIONS MODE D’EMPLOI PCM AUDIO TECHNOLOGY / DVD VIDEO AUTO CHANGER DVM-3700 HDCD AL24 POWER ¢ ON / STANDBY £ CONTROL RANDOM REPEAT DISC SKIP REMOTE SENSOR PHONES LEVEL 5 DVD Video Automatic Disc Loading System...
-
Page 2: Important To Safety
2. Do not open the top cover In order to prevent electric shock, do not open the top cover. If problems occur, contact your DENON DEALER. 3. Do not place anything inside Do not place metal objects or spill liquid inside the DVD video player. - Page 3 ON / STANDBY £ CONTROL RANDOM PHONES LEVEL PHONES REAR PANEL PANNEAU ARRIERE VIDEO OUT S-VIDEO OUT DVM-3700 AL24 REPEAT DISC SKIP REMOTE SENSOR 5 DVD Video Automatic Disc Loading System @9 #1 @5 5 @6 @7 @ 8 #0 COAXIAL OPTICAL...
-
Page 4: Safety Instructions
Read Instructions – All the safety and operating instructions should be read before the appliance is operated. Retain Instructions – The safety and operating instructions should be retained for future reference. Heed Warnings – All warnings on the appliance and in the operating instructions should be adhered to. - Page 5 NOTE ON USE / OBSERVATIONS RELATIVES A L’UTILISATION • Avoid high temperatures. Allow for sufficient heat dispersion when installed on a rack. • Eviter des températures élevées Tenir compte d’une dispersion de chaleur suffisante lors de l’installation sur une étagère. •...
-
Page 6: Table Of Contents
±0.00002 dB, a figure comparable to that of professional recorders. High precision multi 24-bit D/A converter (1) The DVM-3700 is equipped with a multi 24-bit D/A converter for faithful D/A conversion of the high quality 24-bit data achieved through AL 24 Processing. This... - Page 7 Dolby Digital (AC-3) bitstream output compatibility (NOTE 1) The DVM-3700 is compatible with Dolby Digital (AC-3) bitstream output. When a Dolby Digital (AC-3) decoder is connected, the three-dimensional sense and positioning of the sound is recreated extremely naturally, resulting in a strong sense of presence, as if you were in a movie theater or concert hall.
-
Page 8: Discs
ENGLISH DISCS • The types of discs listed on the table below can be used on the DVM-3700. The marks are indicated on the disc labels or jackets. Usable Mark discs (logo) Digital audio + DVD video Digital audio +... -
Page 9: Cautions On Handling Discs
Only the discs including the marks shown on page 8 can be played on the DVM-3700. Note, however, that discs with special shapes (heart-shaped discs, hexagonal discs, etc.) cannot be played on the DVM-3700. Do not attempt to play such discs, as they may damage the player. Holding Discs Avoid touching the surface of discs when loading and unloading them. -
Page 10: Connections
• Be sure to connect the left and right channels properly, L (left) to L, R (right) to R. (1) Connecting to an AV TV • Use the included video/audio cord to connect the TV’s video input connectors and audio input connector to the DVM-3700’s video output connectors and audio output connector. DVM-3700... - Page 11 DVM-3700 COMPONENT VIDEO IN NOTE: • Use three commercially available 75 Ω/ohm pin-plug cord to connect the DVM-3700’s color component output connectors to the TV or monitor. NOTES: • Some discs contain copy prohibit signals. If such discs are played via a VCR, the copy prohibit system may cause disturbance in the picture.
- Page 12 (3) Connecting to a Dolby Digital (AC-3) or DTS (digital theater systems) Decoder When DVDs recorded in Dolby Digital or DTS are played, Dolby Digital or DTS bitstream signals are output from the DVD player’s digital audio output connectors. If a Dolby Digital or DTS decoder is connected, you can achieve sound with the power and sense of presence of a movie theater or concert hall.
- Page 13 Sound output from the DVM-3700’s digital audio output connectors Disc played Audio recording format Dolby Digital (AC-3) DVD video Linear PCM 48 kHz/96 kHz 16/20/24 bit Video CD MPEG1 Linear PCM NOTE 1: The type of audio output from the connector can be selected by “7 Digital Audio Output” of the initial setting. (See page 56.) NOTE 2: Compressed audio is converted to PCM before output.
-
Page 14: Connecting To A Stereo Component
(5) Connecting to a Stereo Component VIDEO IN VIDEO OUT S-VIDEO OUT NOTE: • Use commercially available 75 Ω/ohm pin-plug cord to connect the DVM-3700‘s video out connector to the TV or monitor. COAXIAL OPTICAL OUT OUT COMPONENT REMOTE DIGITAL OUT... -
Page 15: Part Names And Functions
• Press this button to set the control mode. In the control mode, the separately sold 100 CD changer (DCM-5000/5001) can be operated using the buttons on the DVM-3700 or the included remote control unit (RC-542). • The CONTROL OUT connector on the rear panel of the DVM-... - Page 16 ENGLISH (3) Display Source Indicators These indicate the type of disc currently playing. Program Indicator • The title/chapter number is Disc Indicator • The number of the trays in which discs are loaded light. • “ ” lights for tray numbers in which CDs and Video CDs are loaded. •...
-
Page 17: Remote Control Unit
REMOTE CONTROL UNIT The DVM-3700 can be controlled from a distance using the included remote control unit (RC-542). (1) Inserting Batteries q Remove the remote control unit’s rear cover. w Place two batteries (“AA” (R6P)) in the battery compartment in the direction indicated by the marks. - Page 18 ENGLISH (3) Names and Functions of Remote Control Unit Buttons FL DISPLAY button Press this to display audio information on the currently playing disc on the fluorescent display. POWER button Press this to switch the power between on and standby. Number buttons Use these to input numbers.
-
Page 19: Loading Discs
NOTES: • Do not move the DVM-3700 while a disc is playing. Doing so may scratch the disc. • For discs on which both sides can be played, load the disc with the side you want to play facing down. - Page 20 ENGLISH (2) Loading Discs How to load a disc • Make sure the drawer is completely open. • Hold the disc by the edges and place it on the disc tray. (Do not touch the signal surface, i.e., the glossy side.) •...
-
Page 21: Playback
PLAYBACK (1) Playback DVM-3700 PCM AUDIO TECHNOLOGY / DVD VIDEO AUTO CHANGER HDCD AL24 POWER ON / STANDBY ¢ £ CONTROL RANDOM REPEAT DISC SKIP REMOTE SENSOR PHONES LEVEL 5 DVD Video Automatic Disc Loading System PHONES Turn on the power. - Page 22 Press the OPEN/CLOSE ( ) button again to close the drawer. • If appears on the TV screen while buttons are being operated, that operation is not possible on the DVM-3700 or with that disc. SLOW/SEARCH - SKIP - CONTROL...
-
Page 23: Stopping Playback
• Cancelling the RESUME function will also clear the chapter preview function. • The chapter preview function may not work with some DVDs. • After 30 minutes in the stop mode, the DVM-3700’s power automatically turns off and the standby mode is set. (Auto Power Off) •... -
Page 24: Selecting The Disc
ENGLISH (3) Selecting the disc Press the button for the number of the desired disc (1 to 5). Press the number of the desired chapter or track (0 to 10 and ≥10 button). (4) Selecting DISC SKIP Press the DISC SKIP button. •... -
Page 25: Skipping To The Beginning Of Chapters Or Tracks
(7) Skipping to the Beginning of Chapters or Tracks During playback, press one of the skip buttons. : Reverse direction : Forward direction • A number of chapters or tracks equal to the number of times the button is pressed is skipped. •... -
Page 26: Using The Gui Screens
ENGLISH USING THE GUI SCREENS Use this function to display and change information on the disc (titles, chapters, time, audio, subtitles, angles, etc.) and on the player (repeat, play mode, markers, etc.). In the play or stop mode, press the DISPLAY button. •... - Page 27 Use the cursor buttons to select the item you wish to change. • The selected item is displayed with a yellow frame. Use the cursor buttons to change the item. • ª • Some changes are effective immediately, while some changes are only made after the SELECT or PLAY button is pressed.
- Page 28 ENGLISH For video and music CDs Change the title No. by using the cursor buttons ( Track No. or the numeric buttons and press SELECT. Elapsed playing time (minute: second) Audio mode (Video CD only) NOTES: • Track No. and the elapsed playing time are not displayed during menu play of Video CDs with playback control. •...
- Page 29 Description of Icons Displayed on the TV Screen (Player Information Screen) Press SELECT during play and press SELECT again at the preferred point to store a marker. (Marker no. is displayed instead of “ * ”.) Markers • To recall a marker, select the preferred marker no. by using the cursor buttons ( •...
- Page 30 ENGLISH Description of Icons Displayed on the TV Screen (Shuttle Screen) Slow-motion play Press the cursor button ( (Backward) (DVD only) –100 Rapid reverse Press the cursor button ( NOTES: • Each time the cursor button • The figures appearing at both ends of the shuttle screen stand for the maximum speeds of rapid reverse and rapid advance. (DVD: +100/–100, Video CD: +40/–40, CD: +50/–50) Still/Pause Press the cursor button (...
-
Page 31: Marking Scenes You Want To See Again
MARKING SCENES YOU WANT TO SEE AGAIN Set marks at scenes you want to see again so that you can start playback from the marked position whenever you want. Setting Marks During playback, press the MARKER button. • The marker screen appears. •... -
Page 32: Playing Repeatedly
ENGLISH PLAYING REPEATEDLY Use this function to play your favorite audio or video sections repeatedly. Playing Repeatedly (Repeat Playback) DVM-3700 PCM AUDIO TECHNOLOGY / DVD VIDEO AUTO CHANGER HDCD AL24 POWER ON / STANDBY ¢ £ CONTROL RANDOM REPEAT DISC SKIP... - Page 33 Playing a Certain Section Repeatedly (A-B Repeat Playback) During playback, press the A-B button. • This sets start point A. Press the A-B button again. • This sets end point B, and repeat playback of the A-B section starts. To return to normal playback: Press the A-B REPEAT button until the display’s “REPEAT”...
-
Page 34: Playing Tracks In The Desired Order
ENGLISH PLAYING TRACKS IN THE DESIRED ORDER Use this function with video and music CDs to play the tracks in the desired order. (This function will not work for DVDs.) Up to 32 tracks can be set in a program. In the stop mode, press the PROG/DIRECT button on the remote control unit. -
Page 35: Playing The Tracks In Random Order
NOTES: • The programmed track numbers on the disc of the displayed disc number appear lit on the music calendar. • Programming is not possible for DVDs. • The PROG/DIRECT button does not function when DVDs are loaded in all five trays. •... -
Page 36: 100 Cd Changer Control Function
Press the buttons on the DVM-3700 or the remote control unit. • When one of the buttons on the DVM-3700 or the remote control unit shown on the table below is pressed, the DCM-5000/5001 operates in the same way as when the corresponding button on the DCM-5000/5001 is pressed. -
Page 37: Using The Multiple Audio, Subtitle And Angle Functions
USING THE MULTIPLE AUDIO, SUBTITLE AND ANGLE FUNCTIONS Switching the Audio Language (Multiple Audio Function) With DVDs containing multiple audio language signals, the audio language can be switched during playback. During playback, press the AUDIO button. • The current audio language number is displayed. •... -
Page 38: Switching Vocals On Or Off For Karaoke Discs (Dvd/Video Cd)
ENGLISH Switching vocals ON or OFF for Karaoke discs (DVD/Video CD) Press AUDIO during play. Press the cursor buttons ( selected. • DVD Karaoke (Solo) (0, 1) (OFF) • DVD Karaoke (Duet) (0, 1) (OFF) 1+2 (ON) • • Video CD ( •... -
Page 39: Switching The Subtitle Language (Multiple Subtitle Function)
Switching the Subtitle Language (Multiple Subtitle Function) With DVDs containing multiple subtitle language signals, the subtitle language can be switched during playback. During playback, press the SUBTITLE button. • The current subtitle language number is displayed. • If no subtitles are recorded on the disc, “– –” is displayed. Use the cursor buttons to select the desired language. -
Page 40: Switching The Angle (Multiple Angle Function)
ENGLISH Switching the Angle (Multiple Angle Function) With DVDs containing multiple angle signals, the angle can be switched during playback. During playback, press the ANGLE button. • The current angle number is displayed. Use the cursor buttons or the number buttons to select the •... - Page 41 Reproducing an Advanced Virtual Surround Sound effect [ Dolby Digital (AC-3) DVD ] This player can reproduce a virtual surround sound effect which provides sound as if heard from the front speakers located at the horizontally further position or heard from nonexistent speakers even when only a 2-channel stereo system is connected [for playback of Dolby Digital DVD software (2ch and above) only].
-
Page 42: Using The Menus
ENGLISH USING THE MENUS Using the Title Menu For DVDs containing multiple titles, the desired title can be selected and played from the title menu. During playback, press the TITLE button. • The title menu appears. • If the TITLE button is pressed again, the disc returns to the point at which the title menu was called out and playback resumes from that point. - Page 43 Using the DVD Menu Some DVDs include special menus called DVD menus. For example, DVDs with complex contents may contain guide menus, and DVDs with multiple languages may contain audio and subtitle language menus. These menus are called “DVD menus”. Here we describe the general procedure for using DVD menus.
-
Page 44: Changing The Default Settings
ENGLISH CHANGING THE DEFAULT SETTINGS The default values preset upon shipment from the factory can be changed. The default settings are retained until they are again changed, even if the power is turned off. In the stop mode, press the SET UP button. •... - Page 45 When “1 Disc Languages” is Selected See page 44. Use the cursor buttons to select the desired setting, then press • ª the SELECT button. 1. Audio Use this to set the language of the sound output from the speakers. 2.
- Page 46 ENGLISH e When “3 Menus” is selected: 1. English (Factory default) Select this to display the menus in English. 2. French Select this to display the menus in French. 3. Spanish Select this to display the menus in Spanish. 5. Other * * * * Select this to display the menus in a language other than the ones above.
- Page 47 If a rating of Level 7 or lower has been selected, use the number buttons to input a 4-digit password, then press the SELECT button. Do not forget the password. Once locked, the setting cannot be changed without inputting the correct password.
- Page 48 ENGLISH When playback is restricted (Level 0 to 7) See page 44. Use the number buttons to input the correct password, then press the SELECT button. q To cancel the restriction (unlock the player): • Press number button “1”, then press the SELECT button. The screen in step 1 on page 44 reappears.
- Page 49 When “3 Menu Language” is Selected See page 44. Use the cursor buttons to select “3 Menu Language”, then press • ª the SELECT button. 1. English (Factory default) Select this to set the language used for the default setting screen and the “PLAY”...
- Page 50 ENGLISH When “4 On-Screen Messages” is Selected See page 44. Press the cursor buttons ( SELECT. 1. On-Screen Messages To select whether “Play”, “Still” and other displays are displayed or not. 2. Color and Position To select the color (Blue/Violet/Green) and position (above/slightly below) of “Play”, “Still”...
- Page 51 The settings are completed, and the screen in step 1 on page 44 reappears. To return to the previous menu screen: Press the RETURN button. To exit the default settings: Press the SET UP button or number button “0” at the default setting screen in step 1 on page 44. NOTE: •...
- Page 52 ENGLISH When “5 FL Display” is Selected See page 44. Use the cursor buttons to select the desired screen brightness, • ª then press the SELECT button. 1. Bright (Factory default) The display indications are always bright. 2. Dim The display indications are always dim. 3.
- Page 53 When “6 TV Aspect” is Selected See page 44. Use the cursor buttons to select “6 TV Aspect”, then press the • ª SELECT button. q 4:3 (Factory default) Select this when a conventional size TV is connected. (Factory preset) •...
- Page 54 ENGLISH The settings are completed, and the screen in step 1 on page 44 reappears. To return to the previous menu screen: Press the RETURN button. To exit the default settings: Press the SET UP button or number button “0” at the default setting screen in step 1 on page 44. 1 Disc Languages 2 Ratings Level 8...
- Page 55 • Concerning images which appear on the TV screen (aspect ratios of the screen) Images which appear on the TV screen differ depending on the type of software and the TV set connected. Type of software Software for wide- Screen whose right and screen left edges are cut off (formatted in the...
- Page 56 ENGLISH When “7 Digital Audio Output” is Selected See page 44. Use the cursor buttons to select “7 Digital Audio Output”, then • ª press the SELECT button. 1. LPCM 96k / 48k To select whether digital audio converted to 48 kHz/16 bit is output from the optical/coaxial digital audio output connector or no digital audio is output during playback of the DVD recorded in Linear PCM of 96 kHz.
- Page 57 e When “3 DTS” is selected 1. Off (Factory default) No digital audio is output during playback of the DVD recorded in DTS. 2. Bitstream (NOTE 1) DTS bitstream is output during playback of the DVD recorded in DTS. Select this setting when the player is connected to the DTS decoder. The settings are completed, and the screen in step 3 reappears.
- Page 58 ENGLISH When “9 Other Settings” is Selected See page 44. Use the cursor buttons to select “9 Other Settings”, then press • ª the SELECT button. 1. Still Mode Use this to reduce fluttering of the picture when playing still pictures. 2.
- Page 59 r When “4 D.Range Compression” is selected 1. Off (Factory default) Select this for the standard range. 2. On Select this to achieve powerful sound even when the volume is low. This setting is suited for watching DVDs late at night with the volume low.
- Page 60 ENGLISH Language code list Code Language 6565 Afar 6566 Abkhazian 6570 Afrikaans Ameharic 6577 6582 Arabic 6583 Assamese 6588 Aymara 6590 Azerbaijani 6665 Bashkir 6669 Byelorussian 6671 Bulgarian 6672 Bihari 6678 Bengali; Bangla 6679 Tibetan 6682 Breton 6765 Catalan 6779 Corsican 6783 Czech...
-
Page 61: Troubleshooting
Are the amplifier and speakers operating properly? If the DVM-3700 does not seem to be functioning properly, check the table below. If this does not solve the problem, the DVM-3700 may be damaged. Turn off the power, unplug the power cord from the power outlet, and contact your store of purchase or nearest DENON sales office. -
Page 62: Main Specifications
ENGLISH MAIN SPECIFICATIONS Signal system: NTSC Applicable discs: (1) DVD/video discs (2) Compact discs (CD-DA, Video CD) S-Video output: Y output level: 1 Vp-p (75 /ohms) Output connectors: S connectors, two sets Video output: Output level: 1 Vp-p (75 /ohms) Component output: Y output level: 1 Vp-p (75 /ohms) Cb output level: 0.648 Vp-p (75 /ohms) Cr output level: 0.648 Vp-p (75 /ohms)
Need help?
Do you have a question about the DVM-3700 and is the answer not in the manual?
Questions and answers