Table of Contents
Advertisement
Available languages
Available languages
Quick Links
Advertisement
Table of Contents

Related Manuals for SHE SHE40ST2001SMF


Summary of Contents for SHE SHE40ST2001SMF
- Page 1 BEDIENUNGSANLEITUNG SHE40ST2001SMF HERZLICHEN GLÜCKWUNSCH! VIELEN DANK, DASS SIE SICH FÜR EIN PRODUKT VON SHE ENTSCHIEDEN HABEN. Diese Bedienungsanleitung gibt es in folgenden Sprachen Seite 2 – 11 DEUTSCH Seite 12 – 21 ENGLISH...
-
Page 2: Table Of Contents
INHALTSVERZEICHNIS Wichtige Informationen zur Sicherheit, Standort und zum elektrischen 2 – 3 Anschluss Recycling, Entsorgung, Konformitätserklärung Beschreibung des Geräts Bezeichnung der einzelnen Teile 5 – 6 Montage Füllen des Wassertanks Inbetriebnahme Reinigungshinweise Behebung von Problemen Technische Informationen Garantie LESEN SIE BITTE DIE BEDIENUNGSANLEITUNG SORGFÄLTIG DURCH BEVOR SIE MIT DER INSTALLATION, BEDIENUNG ODER WARTUNG BEGINNEN. - Page 3 Händler oder die Kundenhotline. Wenden Sie sich für eventuelle Reparaturen des Geräts, des Netzsteckers oder Kabels stets und ausschließlich an vom Hersteller autorisierte Kundendienststellen. Die Kundendienststellen können Sie online unter www.she.at abrufen. ● Kinder unter 8 Jahren und Personen mit eingeschränkten physischen, psychischen, sensorischen oder geistigen Fähigkeiten sowie mangelnder Erfahrung und Wissen...
-
Page 4: Recycling, Entsorgung, Konformitätserklärung
örtlichen Behörden. KONFORMITÄTSERKLÄRUNG Hiermit bestätigen wir, dass dieser Artikel grundlegenden Anforderungen, Vorschriften und Richtlinien der EU entspricht. Die ausführliche Konformitätserklärung können Sie jederzeit unter folgendem Link einsehen: she.at/downloads/doc/she40st2001smf.pdf Irrtümer und technische Änderungen vorbehalten. www.she.at BESCHREIBUNG DES GERÄTES Seite 4 von 21... -
Page 5: Bezeichnung Der Einzelnen Teile
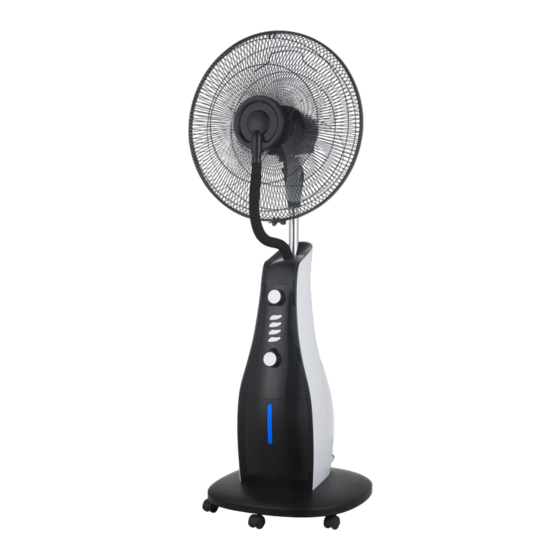
BEZEICHNUNG DER EINZELNEN TEILE Nebelplatte Vorderes Schutzgitter Rotorblattschraube Ventilatorflügel Gewindemutter Hinteres Schutzgitter Ventilatormotor auf Teleskopstange Gehäuse Standfuß mit Rollen MONTAGE Stecken 2. Setzen Sie nun das Drehen Ventilatormotor gesamte Gehäuse (7+8) Rotorblattschraube (3) und die Teleskopstange (7) in das in den Standfuß (9) und Gewindemutter Gehäuse (8) und drücken schrauben... -
Page 6: Füllen Des Wassertanks
Schieben Bringen 6. Bringen Sie nun das vordere anschließend anschließend Schutzgitter (2) an und fixieren Ventilatorflügel (4) über Nebelplatte dieses indem Sie alle Klammern die Motorwelle und fixieren forderen Schutzgitter (2) schließen diese zuvor Sicherheitsschraube entfernten festschrauben. Rotorblattschraube (3). Stecken Sie anschließend den Schlauch an. -
Page 7: Inbetriebnahme
INBETRIEBNAHME 1. Stellen Sie das Gerät auf eine ebene und trockene Fläche (Keine Verwendung in Nassräumen). 2. Stecken Sie den Stecker in eine Standard 220~240V Steckdose. Beschreibung des Bedienfelds Sprühnebel Geschwindigkeitsstufen Timer Funktionen einstellen Ein/Ausschalten des Geräts & Geschwindigkeit einstellen Betätigen Sie Tasten der Geschwindigkeitsstufen um das Gerät einzuschalten: ... -
Page 8: Reinigungshinweise
drücken ziehen Oszillation Durch herunterdrücken des Oszillationsstifts bewegt sich der Ventilatorkopf von rechts nach links und wieder zurück. Dadurch erreichen eine horizontale Luftverteilung im Raum. Um die Funktion zu stoppen ziehen Sie den Stift wieder hinauf. Sprühnebel Um die Funktion zu starten drehen Sie am Sprühnebelregler. REINIGUNGSHINWEISE ACHTUNG ... -
Page 9: Behebung Von Problemen
HINWEIS Wenn die Befeuchtungsfunktion längere Zeit nicht verwendet werden sollte, entleeren Sie Wassertank und Restwasser und trockenen Sie alle Teile sorgfältig und gründlich ab. BEHEBUNG VON PROBLEMEN PROBLEM MÖGLICHE URSACHE LÖSUNG Der Entnehmen Wassertank könnte beschädigt sein. Wassertank und untersuchen diesen Beschädigungen. -
Page 10: Technische Informationen
Kontaktadressen für weitere Schuss Home Electronic GmbH Informationen und Serviceline: Scheringgasse 3, A-1140 Wien Tel: +43 (1) 97 0 21 – 0 Serviceline: +43 (1) 97 0 21 – 502 www.she.at FB-Nr: 236974 t / FB-Gericht: Wien Seite 10 von 21... -
Page 11: Garantie
Mit diesem Qualitätsprodukt von SHE haben Sie eine Entscheidung für Innovation, Langlebigkeit und Zuverlässigkeit getroffen. Für dieses SHE Gerät gewähren wir eine Garantiezeit von 2 Jahren ab Kaufdatum gültig in Österreich! Sollten in diesem Zeitraum wider Erwarten dennoch Servicearbeiten an Ihrem Gerät notwendig sein, garantieren wir Ihnen hiermit eine kostenlose Reparatur (Ersatzteile und Arbeitszeit) oder (nach Ermessen der Firma Schuss) das Produkt auszutauschen. - Page 12 Table of contents Important information on safety, location and electrical connection Recycling, Disposal and Declaration of Conformity Delivery content Technical description Assembly Startup Setting the functions Cleaning instructions Technical instructions Warranty PLEASE READ THIS INSTRUCTION MANUAL CAREFULLY BEFORE STARTING INSTALLATION, OPERATION OR MAINTENANCE. PROTECT YOURSELF AND OTHERS BY FOLLOWING THE SAFETY INSTRUCTIONS.
- Page 13 10. For any possible repairs to the device and the mains plug or power cable you must always refer exclusively to the customer service points recommended by the manufacturer. You can view our customer service points online at www.she.at. ●...
- Page 14 We hereby confirm that this item complies with the basic requirements, regulations and directives of the EU. You can view the detailed Declaration of Conformity by clicking on the following link: www.she.at/downloads/doc/she40st2001smf.pdf Subject to errors and technical changes. www.she.at DESCRIPTION...
- Page 15 DESCRIPTION OF THE PARTS 1. Front mist plate 2. Front Guard 3. Blade cap 4. Blade 5. Guard Mounting Nut 6. Rear Guard 7. Motor on telescopic rod 8. Fan Body 9. Base and castor wheels ASSEMBLY 1. Insert the fan motor on 2.
- Page 16 FILLING OF THE WATER TANK 1. Open the water tank 2. Lift out the water tank. 3. Turn the tank over so that cover. the shutter is facing up. 4. Now unscrew the cap and fill the tank with pure, cold water. 5.
- Page 17 START UP 1. Place the device on a flat and dry surface (no use in wet rooms). 2. Plug the connector into a standard 220 ~ 240V outlet. Description of the control panel Setting the functions ON/OFF and Setting the Speed Please push the buttons to start the fan and set the speed levels: ...
- Page 18 CLEANING TIPS WATCH OUT! Always allow the unit to come to a complete stop before cleaning and disconnect it from the mains by pulling the power plug with dry hands. Do not immerse the fan in water or other liquids. Do not allow water to drip onto or into the motor housing of the fan.
- Page 19 TROUBLE SHOOTING PROBLEM POSSIBLE CAUSE SOLUTION The water tank could be Remove the water tank and damaged. inspect it for damage. The watertank is empty. Fill the watertank – a full water tank lasts up to 8 hours. The fan works, but the fog function does not work ...
- Page 20 Home Electronic GmbH service line: Scheringgasse A-1140 Vienna Tel: +43 (1) 97 0 21 – 0 Service line: +43 (1) 97 0 21 – 502 www.she.at Commercial register no.: 236974 t / Commercial register court: Vienna Seite 20 von 21...
-
Page 21: Seite 2 Von
By purchasing a SHE quality product you have acquired an innovative, long lasting and reliable item. For this SHE device we grant a warranty of 2 years from the date of purchase, valid in Austria only. In the unlikely event that service work is required on your device in this period we warrant free repair (spare parts and labour) or (subject to Schuss’s decision) to replace the product.
Need help?
Do you have a question about the SHE40ST2001SMF and is the answer not in the manual?
Questions and answers