GOLDENSEA UV UVM216 User Manual
Hide thumbs
Also See for UVM216:
- User manual (16 pages) ,
- Quick start manual (4 pages) ,
- User manual (16 pages)
Table of Contents
Advertisement
Quick Links
Advertisement
Table of Contents

Subscribe to Our Youtube Channel
Related Manuals for GOLDENSEA UV UVM216


Summary of Contents for GOLDENSEA UV UVM216
- Page 1 UVM216 USER MANUAL KEEP THIS MANUAL FOR FUTURE NEEDS...
-
Page 2: Table Of Contents
Thank you for purchasing a GOLDENSEA UV product. You have acquired a powerful and versatile device. We are confident that you will be satisfied with our excellent products and service. For your own safety, please read this user manual carefully before installing and operating the device. -
Page 3: Safety Instructions
10. Insufficient disinfection time or insufficient radiation will influence the effect of disinfection. 11. If possible, the external power supply for GOLDENSEA UV products should be installed with a qualified inline leakage protection device. 12. Ensure the surface of the lamp tube is clean before use. If dust is found on the lamp tube, please wipe it with a clean cloth. - Page 4 18. Dispose of used or broken lamps by following your local hazardous waste management guidelines. Do not dispose of lamps with household waste. 19. If there is a technical problem with any GOLDENSEA UV product, please contact GOLDENSEA or an official GOLDENSEA UV local distributor; Never disassemble a product without the instruction of qualified service personnel.
- Page 5 www.goldenseauv.com UV-C RISK GROUP 3 WARNING UV-C emitted from this product. Avoid eye and skin exposure to unshielded product. Follow installation instructions and user manual. Important: Damage caused by disregarding this user manual is not subject to warranty. The dealer and manufacturer will not accept liability for any resulting defects or problems.
-
Page 6: Features
www.goldenseauv.com For safety reasons, please be aware that modifications to the device are prohibited and may lead to short-circuits or fire. GOLDENSEA will not be liable for any consequence caused by modifications to the product. 2. Features Power Supply • AC 100-240V~, 50/60Hz •... - Page 7 www.goldenseauv.com Accessories List: UV Tube Included Remote Control Included (battery type: CR2025) UV Glasses Included (protective eyewear) Warning Sign Included UV Irradiance Meter Optional...
-
Page 8: Product Overview
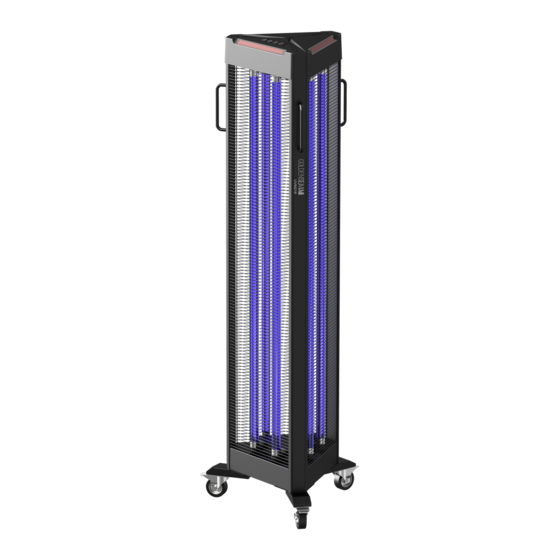
www.goldenseauv.com 3. Product Overview 1) Grid Opening Tabs 8) Brake Lever 2) Handle 9) Indicator Lights 3) Protective Grid 10) 30 mins - touch key 4) UV Tube 11) 60 mins - touch key 5) Power Switch 12) 120 mins - touch key 6)... -
Page 9: Dimensional Drawings
www.goldenseauv.com 4. Dimensional Drawings... -
Page 10: Operation Guide
www.goldenseauv.com 5. Installation Instructions Installation of Wheels 5.1. The 3 universal wheels of this device had been turned inwards and fixed at the center of the bottom when it was packed. Before using the product, the 3 wheels must be installed back to the correct positions. - Page 11 www.goldenseauv.com 7. Take the remote control with you when exiting the disinfection area or store it in the remote control bag. 8. Close the door of the disinfection area. 9. If there is a significant gap on the door, please make sure the gap is closed before operating.
- Page 12 www.goldenseauv.com 6. Once the countdown has ended, the UV tubes will be activated and light up, and the red power indicator will stay on during the entire disinfection process. 7. Once the disinfection process has ended, the red indicator on the button will turn off and the power indicator will switch to green.
- Page 13 www.goldenseauv.com 2. To make it work again after auto power off, put the device back to the normal upright position, make sure the power plug is still well-connected to the power socket, re-start the operation again from the beginning. 6.6. Moving The Unit This device has been integrated with 3 universal wheels and handles for fast and easy relocation.
-
Page 14: Replacing The Uv Tube
www.goldenseauv.com 7. Replacing The UV Tube To maintain the sterilizing efficacy, the UV tube needs to be replaced after 9,000 hours of use. Steps: 1. Wait for UV tube to cool down (to avoid scalding) after switching off the device. 2. -
Page 15: Troubleshooting Tips
www.goldenseauv.com 8. Troubleshooting Tips 8.1. What to do if the device doesn’t work? 1. Ensure the device is plugged into a working wall socket. 2. Ensure the plug is wired correctly and terminal well-connected. 3. If you still have issues with the device, please contact your local dealer or our customer service for assistance. -
Page 16: Cleaning And Maintenance
www.goldenseauv.com 9. Cleaning and Maintenance 1. To ensure the device remains in good condition and does not fail prematurely, regular maintenance, cleaning and checks are required. 2. For cleaning of the device, please use a lint-free cloth. 3. To avoid damage to the device, never use detergent or solvents. 4.
Need help?
Do you have a question about the UVM216 and is the answer not in the manual?
Questions and answers