Chapters
Table of Contents

Related Manuals for Nostalgia SMM200 Series


Summary of Contents for Nostalgia SMM200 Series
- Page 1 All products are trademarks of Nostalgia Products LLC. Worldwide design & utility patented or patents pending. © 2017 Nostalgia Products LLC. www.nostalgiaproducts.com (rev. 07/11/17 JR)
- Page 2 Electric S'mores Maker Appareil Électrique Pour S’mores Máquina Eléctrica de S’mores Instructions and Recipes Consignes et Recettes Instrucciones y Receta...
-
Page 4: Table Of Contents
CONTENTS IMPORTANT PRECAUTIONS ......3 IMPORTANT SAFEGUARDS ......3 INTRODUCTION . -
Page 5: Important Precautions
IMPORTANT PRECAUTIONS NEVER immerse appliance in water. NEVER use near water. NEVER use an abrasive sponge or cloth on the appliance. NEVER leave appliance unattended while in use. NEVER place anything other than what is being cooked on the appliance. Unplug unit from outlet when not in use and during cleaning. -
Page 6: Introduction
SAVE THESE INSTRUCTIONS! INTRODUCTION Thank you for purchasing the ELECTRIC S'MORES MAKER from Nostalgia™! Now you can bring a taste of the outdoors inside and enjoy homemade s'mores all year 'round! The simple pleasure of gooey marshmallow, chocolate and graham crackers can be yours without the hassle of building a bonfire, or dealing with those pesky mosquitos! Simply plug in, turn on and roast your marshmallow to perfection. -
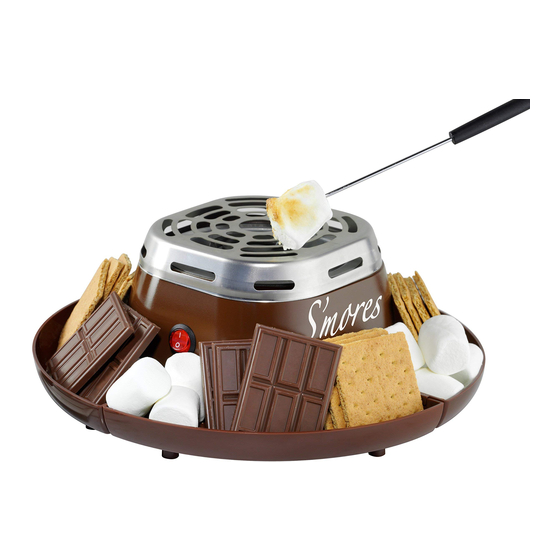
Page 7: Parts & Assembly
PARTS & ASSEMBLY PARTS Heater (inside) Top Cover Food Tray Roasting Power Switch Fork ASSEMBLY • Thread the plug of the ELECTRIC S'MORES MAKER through the hole in the center of the Food Tray. • The Power Cord should be placed between the gaps of each compartment. •... -
Page 8: How To Operate
HOW TO OPERATE • Place the ELECTRIC S'MORES MAKER on a flat, stable surface near an electrical outlet before starting. Keep about a foot of space around the unit to make sure that there is proper ventillation. • Always make sure that the cord is away from any water source. •... -
Page 9: Helpful Tips
HELPFUL TIPS MARSHMALLOWS Packaged marshmallows tend to become misshapen. For even heating, it is best to mold marshmallows back into cylindrical shape before sliding onto Roasting Fork for cooking. BURNING/SMOKING DO NOT overcook the marshmallow, as it may melt and fall on the Top Cover, causing smoke, fire, and a stain mark. -
Page 10: Recipes
RECIPES How to make the perfect s'mores with your ELECTRIC S'MORES MAKER: Prepare marshmallows by following directions in How to Operate section. While marshmallows are roasting, take graham crackers and break into halves. Break milk chocolate bars into squares and place one square onto each graham cracker half. When marshmallows are done, place one roasted marshmallow on top of chocolate square and top with a graham cracker half. - Page 11 ROASTED STRAWBERRY-BANANA FLUFFERNUTTER SANDWICH • Large, Strawberry Roast marshmallows using ELECTRIC S'MORES Marshmallows MAKER as directed on page 6. • Peanut Butter While marshmallows are roasting, toast bread slices until lightly browned and slightly crispy on the outside. • Slices of Bread (white bread preferred) Spread peanut butter on each slice of bread.
-
Page 12: Returns & Warranty
A representative will contact you as soon as possible. Product Warranty Terms Nostalgia Products LLC (the “Company”) hereby warrants that for a period of one (1) year from the date of original purchase, this product will be free of defects in material and workmanship under normal home use, provided that the product is operated and maintained in accordance with the operating instructions. - Page 13 TABLE DES MATIÈRES IMPORTANTES MESURES DE PRÉCAUTION ....12 IMPORTANTES MISES EN GARDE ......12 INTRODUCTION .
-
Page 14: Importantes Mesures De Précaution
IMPORTANTES MESURES DE PRÉCAUTION NE JAMAIS plonger l'appareil dans l'eau. NE JAMAIS utiliser près d'une source d'eau. NE JAMAIS utiliser une éponge ou un chiffon abrasif sur l'appareil. NE JAMAIS laisser l'appareil sans surveillance pendant le fonctionnement. NE JAMAIS mettre à cuire autre chose que les aliments de cuisson dans l'appareil. Débrancher la prise de l'appareil lorsqu'il n'est pas utilisé... -
Page 15: Introduction
CONSERVER CES CONSIGNES ! INTRODUCTION Merci d'avoir acheté l'APPAREIL ÉLECTRIQUE POUR S’MORES de Nostalgia Electrics ! Vous pouvez désormais apporter le goût de l'extérieur à l'intérieur et dégustez des s'mores tout au long de l'année ! Le simple plaisir de déguster de guimauves, chocolat coulant et des biscuits Graham sera le vôtre, sans les tracas pour construire un feu de... -
Page 16: Pièces Et Assemblage
PIÈCES ET ASSEMBLAGE PIÈCES Chaufferette (à l'intérieur) Plaque du dessus Barquette Fourchette à fondue Interrupteur de marche/arrêt ASSEMBLAGE • Passer la prise de l'APPAREIL ÉLECTRIQUE POUR S’MORES par le trou au centre du plateau à barquettes. • Le cordon d'alimentation doit être placé entre les espacements de chaque compartiment. •... -
Page 17: Mode D'emploi
MODE D'EMPLOI • Placer l'APPAREIL ÉLECTRIQUE POUR S’MORES sur une surface plane et stable, à proximité d'une prise de courant avant de commencer. Maintenir un dégagement d'environ 30 cm (1 pi) autour de l'appareil pour s'assurer d'une bonne aération. • Toujours s'assurer que le cordon électrique est éloigné... -
Page 18: Conseils Utiles
CONSEILS UTILES GUIMAUVES Les guimauves emballées ont tendance à se déformer. Pour un réchauffement égal, il est préférable de remouler les guimauves en forme cylindrique avant de les glisser dans la fourchette à fondue pour la cuisson. BRÛLÉE / FUMÉE NE PAS trop cuire la guimauve, puisqu'elle pourrait fondre et tomber sur la plaque du dessus, provoquer de la fumée, le feu et tâcher. -
Page 19: Recettes
RECETTES Comment faire des s'mores parfaites avec votre APPAREIL ÉLECTRIQUE POUR S’MORES: Préparer les guimauves en suivant les directives du paragraphe Mode . Penadant que les guimauves grillent, prendre les biscuits Graham et les casser en deux. Casser les barres de chocolat au lait en carrés et mettre un carré... - Page 20 SANDWICH GRILLÉ AUX FRAISES - BANANE ET SANDWICH AU FLUFFERNUTTER • Grosses guimauves à Griller des guimauves à l'aide de votre APPAREIL la saveur de fraises ÉLECTRIQUE POUR S’MORES, comme indiqué à la page 6. • Beurre d'arachides Pendant que les guimauves se font griller, griller des tranches de pain jusqu'à...
-
Page 21: Retours Et Garantie
Un représentant vous contactera dès que possible. Conditions de garantie du produit Le groupe Nostalgia Products LLC (référé tel « l’Entreprise ») garantit que pour une période d’un (1) an en date d’achat, ce produit est sans défaut de matériel et de fabrication selon une utilisation normale à... - Page 22 CONTENIDO PRECAUCIONES IMPORTANTES ......21 PROTECCIONES IMPORTANTES ......21 INTRODUCCIÓN .
-
Page 23: Precauciones Importantes
PRECAUCIONES IMPORTANTES No sumerja NUNCA el aparato en agua. No lo utilice NUNCA cerca del agua. No utilice NUNCA una esponja o un paño abrasivo con el aparato. No deje NUNCA el aparato desatendido mientras esté en funcionamiento. No introduzca NUNCA en el aparato ninguna otra cosa que no sea lo que se está... -
Page 24: Introducción
¡GUARDE ESTAS INSTRUCCIONES! INTRODUCCIÓN ¡Gracias por comprar la MÁQUINA ELÉCTRICA DE S’MORES de Nostalgia Electrics™! ¡Ahora puede llevar dentro el sabor de exteriores y disfrutar los s’mores todo el año! ¡El simple placer de disfrutar pegajosos malvaviscos, chocolates y galletas... -
Page 25: Partes Y Ensamblaje
PIEZAS Y ENSAMBLAJE PIEZAS Calentador (Adentro) Tapa superior Bandeja de comida Tornillo Interruptor para asar de energía ENSAMBLAJE • Enrosque el tapón de la MÁQUINA ELÉCTRICA DE S’MORES a través del orificio en el centro de la bandeja de comida. •... -
Page 26: Cómo Funciona
CÓMO FUNCIONA • Sitúe la MÁQUINA ELÉCTRICA DE S’MORES sobre una superficie plana y estable cerca de una toma eléctrica antes de comenzar. Mantenga casi un pie de espacio cerca de la unidad para asegurarse de que hay una ventilación adecuada. •... -
Page 27: Consejos Útiles
CONSEJOS ÚTILES MALVAVISCOS Los malvaviscos empaquetados tienden a deformarse. Para un calentamiento uniforme, lo mejor es moldear los malvaviscos a su forma cilíndrica antes de deslizarlos en los tenedores para asar. COMBUSTIÓN/HUMO NO cocine demasiado el malvavisco, ya que puede derretirse y caer en la tapa superior y producir humo, fuego y manchas. -
Page 28: Recetas
RECETAS Cómo hacer los s’mores perfectos con la MÁQUINA ELÉCTRICA DE S’MORES: Prepare los malvaviscos al seguir las instrucciones en la sección Funcionamiento. Mientras se estén asando los malvaviscos, tome las galletas graham y rómpalas en dos mitades. Separe las barras de chocolate con leche en cuadrados y coloque un cuadrado en cada mitad de una galleta graham. - Page 29 EMPAREDADO DE MANTEQUILLA DE MANÍ ASADO CON FRESA Y BANANA • Malvaviscos de Ase los malvaviscos con la MÁQUINA ELÉCTRICA fresa grandes DE S’MORES como se indica en la página 6. • Mantequilla de maní Mientras que los malvaviscos se estén asando, tueste las rebanadas de pan hasta que se doren •...
- Page 30 BONIATOS Y MALVAVISCOS HORNEADOS • Malvaviscos Precaliente en horno a 350˚. blancos grandes Coloque los boniatos rebanados aún con cáscaras • Boniatos, rebanados en una hoja de galletas antiadherente. por la mitad Coloque las porciones de mantequilla y riéguelas • Mantequilla abundantemente con azúcar y especias.
-
Page 31: Devoluciones Y Garantía
Términos de garantía del producto Po este medio, Nostalgia Products LLC (la “Compañía”) garantiza que por un período de un (1) año a partir de la fecha de compra original, este producto estará sin defectos en cuanto a materiales y mano de obra en uso normal en casa, siempre que el producto se maneje y mantenga de acuerdo con las instrucciones de manejo.
Need help?
Do you have a question about the SMM200 Series and is the answer not in the manual?
Questions and answers