Table of Contents
Advertisement
Advertisement
Table of Contents

Related Manuals for Vogue 320267


Summary of Contents for Vogue 320267
-
Page 2: Section1. Introduction
Section1. Introduction Thank you for choosing this appliance. It has been designed to give years of trouble-free use provided it is installed and maintained correctly. Please read these instructions carefully before installing or using your appliance. It is advisable to keep your purchase and installation receipts with these instructions in a safe place for future reference. - Page 3 Operation and maintenance Electrical Shock Hazard • Do not cook on a broken or cracked cooktop. If the cooktop surface should break or crack,switch the appliance off immediately at the mains power supply (wall switch) and contact a qualified technician. •...
- Page 4 • Never leave the appliance unattended when in use. Boilover causes smoking and greasy spillovers that may ignite. • Never use your appliance as a work or storage surface. • Never leave any objects or utensils on the appliance. • Never use your appliance for warming or heating the room. •...
- Page 5 •This appliance is intended to be used in household and similar applications such as: -staff kitchen areas in shops, offices and other working environments; -farm houses; -by clients in hotels, motels and other residential type environments ; -bed and breakfast type environments. •WARNING: The appliance and its accessible parts become hot during use.
-
Page 6: Section 3. Description Of The Appliance
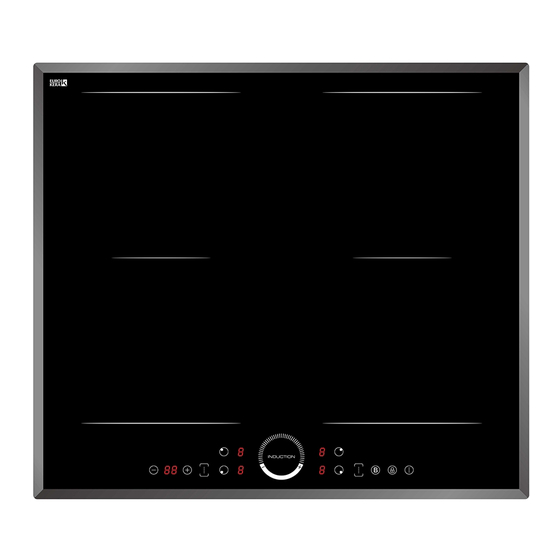
Section 3. Description of the appliance. 1. Max power 2000 booster 2600 W 2. Max power 1500 booster 2000 W 3. Max power 2000 booster 2600 W 4. Max power 1500 booster 2000 W 5-6. Flex zone 2500-2800W 7. Glass Plate 8. -
Page 7: Section 4. Operating The Appliance
Section 4. Operating the appliance 4.1. Pan dimensions The cooking zones are up to a limit, automatically adapted to the diameter of the pan. However the bottom of this pan must have a minimum of diameter according to the corresponding cooking zone. To obtain the best efficiency of your hob, please place the pan in the centre of the cooking zone. -
Page 8: Using The Touch Controls
Make sure that the base of your pan is smooth, sits flat against the glass, and is the same size as the cooking zone. Always centre your pan on the cooking zone. Always lift pans off the ceramic hob – do not slide, or they may scratch the glass. -
Page 9: Using Your Hob
• You will hear a beep each time a touch is registered. • Make sure the controls are always clean, dry, and that there is no object (e.g. a utensil or a cloth) covering them. Even a thin film of water may make the controls difficult to operate. -
Page 10: When You Have Finished Cooking
4. Set a power level by touching the “-”, “+”, or slide along the “ ” control, or just touch any point of the “ ”. If the display flashes alternately with the heat setting This means that: • you have not placed a pan on the correct cooking zone or, •... -
Page 11: Using The Boost Function
4. Beware of hot surfaces • “H” showing means the cooking zone is hot to touch. It will disappear when the surface has cooled down to a safe temperature. It can also be used as an energy saving function if you want to heat further pans, use the hotplate that is still hot. Using the Boost Function Boost function is the function that one zone rising to a larger power in one second and lasting for 5 minutes. - Page 12 5. In this hob, all zones can work with boost function separately. If you need to use boost two zones of the same group, please switch off the other zone in the same group first. Otherwise will flash on the display of the selected zone and power level will be automatically set.
- Page 13 2. Touch the flex zone selection button, the indicator next to the key will flash. The heating zone will go into flex zone cooking, meanwhile, the red dot led will light ,The power level indicators of the front zone and the rear zone become to the same power level.
- Page 14 the other one within the flexible area keeping the same power level of the zone where the cookware originally was placed, and the part that is not covered by cookware will not heat. • Important: Make sure to place the cookwares centered on the single cooking zone. In case of big pot, oval, rectangular and elongated pans make sure to place the pans centered on the cooking zone covering both cross.
-
Page 15: Using The Timer As A Minute Minder
Child Lock Control • You can lock the controls to prevent unintended use (for example children accidentally turning the cooking zones on). • When the controls are locked, all the controls except the ON/OFF control are disabled. To lock the controls Touch the keylock control. -
Page 16: Setting The Timer To Turn One Cooking Zone Off
3. Set the time by touching the “-“or “+” control of the timer. Hint: Touch the “-“ or ”+” control of the timer once to decrease or increase by 1 minute. Touch and hold the “-“ or “+” control of the timer to decrease or increase by 10 minutes. - Page 17 2. Touch timer control by touching “+”, the minder indicator will start flashing and “30” will show in the timer display. 3. Set the time by touching the “-” or “+” control of the timer. Hint: Touch the “-“ or “+” control of the timer once will decrease or increase by 1 minute.
-
Page 18: Over Temperature Protection
Other cooking zone will keep operating if they are turned on previously. Setting the timer to turn more than one cooking zone off 1. If more than one heating zone use this function, the timer indicator will show the lowest time. (e.g. -
Page 19: Auto Shutdown
Auto Shutdown Another safety feature of the hob is auto shut down. This occurs whenever you forget to switch off a cooking zone. The default shutdown times are shown in the table below: Power level Default working timer (hour) Heat Settings The settings below are guidelines only. -
Page 20: Hints And Tips
Everyday soiling on 1. Switch the power to the • When the power to the cooktop is glass (fingerprints, cooktop off. switched off, there will be no ‘hot marks, stains left by 2. Apply a cooktop cleaner surface’ indication but the cooking food or non-sugary while the glass is still warm zone may still be hot! Take... - Page 21 The induction hob No power. Make sure the induction hob is cannot be turned on. connected to the power supply and that it is switched on. Check whether there is a power outage in your home or area. If you’ve checked everything and the problem persists, call a qualified technician.
-
Page 22: Technical Specification
(typically alternating with one or two digits in the cooking timer display). Technical Specification Cooking Hob 320267 Cooking Zones 4 Zones Supply Voltage 220-240V~ Installed Electric Power 6600-7200W Product Size L×W×H(mm) 590X520X55 Building-in Dimensions A×B (mm) - Page 23 Model L(mm) W(mm) H(mm) D(mm) A(mm) B(mm) X(mm) 320267 50mini 5.2. Space to Rear or Side Wall A = 760mm B = 50mm (min) C = 20mm (min) D = Air Gap/Intake E = Air Exit (5mm) 5.3. Fixing Brackets Before locating the fixing brackets The unit should be placed on a stable, smooth surface (use the packaging).
- Page 24 Adjust the bracket position to suit for different table top thickness. a) Screw b) Bracket c) Screw Hole d) Base of hotplate...
-
Page 25: Electrical Connection
5.4. Electrical Connection These appliances have a large Power Rating and must be ‘hard wired’ into a suitable fused spur adjacent to the appliance housing. product must be installed by a Qualified Electrician. Please note that a switchable spur should be accessible above the work surface in order that the power can be turned off. -
Page 26: Section 7. Maintenance
This appliance shall not be used by children aged from 8 years and above and persons with reduced physical, sensory or mental capabilities, or lack of experience and knowledge, unless they have been given supervision or instruction on how to use the appliance in a safe way and understand the hazards involved. -
Page 27: What To Do If Something Goes Wrong
7.1. Cleaning the Hob Surface Clean spillages from the hob surface as soon as possible after use. Always ensure that the surface has cooled down before cleaning. Use a soft cloth or kitchen paper to clean the surface. If the spillage has dried on the surface you may need to use a specialist vitro- ceramic glass cleaner, available from all good supermarkets. -
Page 28: Important Note
Problem Possible causes What to do F3/F4 Temperature sensor of the Please contact the supplier. induction coil failure Temperature sensor of the F9/FA Please contact the supplier. IGBT failure. E1/E2 Abnormal supply voltage Please inspect whether power supply is normal. Power on after the power supply is normal.
Need help?
Do you have a question about the 320267 and is the answer not in the manual?
Questions and answers