
Related Manuals for Vogue 320265


Summary of Contents for Vogue 320265
-
Page 1: User Guide
INSTALLATION INSTRUCTIONS USER GUIDE VOGUE Induction Cooktop 600mm 320265 To prevent the risk of accidents or damage to the appliance, it is essential to read these instructions before it is installed and used for the f irst time... -
Page 2: Section1. Introduction
Section1. Introduction Thank you for choosing this appliance. It has been designed to give years of trouble-free use provided it is installed and maintained correctly. Please read these instructions carefully before installing or using your appliance. It is advisable to keep your purchase and installation receipts with these instructions in a safe place for future reference. - Page 3 Operation and maintenance Electrical Shock Hazard • Do not cook on a broken or cracked cooktop. If the cooktop surface should break or crack,switch the appliance off immediately at the mains power supply (wall switch) and contact a qualified technician. •...
- Page 4 • Never leave the appliance unattended when in use. Boilover causes smoking and greasy spillovers that may ignite. • Never use your appliance as a work or storage surface. • Never leave any objects or utensils on the appliance. • Never use your appliance for warming or heating the room. •...
- Page 5 •This appliance is intended to be used in household and similar applications such as: -staff kitchen areas in shops, offices and other working environments; -farm houses; -by clients in hotels, motels and other residential type environments ; -bed and breakfast type environments. •WARNING: The appliance and its accessible parts become hot during use.
-
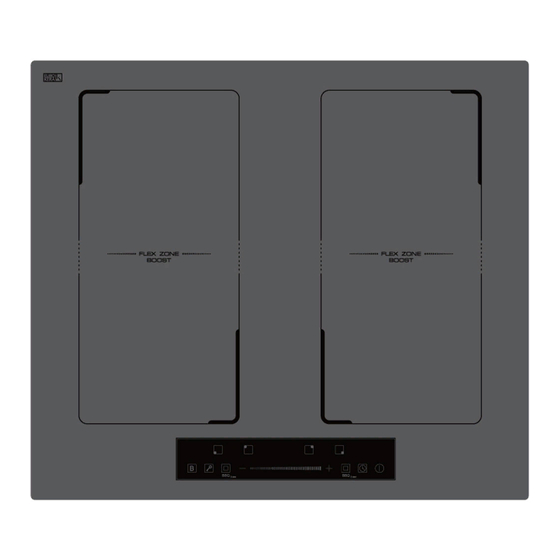
Page 6: Section 3. Description Of The Appliance
Section 3. Description of the appliance. 1. Max power 2000W booster 2600W Cook Zone 2. Max power 1500W booster 2000W Cook Zone 3. Max power 2000W booster 2600W Cook Zone 4. Max power 1500W booster 2000W Cook Zone 5-6. Flex zone 2500-2800W 7. -
Page 7: Section 4. Operating The Appliance
Section 4. Operating the appliance 4.1. Pan dimensions The cooking zones are up to a limit, automatically adapted to the diameter of the pan. However the bottom of this pan must have a minimum of diameter according to the corresponding cooking zone. To obtain the best efficiency of your hob, please place the pan in the centre of the cooking zone. -
Page 8: Using The Touch Controls
Make sure that the base of your pan is smooth, sits flat against the glass, and is the same size as the cooking zone. Always centre your pan on the cooking zone. Always lift pans off the ceramic hob – do not slide, or they may scratch the glass. -
Page 9: Using Your Hob
• You will hear a beep each time a touch is registered. • Make sure the controls are always clean, dry, and that there is no object (e.g. a utensil or a cloth) covering them. Even a thin film of water may make the controls difficult to operate. -
Page 10: When You Have Finished Cooking
• If you don’t choose a heat setting within 1minute, the ceramic hob will automatically switch off. You will need to start again at step 1. • You can modify the heat setting at any time during cooking. • You can modify the power level from 0 to 9 By the slide control. 4. - Page 11 3. Turn the whole cooktop off by touching the “ON/OFF” control. 4. Beware of hot surfaces “H” will show which cooking zone is hot to touch. It will disappear when the surface has cooled down to a safe temperature. It can also be used as an energy saving function if you want to heat further pans, use the hotplate that is still hot.
- Page 12 The power display will show “P” to indicate that the zone is boosting. 3. The Boost power will last for 5 minutes and then the zone will go back to the power stage which was set before boost. 4. If you want to cancel Boost, touch the heating zone selection button first, And then touch the Boost button.
- Page 13 Using the Flex Zone 1. Touch the heating zone selection button that you hope to go into flex zone cooking, an indicator next to the key will flash. 2. Touch the flex zone selection button, the indicator next to the key will flash. The heating zone will go into flex zone cooking, meanwhile, the indicator “...
- Page 14 Pot for Flex Zone • This area can be used as a single zone or as two different zones, accordingly to the cooking needs anytime. • Flexible area is made of two independent inductors that can be controlled separately. When working as a single zone, a cookware is moved from one zone to the other one within the flexible area keeping the same power level of the zone where the cookware originally was placed, and the part that is not covered by cookware will not heat.
- Page 15 Using the BBQ function For the left (right ) two cooking zone have a BBQ function .BBQ function is for when you want to use a grill pan or comal to BBQ beef ,meat or vegetables with a balance power. Touch the heating zone selection button that you hope to go into flex zone cooking, an indicator next to the key will flash.
-
Page 16: Using The Timer
• Make sure the Induction hob is turned on. • Touch and hold the keylock control for a while. • You can now start using your Induction hob. When the hob is in the lock mode, all the controls are disable except the ON/OFF, you can always turn the ceramic hob off with the ON/OFF control in an emergency, but you shall unlock the hob first in the next operation... - Page 17 timer will automatically return to 0 minute. 4. Touch the ‘Timer’, the timer is cancelled, and the”--“ will show in the minute display. 5. When the time is set, it will begin to count down immediately. The display will show the remaining time and the timer indicator will flash for 5 seconds.
- Page 18 Touch and hold the “-“ or “+” control of the timer will decrease or increase by 10 minutes. If the setting time exceeds 99 minutes, the timer will automatically return to 0 minute. 4. Touching the heating zone selection control, and then touch the ‘Timer’, the timer is cancelled, and the”--“...
-
Page 19: Over Temperature Protection
If you want to check the set time of other heating zone, touch the heating zone selection control. The timer will indicate its set time. (set to 6 minutes) (set to 3 minutes) 2. When cooking timer expires, the corresponding heating zone will be automatically switch off and show “H”. -
Page 20: Heat Settings
Heat Settings The settings below are guidelines only. The exact setting will depend on several factors, including your cookware and the amount you are cooking. Experiment with the induction hob to find the settings that best suit you. Heat setting Suitability 1 - 2 •... -
Page 21: Hints And Tips
Boilovers, melts, Remove these immediately • Remove stains left by melts and with a fish slice, palette knife sugary food or spillovers as soon hot sugary spills on or razor blade scraper suitable as possible. If left to cool on the the glass for Induction glass cooktops, glass, they may be difficult to... -
Page 22: Technical Specification
(typically alternating with one or two digits in the cooking timer display). Technical Specification Cooking Hob 320265 Cooking Zones 4 Zones Supply Voltage 220-240V~ Installed Electric Power 6600-7200W Product Size L×W×H(mm) 590X520X55 Building-in Dimensions A×B (mm) -
Page 23: Section 5. Installation
Be sure the thickness of the work surface is at least 30mm. Please select heat-resistant work surface material to avoid larger deformation caused by the heat radiation from the hotplate. As shown below: Model L(mm) W(mm) H(mm) D(mm) A(mm) B(mm) X(mm) 320265 50mini 5.2. Space to Rear or Side Wall... - Page 24 A = 760mm B = 50mm (min) C = 20mm (min) D = Air Gap/Intake E = Air Exit (5mm) 5.3. Fixing Brackets Before locating the fixing brackets The unit should be placed on a stable, smooth surface (use the packaging). Do not apply force onto the controls protruding from the hob.
-
Page 25: Electrical Connection
5.4. Electrical Connection These appliances have a large Power Rating and must be ‘hard wired’ into a suitable fused spur adjacent to the appliance housing. product must be installed by a Qualified Electrician. Please note that a switchable spur should be accessible above the work surface in order that the power can be turned off. - Page 26 This appliance shall not be used by children aged from 8 years and above and persons with reduced physical, sensory or mental capabilities, or lack of experience and knowledge, unless they have been given supervision or instruction on how to use the appliance in a safe way and understand the hazards involved.
-
Page 27: Section 7. Maintenance
Section 7. Maintenance Before any maintenance or cleaning work is carried out, DISCONNECT the appliance from the ELECTRICITY supply and ensure that the appliance is completely cool. 7.1. Cleaning the Hob Surface Clean spillages from the hob surface as soon as possible after use. Always ensure that the surface has cooled down before cleaning. -
Page 28: Important Note
If an abnormality comes up, the induction cooker will enter the protective state automatically and display corresponding protective codes: Problem Possible causes What to do F3/F4 Temperature sensor of the Please contact the supplier. induction coil failure Temperature sensor of the F9/FA Please contact the supplier.
Need help?
Do you have a question about the 320265 and is the answer not in the manual?
Questions and answers