
Subscribe to Our Youtube Channel
Related Manuals for xpr BIOPROX-EM


Summary of Contents for xpr BIOPROX-EM
- Page 1 BIOPROX-EM Biometric Proximity Reader User’s Manual v.a1 Visual Plus Corporation Company...
-
Page 2: Table Of Contents
Contents 1. DESCRIPTION 2. SPECIFICATIONS 3. MOUNTING 4. WIRING 5. CONNECTING BIOMETRIC READERS TO EWS CONTROLLER 5.1 CONNECTING BIOMETRIC READERS IN SAME RS485 LINE WITH THE EWS CONTROLLERS 5.2 CONNECTING BIOMETRIC READERS WHEN ALL THE CONTROLLERS HAVE TCP/IP COMMUNICATION 6. CONNECTING BIOMETRIC READERS TO 3RD PARTY CONTROLLER 6.1 CONVERTERS PIN DESCRIPTION 7. -
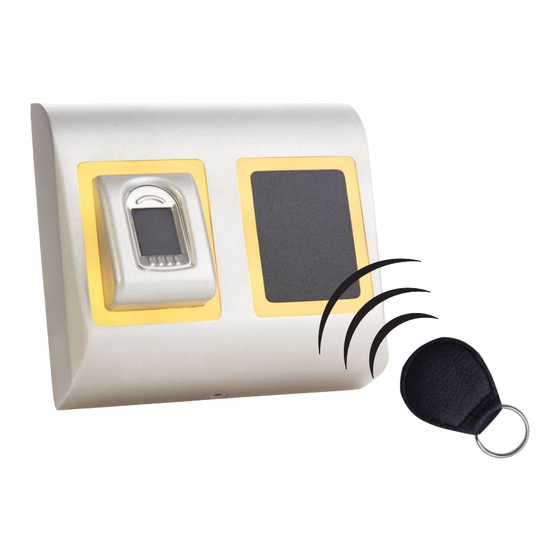
Page 3: Description
1. DESCRIPTION BIOPROX-EM is a Wiegand biometric and proximity reader for access control applications with programmable wiegand output. It offers storage of up to 9500 fingerprints, it reads EM4100 compatible cards/tags and has a programmable Wiegand Output (8 to 128 bits). -
Page 4: Mounting
(fitted with additional heater if very low temperature) to keep a constant sensor level performance. XPR™ cannot guarantee the functionality of the product if measures and advice before are not followed. -
Page 5: Wiring
4. WIRING 12V DC Black Pink RS485 Violet Orange LED Red - Green LED Green - White WIEGAND Yellow Gray Tamper Blue Tamper 12V DC 9-14V DC ground RS485 A Tricolor LED (Red, Green, Orange) RS485 B Red LED - Green LED - Data 1 Data 0... -
Page 6: Connecting Biometric Readers In Same Rs485 Line With The Ews Controllers
5.1 CONNECTING BIOMETRIC READERS IN SAME RS485 LINE WITH THE EWS CONTROLLERS Jumper for Jumper for RS485 termination RS485 termination TCP/IP 1 km max / 32 Units (EWS + Biometric Readers) RS485 Stub max. 5m 50 ohm 50 ohm The Biometric readers are connected through RS485 bus. The same RS485 bus that the EWS controllers are connected to. ... -
Page 7: Connecting Biometric Readers To 3Rd Party Controller
6. CONNECTING BIOMETRIC READERS TO THIRD PARTY CONTROLLERS 3rd party controller 3rd party controller - + D0 D1 - + D0 D1 - + D0 D1 - + D0 D1 BIOE CNV100 USB Desktop Reader RS485 A RS485 B CNV200 optional BIOMANAGER Software CNV300... -
Page 8: Enrollment
2. Right click on the reader and select properties (8.1) 3. In the Basic tab, for “Type” of the Reader select “BIOPROX-EM”. (8.2) 4. After selecting the type, a third tab will appear “Biometric”. Go to that tab and put the serial number of the Biometric Reader. -
Page 9: Enrolling Fingerprints From A Reader
8.2 ENROLLING FINGERPRINTS FROM A READER 1. Open the Users Window and create a new user. Click on “New User”, put a name, ID(card number). (8.7) 2. Go to the “Biometric” Tab 3. Select the reader(with left click) from which the enrollment will be done. (8.8) 4. -
Page 10: Enrolling Fingerprints From Desktop Reader
8.3 ENROLLING FINGERPRINTS FROM DESKTOP READER Plug the Desktop Reader (BIOE) in the PC. If the device is not installed automatically use the drivers located on the CD provided with the Biometric reader. It is installed in the same way as a USB Device. When the desktop reader has been installed it will automatically appear in the Software. -
Page 11: Deleting Fingerprints
8.4 DELETING FINGERPRINTS In General, the fingerprints are stored in the Biometric reader and in the Software. Deleting can be done only in the readers or from both places. Deleting one user from the biometric reader Select the User Click on “Delete User”. The User together with its fingerprints will be deleted from both the software and the fingerprint readers. -
Page 12: Uploading The Fingerprints To The Biometric Readers
8.5 UPLOADING THE FINGERPRINTS TO THE BIOMETRIC READERS Right click on the biometric reader Select “Upload all users to reader” While receiving the fingerprints the reader will blink in orange. Note: Use this feature when you change or add a reader, if pending tasks are deleted in the software or if there are doubts that fingerprints in the reader memory are not synchronized with the software database. -
Page 13: Entry Mode
8.7 ENTRY MODE 8.7.1 Card or Finger Right click on the biometric reader Select “Properties” and go to the “Biometric” tab For Entry Mode select “Card or Finger” (8.20) Note: All the fingers and the card will send the same wiegand number (8.21) 8.7.2 Card and Finger Right click on the biometric reader... -
Page 14: Sensor Calibration
8.8 SENSOR CALIBRATION Right click on the biometric reader and select “Calibrate” and wait for confirmation message. Note: It is recommended to do a calibration while commissioning the reader and in cases when there are problems with reading the fingers 8.9 SEND CONFIGURATION ·... -
Page 15: Configuring The Biometric Readers In Biomanager
9 CONFIGURING THE BIOMETRIC READERS IN BIOMANAGER BioManager is software for fingerprint management of XPR Biometric readers, when used with third party access controllers. Main functions: - Fingerprint Enrollment It can be done by ANY Biometric reader in the network or by Desktop (USB) Biometric reader. -
Page 16: Edit Reader
If reader is online, new line is added on top of the event table If reader is not online, following line is added on top of the event table If reader is online, right click on reader and select Upload configuration Check at event table if configuration was successful 9.2 EDIT READER Right-click on the reader and select Properties... -
Page 17: Delete Reader
9.3 DELETE READER Right-click on the reader and select Delete reader 9.4 CALIBRATE SENSOR Right-click on the reader and select Calibrate See the events panel to check the calibration flow It is recommended to do sensor calibration once after reader is mounted. Clean the fingerprint sensor before calibration. 9.5 ADD USER At user table, click on the last empty user field and enter user name Click on ID (User code) field and enter ID number. -
Page 18: Delete Users
9.7 DELETE USERS Check the users to be deleted Right-click on the users table Click on Delete checked users menu Confirm warning message 9.8 ENROLL FINGERS Select the User in the User Column, not the check box (the check box is for sending ... -
Page 19: Delete Fingerprints
9.10 DELETE FINGERPRINTS After the transfer, the fingerprint are stored in the Biometric reader and in the PC. Deleting can be done only in the software, only in the readers or from the both places. 9.10.1 Deleting one user from the biometric reader Select the users checkbox. -
Page 20: Custom Wiegand
Use mouse click to select the combination you need or use right-click to check or clear entire row or column Select Upload Users to readers or Delete Users from readers at right-click menu As upload is progressing, check boxes are cleared mining appropriate combination was successfully done When upload is over, if there are still checked items, repeat the upload command 9.12 CUSTOM WIEGAND BioManager has defined Wiegand 26 and 34 bit as standard options and other 3 Wiegand settings as user definable. -
Page 21: Wiegand Protocol Description
10. WIEGAND PROTOCOL DESCRIPTION The data is sent over the lines DATA 0 for the logic “0” and DATA 1 for the logic “1”. Both lines use inverted logic, meaning that a pulse low on DATA 0 indicates a “0” and a pulse low on DATA 1 indicates a “1”.When the lines are high, no data is being sent. Only 1 of the 2 lines ( DATA 0 / DATA 1 ) can pulse at the same time. -
Page 22: Safety Precautions
11. SAFETY PRECAUTIONS Do not install the device in a place subject to direct sun light without protective cover. Do not install the device and cabling close to a source of strong electro-magnetic fields like radio-transmitting antenna. Do not place the device near or above heating equipments. If cleaning, do not spray or splash water or other cleaning liquids but wipe it out with smooth cloth or towel. - Page 23 As per the European Directives 2002 / 95 / EC & 2002 / 96 / EC This product is in compliance to the restriction of hazardous substance - ROHS under (Directive 2002 / 95 / EC) and this product should not be disposed in the municipal waste stream but should be handed over to any designated collection facilities appointed by the government or the local authorities to enable recovery &...
- Page 24 Visual Plus Corporation, s.a. Drève Richelle 161 WOP G - Bte 34 1410 Waterloo - Belgium Visual Plus Corporation Company www.visual-plus.com...
Need help?
Do you have a question about the BIOPROX-EM and is the answer not in the manual?
Questions and answers