TP-Link Archer T4U User Manual
Ac1300 high gain wireless mu-mimo usb adapter
Hide thumbs
Also See for Archer T4U:
- User manual ,
- Quick installation manual (2 pages) ,
- User manual (44 pages)

Subscribe to Our Youtube Channel
Related Manuals for TP-Link Archer T4U


Summary of Contents for TP-Link Archer T4U
- Page 1 Archer T4U User Guide AC1300 High Gain Wireless MU-MIMO USB Adapter REV3.2.0 1910012228...
-
Page 2: Table Of Contents
4. 2. 1. TP-Link Utility ........ -
Page 3: About This Guide
• The Quick Installation Guide (QIG) can be found where you find this guide or inside the package of the product. • Specifications can be found on the product page at http://www.tp-link.com. • Our Technical Support contact information can be found at the... -
Page 4: Chapter 1 Get To Know About Your Adapter
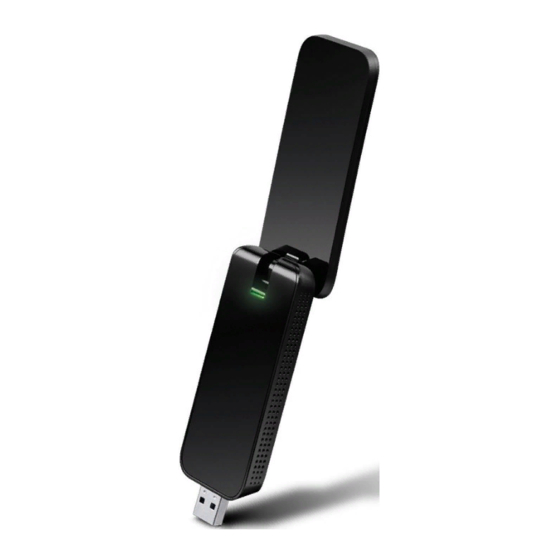
Chapter Get to Know About Your Adapter This chapter introduces what the adapter can do and shows its appearance. This chapter contains the following sections: • Product Overview • LED Status... -
Page 5: Product Overview
Chapter 1 Get to Know about Your Adapter Product Overview TP-Link Wireless USB Adapter connects your desktop computer to a Wi-Fi network for lag-free video streaming, online gaming, secure internet surfing and internet calls. • Compatible with 802.11a/b/g/n products • Supports ad-hoc and infrastructure mode •... - Page 6 Chapter 1 Get to Know about Your Adapter Tips: If the LED is off, try these troubleshooting tips: 1. Remove and reinstall the adapter. 2. Check the Windows device manager to see if the adapter is recognized and enabled. Reinstall the adapter software, if necessary.
-
Page 7: Chapter 2 Connect To A Computer
Chapter Connect to a Computer... - Page 8 Chapter 2 Connect to a Computer Before you begin using your adapter, insert the adapter into a USB port on your computer directly. After connecting your adapter to the computer, please follow the instructions in the appropriate chapter for your operating system: Windows, Mac OS X, Linux.
-
Page 9: Chapter 3 Windows 7
Chapter Windows This chapter introduces how to install your adapter’s driver and WPS Tool, use your adapter to join a wireless network, and uninstall your adapter in a Windows system. The adapter is equipped with a Setup wizard, which can guide you through the installation process. -
Page 10: Install Driver And Wps Tool
Autoplay window. Note: 1. You can also download the driver from the product’s Support page at www tp-link com. 2. In some operating systems, the CD screen will pop up automatically. Otherwise, run the CD manually. Select Archer T4U and follow the instructions to complete the installation. -
Page 11: Join A Wireless Network
Chapter 3 Use Your Adapter If you want to connect effortlessly with the push of a WPS button, click follow the instructions to install the mini WPS Tool first. When the following screen appears, the WPS Tool has been installed successfully. You can enjoy connecting to your Wi-Fi with the push of the WPS button. -
Page 12: Uninstall Driver And Wps Tool
The software uninstallation steps vary a bit in different systems, please follow the appropriate instructions for your Windows operating system: Windows 8/8.1/10, Windows • Windows 8/8 1/10 Go to Start menu to find the TP-Link application. Click Uninstall Archer T4U Driver, then follow the on-screen instructions to complete the uninstallation. - Page 13 Chapter 3 Use Your Adapter Windows 7 Go to Start > All Programs > TP-Link > Uninstall TP-Link Archer T4U Driver. Follow the on-screen instructions to complete the uninstallation.
-
Page 14: Mac Os X
Chapter Mac OS X This chapter introduces how to install your adapter’s driver and utility, use your adapter to join a wireless network, manage your adapter, and uninstall your adapter in Mac OS This chapter includes the following sections: • Install Driver and Utility •... -
Page 15: Install Driver And Utility
We take the steps in Mac OS X 10.10 as an example - the steps may vary slightly for other versions of Mac OS. Download the driver and utility from this product’s Support page from TP-Link’s official website www.tp-link.com. Note: The CD is included in the package. - Page 16 Click Restart to finish the installation. After restarting the computer, the TP-Link Utility icon will appear on the menu bar in the upper-right corner of the screen. To use the utility to join a Wi-Fi network with your adapter, refer to Join a Wireless Network.
-
Page 17: Join A Wireless Network
Join a Wireless Network There are two options of using the adapter to join a Wi-Fi network. Option 1: TP-Link Utility TP-Link Utility lets you easily connect the adapter to a Wi-Fi network and manage the adapter. Option 2: WPS (Wi-Fi Protected Setup) WPS (Wi-Fi Protected Setup) is a network security standard for easily adding computers and other devices to a home network. -
Page 18: Wps (Wi-Fi Protected Setup)
Chapter 4 Mac OS X Note: If your Wi-Fi network is not displayed in the list, you can try to join it by WPS or by clicking Join Other on the above screen, and then follow the on-screen instructions to join the network. 4 2 2 WPS (Wi-Fi Protected Setup) WPS can be activated via PBC (Push Button Configuration) and PIN code. - Page 19 2. The following screen indicates a successful connection by WPS. Click OK. Option 2 1. Press the WPS/QSS button on your router or AP. 2. Within 2 minutes, click the TP-Link Utility icon on the menu bar, and then click at the bottom of the network list.
- Page 20 Chapter 4 Mac OS X 3. Click PBC. 4. The following screen indicates a successful connection by WPS. Click OK.
- Page 21 Chapter 4 Mac OS X • PIN 1. Click the TP-Link Utility icon on the menu bar, and then click at the bottom of the network list. 2. Click PIN. 3. Within 2 minutes, log in to the Web Management page of your router or AP. Go to its page, enter the PIN of the adapter in the corresponding field and click Connect.
-
Page 22: Management
Chapter 4 Mac OS X Management TP-Link Utility provides you with an easy way to manage various connection settings of your Wi-Fi network. Click the TP-Link Utility icon on the menu bar, and then click Open Wireless Utility at the bottom of the network list. - Page 23 Chapter 4 Mac OS X Profiles screen lets you manage different Wi-Fi connection settings as profiles so that you can connect to your network easily. Preferred Networks displays the networks that you once connected to. The networks’ status and information are displayed on the table. •...
-
Page 24: Uninstall Driver And Utility
Chapter 4 Mac OS X Uninstall Driver and Utility Double-click Uninstall.command in the downloaded folder. Follow the wizard to complete the unistallation and when the following screen appears, the uninstallation is complete. -
Page 25: Chapter 5 Linux
Chapter Linux... - Page 26 Chapter 5 Linux Visit the TP-Link’s website at http://www.tp-link.com, and go to Archer T4U’s product page. Then find the compatible version of driver in the support page. Download and install the driver on your computer.
- Page 27 Specifications are subject to change without notice. is a registered trademark of TP-Link TECHNOLOGIES CO., LTD. Other brands and product names are trademarks or registered trademarks of their respective holders. No part of the specifications may be reproduced in any form or by any means or used to make any derivative such as translation, transformation, or adaptation without permission from TP-Link TECHNOLOGIES CO., LTD.
- Page 28 FCC STATEMENT This equipment has been tested and found to comply with the limits for a Class B digital device, pursuant to part 15 of the FCC Rules. These limits are designed to provide reasonable protection against harmful interference in a residential installation. This equipment generates, uses and can radiate radio frequency energy and, if not installed and used in accordance with the instructions, may cause harmful interference to radio communications.
- Page 29 2412MHz—2472MHz(20dBm) 5180MHz—5240MHz(23dBm) EU declaration of conformity TP-Link hereby declares that the device is in compliance with the essential requirements and other relevant provisions of directives 2014/53/EU, 2009/125/EC and 2011/65/EU. The original EU declaration of conformity may be found at http://www.tp-link.com/en/ RF Exposure Information This device meets the EU requirements (2014/53/EU Article 3.1a) on the limitation of...
- Page 30 Radiation Exposure Statement: This EUT is compliance with SAR for general population/uncontrolled exposure limits in RSS-102 and had been tested in accordance with the measurement methods and procedures specified in IEEE 1528 and IEC 62209. This equipment should be installed and operated with minimum distance 1.0 cm between the radiator and your body.
- Page 31 вимогам нормативних документів та вимогам, що передбачені чинними законодавчими актами України. Safety Information • Keep the device away from water, fire, humidity or hot environments. • Do not attempt to disassemble, repair, or modify the device. • Do not use damaged charger or USB cable to charge the device. •...
Need help?
Do you have a question about the Archer T4U and is the answer not in the manual?
Questions and answers