Table of Contents
Advertisement
Quick Links
Advertisement
Table of Contents

Subscribe to Our Youtube Channel
Related Manuals for AEG BE501310A


Summary of Contents for AEG BE501310A
- Page 1 User Manual BE501310A Oven...
-
Page 2: Table Of Contents
15. WARRANTY ........................ 34 FOR PERFECT RESULTS Thank you for choosing this AEG product. We have created it to give you impeccable performance for many years, with innovative technologies that help make life simpler features you might not find on ordinary appliances. Please spend a few minutes reading to get the very best from it. -
Page 3: Safety Information
ENGLISH SAFETY INFORMATION Before the installation and use of the appliance, carefully read the supplied instructions. The manufacturer is not responsible for any injuries or damages that are the result of incorrect installation or usage. Always keep the instructions in a safe and accessible location for future reference. -
Page 4: Conditions Of Use
Always use oven gloves to remove or put in • accessories or ovenware. Before maintenance cut the power supply. • Ensure that the appliance is switched off before • replacing the lamp to avoid the possibility of electric shock. - Page 5 ENGLISH 3.2 Electrical connection 3.3 Use WARNING! WARNING! Risk of fire and electrical Risk of injury, burns and shock. electrical shock or explosion. • All electrical connections should be • This appliance is for household use made by a qualified electrician. only.
- Page 6 • Discoloration of the enamel has no • Clean the appliance with a moist soft effect on the performance of the cloth. Only use neutral detergents. Do appliance. not use any abrasive products, • Use a deep pan for moist cakes. Fruit...
-
Page 7: Product Description
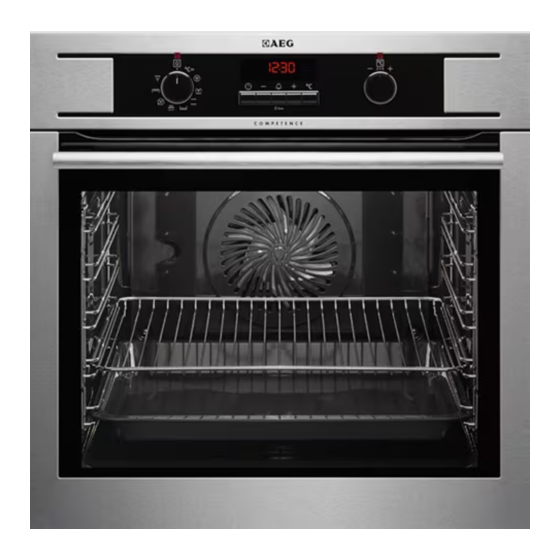
ENGLISH 4. PRODUCT DESCRIPTION 4.1 General overview Control panel Knob for the oven functions Power lamp / symbol Electronic programmer Knob for the temperature Power lamp / symbol Heating element Lamp Shelf support, removable Shelf positions 4.2 Accessories For roasting and grilling. Use the trivet only with the Nonstick wire shelf Grill- / Roasting pan. -
Page 8: Before First Use
5. BEFORE FIRST USE 1. Press to set the current WARNING! hour. Refer to Safety chapters. 2. Press to confirm or the set hour 5.1 Initial Cleaning will be saved automatically after 5 seconds. Remove all accessories and removable... - Page 9 ENGLISH 3. To deactivate the appliance turn the knobs for the oven functions and temperature to the off position. 6.3 Oven functions Oven function Application Off position The appliance is off. Fast Heat Up To decrease the heat-up time. True Fan Cook- To bake on up to three shelf positions at the same time and to dry food.
- Page 10 2. Turn the knob for the temperature to 3. Set an oven function. set the temperature. An acoustic signal sounds when the appliance is at the set temperature. The fast heat up function does not deactivate after the acoustic signal. You must deactivate the function manually.
-
Page 11: Clock Functions
ENGLISH 7. CLOCK FUNCTIONS 7.1 Clock functions table Clock function Application TIME OF DAY To set, change or check the time of day. Refer to "Set- ting the time". MINUTE MINDER Use to set a countdown time (maximum 23 h 59 min). This function has no effect on the operation of the ap- pliance. -
Page 12: Using The Accessories
"00:00" and flash in the display. heat. Press any button to stop the acoustic signal. To reset the Count Up Timer, press and hold . The timer starts to count If you set the MINUTE up again. - Page 13 ENGLISH 8.2 Telescopic runners - Put the wire shelf on the deep pan. Put the wire shelf and the deep pan on the inserting the accessories telescopic runners. With the telescopic runners you can put in and remove the shelves more easily. CAUTION! Do not clean the telescopic runners in the dishwasher.
-
Page 14: Additional Functions
2. Put the deep pan into the oven on the necessary shelf position. 9. ADDITIONAL FUNCTIONS 9.1 Using the Child Lock When you deactivate the appliance while the Function When the Child Lock is on, the appliance Lock is on, the Function Lock cannot be activated accidentally. -
Page 15: Hints And Tips
ENGLISH 9.5 Cooling fan If you deactivate the appliance, the cooling fan can continue to operate until When the appliance operates, the the appliance cools down. cooling fan activates automatically to keep the surfaces of the appliance cool. 10. HINTS AND TIPS shelf positions to the values in the WARNING! tables. - Page 16 Baking results Possible cause Remedy The cake is too dry. The oven temperature is too The next time you bake, set low. a higher oven temperature. The cake is too dry. The baking time is too long. The next time you bake, set a shorter baking time.
- Page 17 ENGLISH Food Function Temperature Time (min) Shelf position (°C) Cheesecake Top / Bottom 170 - 190 60 - 90 Heat 1) Preheat the oven. Cakes / pastries / breads on baking trays Food Function Temperature Time (min) Shelf position (°C) Plaited bread / Top / Bottom 170 - 190...
- Page 18 Food Function Temperature Time (min) Shelf position (°C) Yeast cakes with Top / Bottom 40 - 80 160 - 180 delicate top- Heat pings (e.g. quark, cream, custard) 1) Preheat the oven. 2) Use a deep pan. Biscuits Food...
- Page 19 ENGLISH Food Function Temperature Time (min) Shelf position (°C) Small cakes / Top / Bottom 20 - 30 Small cakes (20 Heat per tray) 1) Preheat the oven. 10.5 Bakes and gratins Food Function Temperature Time (min) Shelf position (°C) Pasta bake Top / Bottom 180 - 200...
- Page 20 Food Temperature Time (min) Shelf position (°C) Apple cake, made with sponge mix- 160 - 170 70 - 80 ture (round cake tin) White bread 190 - 200 55 - 70 10.7 Multilevel Baking Use the function True Fan Cooking.
- Page 21 ENGLISH Food Temperature Time (min) Shelf position (°C) 2 positions 3 positions Small cakes / 23 - 40 1 / 4 Small cakes (20 per tray) 1) Preheat the oven. 10.8 Pizza Setting Food Temperature (°C) Time (min) Shelf position Pizza (thin crust) 15 - 20 1)2)
- Page 22 • Baste large roasts and poultry with end of the roasting time, and use the their juices several times during residual heat. roasting. This gives better roasting results. • You can deactivate the appliance approximately 10 minutes before the 10.10 Roasting tables...
- Page 23 ENGLISH Lamb Food Quantity Function Temperature Time (min) Shelf posi- (kg) (°C) tion Leg of lamb / 1 - 1.5 Turbo Grill- 150 - 170 100 - 120 Roast lamb Saddle of 1 - 1.5 Turbo Grill- 160 - 180 40 - 60 lamb Game...
- Page 24 10.11 Grilling • Grill only flat pieces of meat or fish. • Always preheat the empty oven with • Always grill with the maximum the grill functions for 5 minutes. temperature setting. CAUTION! • Set the shelf into the shelf position as Always grill with the oven recommended in the grilling table.
- Page 25 ENGLISH Food Temperature (°C) Time (min) Shelf position Chicken Wings 190 - 210 20 - 30 Frozen ready meals Food Function Temperature Time (min) Shelf position (°C) Frozen pizza Top / Bottom as per manufac- as per manufac- Heat turer’s instruc- turer’s instruc- tions tions...
- Page 26 10.14 Preserving - Bottom • The jars cannot touch each other. • Put approximately 1/2 litre of water Heat into the baking tray to give sufficient moisture in the oven. • Use only preserve jars of the same • When the liquid in the jars starts to dimensions available on the market.
-
Page 27: Care And Cleaning
ENGLISH Vegetables Food Temperature Time (h) Shelf position (°C) 1 position 2 positions Beans 60 - 70 6 - 8 1 / 4 Peppers 60 - 70 5 - 6 1 / 4 Vegetables for 60 - 70 5 - 6 1 / 4 sour Mushrooms... - Page 28 Install the heating element correctly above the supports on the inner walls of the appliance. 5. Install the shelf supports. 11.4 Removing and installing the door You can remove the door and the internal glass panels to clean it. The...
-
Page 29: Troubleshooting
ENGLISH 8. Hold the door glass panels on their 1. Deactivate the appliance. top edge one by one and pull them 2. Remove the fuses from the fuse box up out of the guide. or deactivate the circuit breaker. The top lamp 1. - Page 30 Problem Possible cause Remedy The oven does not heat up. The automatic switch-off is Refer to "Automatic switch- activated. off". The oven does not heat up. The Child Lock is on. Refer to "Using the Child Lock". The oven does not heat up.
-
Page 31: Installation
ENGLISH 12.2 Service data on the front frame of the appliance cavity. Do not remove the rating plate If you cannot find a solution to the from the appliance cavity. problem yourself, contact your dealer or an Authorised Service Centre. The necessary data for the service centre is on the rating plate. - Page 32 50 mm min. 550 min. 550 min. 560 min. 560 alternativ 100 max. R1200 mm H05VV-F H05RR-F min. 1600 mm...
-
Page 33: Energy Efficiency
ENGLISH 90° 2x3,5x25 14. ENERGY EFFICIENCY 14.1 Product Fiche and information according to EU 65-66/2014 Supplier's name Model identification BE501310AM Energy Efficiency Index 81.2 Energy efficiency class Energy consumption with a standard load, conven- 0.99 kWh/cycle tional mode... - Page 34 Energy consumption with a standard load, fan-forced 0.69 kWh/cycle mode Number of cavities Heat source Electricity Volume 71 l Type of oven Built-In Oven Mass 41.5 kg EN 60350-1 - Household electric cooking Residual heat appliances - Part 1: Ranges, ovens, steam...
-
Page 35: Warranty
(d) ‘ASC’ means AEG authorised service centres; (viii) failure to comply with any additional instructions supplied with (e) AEG is the brand controlled by Electrolux Home Products Pty Ltd the Appliance; of 163 O’Riordan Street, Mascot NSW 2020, ABN 51 004 762 341... - Page 36 www.aeg.com/au...
Need help?
Do you have a question about the BE501310A and is the answer not in the manual?
Questions and answers