Advertisement
Quick Links
Advertisement

Related Manuals for Daymak Sasquatch 1000W


Summary of Contents for Daymak Sasquatch 1000W
- Page 1 Sasquatch 1000W User Manual...
- Page 2 Daymak warranties, services, and stocks parts for everything it sells. We support our prod- ucts. Please feel free to visit our website. You’ll find the latest in cool transportation solutions,...
-
Page 3: Table Of Contents
Table of Contents Introduction..............................4 Part Diagrams ..............................5 Riding Instructions ............................6 Operating Instructions ..........................10 The Battery ..............................12 Technical Data ...............................17 Maintenance and Troubleshooting .......................20... -
Page 4: Introduction
Daymak does not assume any liability for damages, loss of profits, or claims from third parties due to improper use of this product. Daymak does not assume any liability for dam- ages due to problems with the product resulting from service by a third party that is not certified by Daymak. -
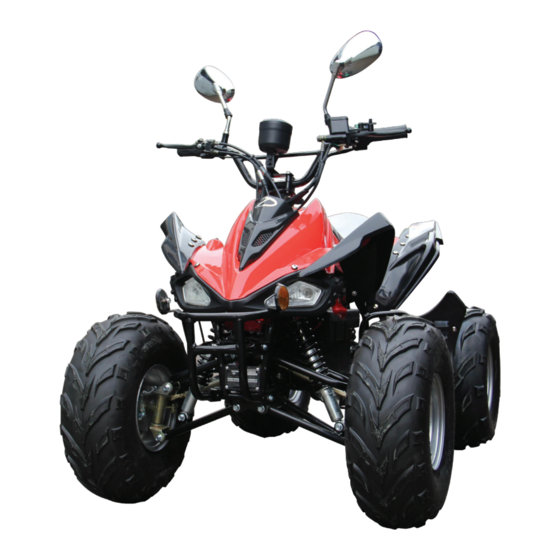
Page 5: Part Diagrams
ATV Part Diagrams Diagram 1: The Sasquatch Youth 1000W Electric ATV This diagram illustrates the various parts of your ATV. Please note that many of these parts are not user-ser- viceable and should be repaired only by trained professionals. This is especially true of the electrical systems and the mechanical components. -
Page 6: Riding Instructions
Riding Instructions This guide assumes that you already know how to ride a standard ATV. Before you try to ride an electric ATV, you should be very familiar with controlling and balancing a normal ATV. Caution If you do not have riding experience, an e-ATV is too dangerous to ride. Do not begin learn- ing to ride a ATV using an e-ATV. - Page 7 Inspecting your Electric ATV Always inspect your e-ATV before you ride it, to make sure its safety features are oper- ating properly. Many accidents can be avoided with routine inspections. Once you are comfortable with your e-ATV, you will be able to detect small changes in the way it feels. If anything changes between uses, make sure to have it properly examined.
- Page 8 Stopping Your e-ATV has two sets of brakes, at the front and at the rear. The levers attached to the handlebars, on the left and right, activate the brakes. Pull the levers toward you to activate the brakes. You can use both brakes to come to a stop more quickly, or you can use one of the brakes to come to a gentle stop, depending on your riding needs at the moment.
- Page 9 Riding in Wet Weather Your e-ATV is designed to function in wet conditions, such as when it is raining. However, because the motor is on the rear wheel, it is easy to slip when moving at high speeds. If it is very wet, be sure to avoid high speeds.
-
Page 10: Operating Instructions
Operating Instructions Using the Rear Storage Compartment The rear storage compartment is opened using the key provided to you when you pur- chased your e-ATV. Insert the key and turn it to the right to open the compartment. Close the case and turn the key in the opposite direction to lock the compartment again. You can use this compartment to store the charger and associated cables, so you can recharge your e-ATV if it runs out of power. - Page 11 Maximum Load Do not exceed the maximum load capabilities of your e-ATV. You can find the exact load- ing capacity listed in the technical specifications in this guide. If you exceed the maximum load, the performance of the ATV will suffer. Exceeding the maximum load of your e-ATV could cause damage to the shocks, to the mechanism and, ultimately, even to the frame.
-
Page 12: The Battery
The Battery This section details what you need to know about the battery that powers your e-ATV. Al- ways remember to treat your e-ATV’s electrical systems with respect. Battery Power The dashboard has a battery charge indicator. When the e-ATV is activated, the needle will jump and indicate the currently available battery power. - Page 13 4. Allow the e-ATV’s battery to charge for the appropriate amount of time (6-12 hours). 5. Disconnect the charger when the LED light on the charger is green. The batteries have been fully charged. If your charger’s LED status light does not change from red to green over an extended period of time, for perhaps more than 14 hours, and the battery is very hot, the battery or charger may need replacing. Stop charging and bring both to your Daymak dealer imme- diately. Do not charge the battery.
- Page 14 Battery Care Follow these suggestions to maintain your battery’s optimal performance. If you do not follow these suggestions, your battery may lose its ability to maintain a charge and might have to be replaced sooner than would otherwise be necessary. • Charge it: Charge your battery immediately after riding it.
- Page 15 Cold Weather and your Battery Below 10 degrees Celsius, the battery will not work as well as it would in warmer tempera- tures. While Lithium-Ion batteries perform better than Lead-Acid batteries in temperature extremes, both will experience reduced performance in cold temperatures. Also, repeatedly riding the e-bike in cold temperatures may cause your battery to have to be replaced sooner.
- Page 16 1500 charges. When the battery has to be replaced, you will notice that your battery cannot carry as much of a charge as it could initially. Contact your local Daymak dealer to purchase a new battery. When replacing your battery, dispose of it at a proper municipal battery recycling facility.
-
Page 17: Technical Data
Daymak pioneered the development of intelligent component control in e-ATVs. The “D- Drive” technology developed by Daymak is the brain of your e-ATV. It allows your e-ATV to achieve faster acceleration, to climb steeper hills, and to save energy. In future, it will allow for other ways of recharging your e-ATV’s batteries, such as by using solar or wind power. - Page 18 The Brakes Front Brakes The brakes on your e-ATV are drum-brakes, like those found on gas scooters and motorcycles. They generally provide for very fine stopping and control. This is a very tested and well-designed technology, but even so, the brakes will require servicing from time to time, and may have to be adjusted for tension. Unlike normal friction-grip ATV brakes, which clamp down from the outside, the drum brakes clamp from the inside.
- Page 19 Basic Statistics Dimensions Weight Loading Capacity Speed and Mileage Wheel Size: 19x7-8 35 kg without battery Standard: 75 kg Max. Speed: 32 km/h Seat Height 75cm (29”) 50 kg with battery Maximum: 150 kg Max. Mileage: 50 km Electrical System Statistics Motor Statistics Charger Statistics Battery Statistics Rated Power: 1000W Charger Input: AC 100 –...
-
Page 20: Maintenance And Troubleshooting
Please contact your Daymak dealer for specific instructions on how to remove your wheel and tires safely, and how to replace the tubes. It may be easier – and safer - to have the tubes replaced by your Daymak dealer. - Page 21 The Brakes The drum brakes on your Smart ATV allow you to stop and are a critical safety feature. Make sure you test them regularly. Take the e-ATV to your Daymak dealer if the brakes appear to be losing their stopping power or feel looser than they were previously. The brakes on your e-ATV may require servicing from time to time. The brake pads will need to be replaced as they wear down, usually after about a year to a year and a half or so, depending on how the e-ATV is ridden.
- Page 22 The Motor Do not service the motor yourself. Bring the e-ATV to your Daymak dealer for service. The motor in your e-ATV is a highly complex and fine-tuned mechanism. Repairing it requires significant expertise. We suggest maintenance every 100 running hours or so.
- Page 23 ATV Maintenance Cleaning Cleaning is extremely important this will ensure your e-bike will serve you for a long time. In the long run, it will save you money and a lot of time waiting for the bike to be repaired. You should clean your ATV weekly.
- Page 24 Schedule The frequency of maintenance depends on how much you ride and under which conditions. Recreational riders needs far less maintenance then off-road riders. The harder you ride, the more you have to take care of your ATV if you want it to last. There are various time intervals for proper maintenance. Quick maintenance should be done before &...
Need help?
Do you have a question about the Sasquatch 1000W and is the answer not in the manual?
Questions and answers