Table of Contents
Advertisement
Quick Links
SIZE: 8.5in X 11in
Portfolio
is a registered
®
trademark of LF, LLC. All rights
reserved.
ATTACH YOUR RECEIPT HERE
Serial Number
Questions, problems, missing parts? Before returning to your retailer, call our
customer service department at 1-800-643-0067, 8 a.m – 6 p.m., EST,
Monday – Thursday, 8 a.m. – 5 p.m., EST, Friday
Purchase Date
1
Page 1/Inside Spread
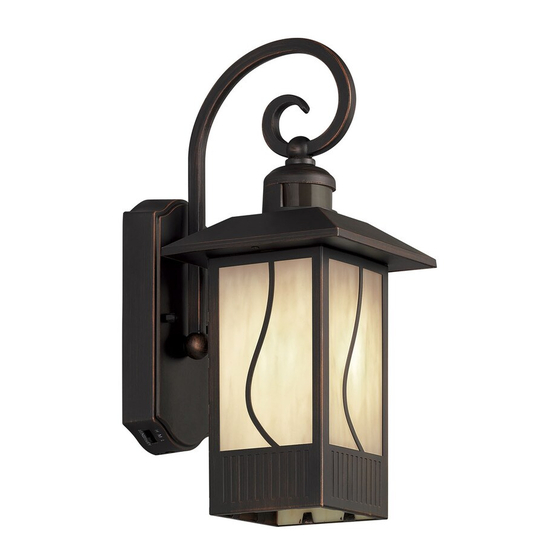
MOTION-ACTIVATED
WALL LANTERN
MODEL # VEL-5069-MD-PIR
ITEM #0358718
Français p. 9
Español p. 17
Advertisement
Table of Contents

Subscribe to Our Youtube Channel
Related Manuals for Portfolio VEL-5069-MD-PIR


Summary of Contents for Portfolio VEL-5069-MD-PIR
- Page 1 SIZE: 8.5in X 11in ITEM #0358718 MOTION-ACTIVATED WALL LANTERN Portfolio is a registered ® MODEL # VEL-5069-MD-PIR trademark of LF, LLC. All rights reserved. Français p. 9 Español p. 17 ATTACH YOUR RECEIPT HERE Serial Number Purchase Date Questions, problems, missing parts? Before returning to your retailer, call our customer service department at 1-800-643-0067, 8 a.m –...
-
Page 2: Package Contents
PACKAGE CONTENTS PART DESCRIPTION QUANTITY Fixture body Cage Glass (preassembled to Cage (B)) HARDWARE CONTENTS (shown actual size) Cage screws Decorative nuts (preassembled to Crossbar (CC)) Wire nut Crossbar Mounting (not shown to size) screw Page 2/Inside Spread... -
Page 3: Safety Information
SAFETY INFORMATION Please read and understand this entire manual before attempting to assemble, operate or install the product. CAUTION Turn off the main power at circuit breaker before installing fixture. ● There is no serviceable part inside the motion sensor. Do not try to repair or disassemble the unit. Doing so could ●... - Page 4 ASSEMBLY INSTRUCTIONS 3. Remove the crossbar (CC) and two decorative nuts (DD) from accessory bag. Save decorative nuts (DD) for later. Attach the crossbar (CC) to the junction box (not included) with the mounting screws (AA). Hardware Used Mounting Screw Crossbar 4.
-
Page 5: Getting Started
OPERATING INSTRUCTIONS GETTING STARTED: After installing the fixture, slide the “TIMER” switch to “TEST”. Restore power at the circuit breaker and turn on your wall switch (if applicable). The light will turn on and remain on for approximately 45 seconds. Then the light will flash 3 times and turn off. -
Page 6: Additional Note
OPERATING INSTRUCTIONS Select locations away from heat sources, such as heating vents, air conditioners, and heated swimming pools. ● When selecting a location, be aware that the motion sensor is more sensitive to movement across its coverage area ● and less sensitive to movement toward or away from the motion sensor (Fig. 3). Fig. -
Page 7: Troubleshooting
TROUBLESHOOTING PROBLEM POSSIBLE CAUSE CORRECTIVE ACTION 1. Wall switch or circuit breaker is off. 1. Turn on switch or circuit breaker. 2. Light bulb may be dead. 2. Test the light bulb in a known working light fixture. Replace light bulb. 3. -
Page 8: Three-Year Limited Warranty
THREE-YEAR LIMITED WARRANTY If this product fails due to a defect in materials or workmanship within three (3) years from the date of purchase, return it along with proof of date of purchase to the retailer and it will be replaced with the same or comparable model free of charge.
Need help?
Do you have a question about the VEL-5069-MD-PIR and is the answer not in the manual?
Questions and answers