Advertisement
Quick Links
Advertisement

Related Manuals for Direct Bikes DB125T-E


Summary of Contents for Direct Bikes DB125T-E
- Page 1 Manual-DB125T-E...
- Page 2 Dear Customer: Thank you for purchasing the Direct Bikes DB125T-E scooter. The Direct Bikes DB125T-E scooter is manufactured using some of the most advanced production techniques in the world. The scooter features high performance, economic fuel consumption and low noise levels. This manual provides detailed information about the correct operation, maintenance and adjustment of your DB125T-E scooter.
- Page 3 Important Notice: • Driver and passenger This vehicle is designed to carry only one driver and one passenger. The driver is required to have the appropriate licence for these requirements. Do not exceed the rated load capacity specified on the specification label. •...
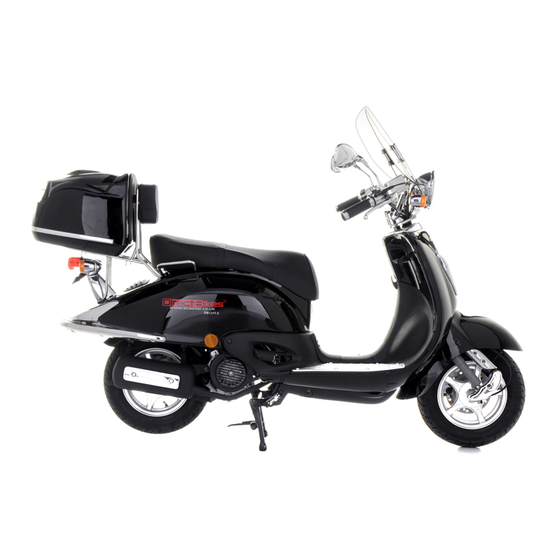
- Page 4 Location of Component parts (1) Back-view mirror (2) Headlight (3) Front turn signal light (4) Muffler (5) Taillight (6) Seat...
-
Page 5: Fuel Gauge
Meter Panel and Indicators All the controls for the indicators and warning lights are located on the meter panel. (1) Speedometer (2) Mileometer (3) High beam indicator (4) Turn right signal light (5) Turn left signal light (6) Fuel meter Fuel gauge The fuel gauge indicates the approximate amount of fuel remaining in the fuel tank. - Page 6 Identification The VIN or chassis number is located on the frame of the scooter and is either under the seat or under the clip in cover in the front of the foot well. The engine number is located on the left side on the bottom of engine. NOTE: You should regard this manual as a permanent component part of your vehicle, it is essential for the continued operation and safety of your...
- Page 7 Fitting the accessories Mirrors The mirrors come ‘handed’, i.e. a left and right one. They screw into either the left and right switch gear or into the front and back brake lever assemblies. There is a lock nut on the threaded part of the mirror to ensure the mirror does not come loose.
- Page 8 Screen Start by adding the backing rubber to the chrome screen bracket with the 2 lugs. Add the 2 ‘U’ shaped rubber mounts to each mounting rod. Push the chrome lugs through the holes in the screen and secure with rubber washer. Attach the bar to the lugs with the nuts provided.
- Page 9 Top box Check the accessories. Take off the two screws that fixed the rear backrest with screwdriver.
- Page 10 Take off the rear backrest. Take off the rear reflector with spanner.
- Page 11 Put the iron bottom board centrally on the rear rack. Place the four bolts through four holes in the bottom board highlighted in the photo with white circles.
- Page 12 Place the four curved brackets underneath the rear rack covering the bars of the rack. Tighten to the bolts with a screwdriver.
- Page 13 Place the cover on to the top bracket. Install back the rear backrest on the bottom bracket with the two screws.
- Page 14 Put the top box centrally on the bottom board. Put the longer bolt and the washer through the hole in the rear of the top box highlighted in the photo with the white circle.
- Page 15 Attach to the rear backrest and tighten. Put the remaining four bolts and washers through the holes in the bottom of the top box highlighted in the photo with the white circles. Tighten the bolts with a screwdriver.
- Page 16 Put the foam pad inside the top box. Please note: A maximum weight of 10 kilos is recommended. The weight may also alter the handling of the scooter.
- Page 17 Fitting the battery Make sure the scooter ignition is in the off position. Put the battery in the compartment. Fit the 2 red leads (sometimes one or both of these leads are covered by a protective black sleeve, if you lower the sleeves you will see the red leads) to the + side (also marked red on the terminal.) using the screw provided.
-
Page 18: Ignition Switch
Guide to Operation Ignition Switch position Turn the switch this position to start the engine; the switch key can not be pulled out in this position. position Turn the switch to this position to shut down the engine; the switch key can be pulled out in this position. - Page 19 NOTE: In hot weather, leaving the engine idling for a long time will cause it to overheat. You should shut it down to let it get cool. Headlight beam switch (1) Push the “ ” buttom for high beam and the “...
- Page 20 Start button (4) When this button is pushed, the starting motor works to start the engine. See the part “Starting the Engine” for the starting procedure. Headlight switch (5) “ ” Position: When the switch is set to this position, the headlight, taillight, position light and meter light all go on.
- Page 21 Important Checks The scooter is nearly ready to go, but before you put any petrol or oil into the scooter, there are a few final things that need checking. These checks should be carried out routinely to insure good performance and safe operation. Checking the oil The engine oil dipstick and cap are combined and is located on the right side of the engine.
- Page 22 Brakes Checking the front brake Check the brake for normal performance and adjust it’s free play. The free play refers to the distance for which the front brake lever travels freely to achieve the braking effect. Required free play : 5 to 10 mm. This must be checked with steering at left, right and centre.
- Page 23 Checking the tyre pressure The tyre pressure is 1.75 bar for the front tyre and 2.0 bar for the rear. If you are carrying passengers or luggage please increase the rear tyre to 2.25 bar. If you are a light person or heavy person these pressures may need adjusting to compensate.
- Page 24 There should be no leaks. Fuel / Vacuum Pipes Please check that all fuel / vacuum pipes are connected and that there are no loose pipes. If you have any questions regarding this please contact Direct Bikes for assistance Tel: 0845 652 0680...
- Page 25 Electrics Please go through the controls and make sure that the following systems are working correctly; Indicators: left and right, front and rear. Lights: sidelights, front and rear. High and low beam for the front light. Rear brake light, working from both the front and rear brake independently.
- Page 26 General ‘walk around’ Before use please go around the scooter and check that all nuts and bolts are tight and secure and that there are no loose parts. Starting the scooter Before starting you need to put petrol in. The petrol cap is either located under the seat or at the rear of the foot well under a locked flap.
-
Page 27: Riding The Scooter
Riding the Scooter Please always wear a HELMET and PROTECTIVE CLOTHING! Familiarise yourself with the controls BEFORE you go out on a public road. Take the appropriate training if you do not all ready know how to ride a scooter. Failure to do so could put yourself or others at risk of injury! The controls are designed for ease of use. - Page 28 CAUTION: Always start the engine with the rear brake pedal depressed. The engine should not be allowed to run too fast when it is being warmed up. Quick opening and closing of the throttle must be avoided. Running in Your new scooter requires a ‘running in’ period. This is very important because it allows the mechanical parts to bed in and will increase the serviceable life of the machine.
- Page 29 Storage When not using your scooter a waterproof cover should be used to protect the scooter from the elements. If storing the scooter for periods in excess of six weeks it is advisable that a few further things are done. Drain the fuel. You will find the drain cock at the lowest point of the carburettor.
- Page 30 To ensure safety, good performance and durability of the vehicle and reduced emission, be sure to perform periodic maintenance by an approved dealer. If you are unaware of your local approved dealer, please contact Direct Bikes on: 0845 652 0680 The following maintenance schedule is made accordingly to the distance travelled or duration of ownership which ever is sooner.
- Page 32 Repeat same service intervals when exceeding 31000kms / 64 months from the table above.
-
Page 33: Troubleshooting
Troubleshooting Checking the carburettor In the unlikely event that your scooter fails to start please check the air pilot screw on the side of the carburettor. It should be 2.5 turns out. Screw all the way in and count the number of turns out. - Page 34 Checking the spark plug A dirty spark plug with dirty electrodes or excessive gap between electrodes will not be able to generate full sparks. (Cleaning) • The best result can be achieved if you clean the spark plug with a spark plug cleaner. •...
- Page 35 Checking the fuse Turn off the master switch and check the fuse to see if it is blown. Replace the blown fuse with one of the specified capacity: • Always find out the cause before replacing a blown fuse. • Unscrew the two screws battery and remove the battery cover.
- Page 36 If you require technical assistance please contact Direct Bikes on: 0845 652 0680...
- Page 37 Safety Precautions It is only the driver that can ensure the safety of travel. A safety-minded scooter driver always spends much time learning how to drive and develop his driving skills in a place where traffic is not so busy before he begins to drive on a public road.
- Page 38 5. As most serious scooter accidents cause injuries of the drivers head, always wear a helmet and protective clothing such as protective glasses, boots, gloves, thick and strong coat. 6. Do not drive on rough rugged roads as rough surfaces may lead to loss of control and cause damage to the vehicle.
- Page 39 6. Always remember to switch on the turn signal lights before making a turn or change lanes. 7. Do not drive your vehicle on the shoulder on either side of the road. Loading WARNING: A) The top box is used to carry only lightweight objects, not for very heavy ones.
Need help?
Do you have a question about the DB125T-E and is the answer not in the manual?
Questions and answers