Table of Contents
Advertisement
Quick Links
Step 3
USer'S GUIde
This guide is also available at www.miowatch.com
B. MOdeS Of OperAtION
Press MODE to move to the next mode.
Step
•
Shows number of
steps taken
DiStAnCe
•
Shows distance
travelled in
kilometers or miles
CAlorieS
•
Dipslays calories
burned
StopWAtCh
•
Time your activities
time
•
Choose either 12 or
24 hour clock
AlArm
•
Set daily alarm.
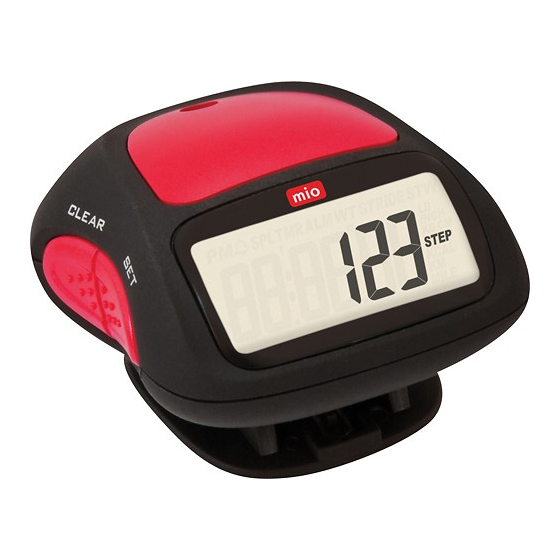
A. MIO Step 3 At-A-GLANCe
Time
Weight
Mode
Mode
Split
Alarm
Alarm
Function
Mode
PM
AM
LB weight in pounds
STEP number of steps walked
INCH stride length in inches
KCAL number of calories burned
KG weight in kilograms
KM distance walked in kilometers
CM stride length in centimeters
MILE distance walked in miles
ACtIVAtING YOUr pedOMeter
If the screen is blank remove the insulation tape
from the battery door to activate the unit.
C. tIpS fOr weArING
•
The pedometer is designed with a clip on the back that
can be clipped on your waist band.
•
For the pedometer to accurately count your steps it must
stay in an upright position and be worn on the hip.
The following situations may result in miscounted steps:
1. If the pedometer isn't perpendicular to the ground.
2. Dragging your feet or taking uneven footsteps
3. The vibrations from being inside a vehicle
4. The motion of standing up or down
D. deterMINING YOUr StrIde LeNGth
You will need a tape measure to ensure accuracy.
1. Pick a spot on the floor and mark it.
2. Start with your toe on that line and proceed to take ten
natural strides of the type of activity you wish to measure
strides for (walk, jog or run).
3. Mark the spot where the toe of your front foot lands
4. Measure the distance between the two marked spots in
inches or centimetres.
5. Divide the number by 10. This is the number that you enter
for stride length.
Note: If you choose to measure your steps in miles (imperial)
all other measurements will be done with the imperial sys-
tem (weight in lbs and stride length in inches). If you choose
to measure your steps in km (metric) all your other measure-
ments will be done with the metric system (cms and kms).
Stopwatch
Stride
Length
CLEAR
button
resets
values
SET
button
resets
timer
E. SettING Up USer dAtA
Setting up time
1. Press the MODE button until you reach the
Time screen (TMR).
2. You can select 12 or 24 hour format by pressing the
DOWN button.
3. To change the hour hold the SET button until the hour
starts flashing, release the SET button then use the UP or
DOWN buttons to adjust the time and press SET to confirm.
Press and hold the DOWN or UP button to quickly move
through the numbers. Repeat for the minutes.
Setting up the AlArm CloCk
1. Press the MODE button until you reach the Alarm Clock
Screen (ALM).
2. To change the hours hold the SET button down until the
hours start flashing, release the SET button then use the
UP or DOWN buttons to adjust the hours. When desired
hour found press the SET button. Repeat for the minutes.
3. After hours and minutes are entered they will start flashing
then press UP or DOWN to toggle the activation of the
alarm. An image of a bell with appear in the top left corner
of the display screen indicating the alarm is activated.
4. When the alarm is sounding it can be turned off by pressing
any button. To deactivate the alarm for future days, repeat
steps 1–3 and toggle the alarm off so the bell disappears.
Note: The alarm will automatically turn off after 1 minute if
no button is pushed.
Setting up the Step Counter
1. Press the MODE button until you reach the Step screen (STEP).
2. To choose either km or miles for your distance to be
measured in, press and hold the SET button, you will see
km or miles flashing. Press UP or DOWN to select miles or
km. Press SET to select.
Note: If you choose to measure your steps in miles
(imperial) all other measurements will be done with the
imperial system (weight in lbs and stride length in inches).
If you choose to measure your steps in km (metric) all your
other measurements will be done with the metric system
(cms and kms).
PANIC ALARM pin
pull to activate
STOP/DOWN
button
starts or
stops timer,
decreases
value
MODE/UP
button
switches
modes,
increases
value
Advertisement
Table of Contents

Related Manuals for Mio STEP 3

Summary of Contents for Mio STEP 3
- Page 1 PANIC ALARM pin Step 3 A. MIO Step 3 At-A-GLANCe pull to activate Time Weight Stopwatch USer’S GUIde Mode Mode Stride Split Alarm Length STOP/DOWN Alarm Function Mode button CLEAR starts or button stops timer, resets decreases values value MODE/UP...
- Page 2 MIO & ACCOMPANYING DOCUMENTS. IF YOU ExPERIENCE SEvERE OR PROLONGED DIS- Battery: Lr1130 for pedometer, Cr2016 for panic alarm FROM ABUSE OR MISUSE. ThIS WARRANTY IS vOID IF ThE PEDOMETER CASE OF ThE MIO COMFORT OR PAIN AT ANY TIME, SEE YOUR DOCTOR IMMEDIATELY. ThE INFORMATION IN FITNESS PEDOMETER hAS BEEN OPENED OR OThERWISE TAMPERED WITh.
Need help?
Do you have a question about the STEP 3 and is the answer not in the manual?
Questions and answers