Table of Contents
Advertisement
Advertisement
Table of Contents

Related Manuals for Creative ZEN ZEN MicroPhoto 4GB


Summary of Contents for Creative ZEN ZEN MicroPhoto 4GB
- Page 2 Information in this document is subject to change without notice and does not represent a commitment on the part of Creative Technology Ltd. No part of this manual may be reproduced or transmitted in any form or by any means, electronic or mechanical, including photocopying and recording, for any purpose without the written permission of Creative Technology Ltd.
-
Page 3: Table Of Contents
To rip music from your CD collection ... 24 To copy audio files or photos from your computer... 25 To copy data files using Creative Media Explorer ... 25 Creating and transferring playlists ... 25 Synchronizing content with your computer ... 26 Disconnecting your player ... - Page 4 Adjusting volume ... 28 Locking Zen MicroPhoto ... 28 Selecting and playing music tracks... 31 Adding a music track to the list of selected tracks ... 31 Searching for similar tracks ... 32 Selecting tracks with Zen MicroPhoto’s DJ... 32 Managing the list of selected tracks...
- Page 5 Viewing the calendar ... 49 Viewing today’s tasks ... 49 Viewing contacts... 49 Personalizing Zen MicroPhoto ... 50 Adjusting Vertical Touch Pad settings ... 50 Changing the Theme ... 50 Setting the date and time... 51 Setting the alarm... 51 Using Zen MicroPhoto’s equalizer (EQ) ...
-
Page 6: Zen Microphoto At A Glance
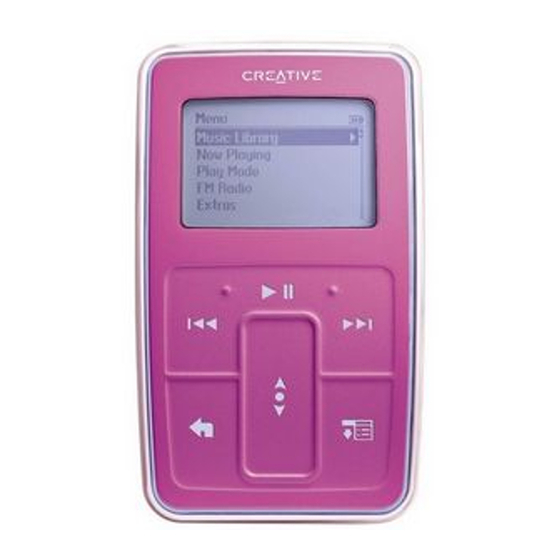
Zen MicroPhoto at a Glance Zen MicroPhoto at a Glance After completing the setup instructions in the Quick Start booklet, take some time to read this User’s Guide to learn how to get the most out of your player. Zen MicroPhoto... - Page 7 Zen MicroPhoto at a Glance Next/Fast-Forward button Press this button to go the next track. Press and hold this button to move forward within a track. Options button Press this button to display the options available. Vertical Touch Pad Use the Vertical Touch Pad to scroll through and select menu items. During playback, use the Vertical Touch Pad to adjust the volume.
- Page 8 USB port. To charge your player without using the computer, purchase the Zen MicroPhoto Power Adapter or Universal Travel Adapter. For more information on this and other Zen MicroPhoto accessories, visit www.creative.com. Microphone Make instant recordings with this built-in microphone.
- Page 9 In line with industry standards and based on Creative's screen manufacturer's technical specifications, occurrences of fixed spots may appear and are considered acceptable if they do not impair display quality.
-
Page 10: Turning Zen Microphoto On And Off
Turning Zen MicroPhoto on and off To turn on Zen MicroPhoto, slide the Power switch towards the Power it there until the OLED display lights up. To turn off Zen MicroPhoto, slide the Power switch towards the Power it there until Shutting down... appears. Vertical Touch Pad Move your thumb up and down the Vertical Touch... -
Page 11: Main Menu
Zen MicroPhoto at a Glance Main Menu Press and hold the Menu/Back button to view Zen MicroPhoto’s main menu. Move your thumb up and down the Vertical Touch Pad to scroll through menu items, and press the Menu/Back button to return to the previous menu or screen. -
Page 12: Now Playing Screen
Now Playing screen The Now Playing screen appears when you turn on Zen MicroPhoto, or when you select Now Playing from the main menu. When you see the Now Playing screen, move your thumb up and down the Vertical Touch Pad to adjust the volume. Status icons at the top right corner of the OLED display indicate Zen MicroPhoto’s current settings and battery status. -
Page 13: Main Applications
Creative Media Explorer Creative Media Explorer offers you the ease of managing music tracks and data files in Zen MicroPhoto, in a Windows Explorer environment. Use Creative Media Explorer, if you: are new to MP3 and WMA ripping and want to build up a library ■... -
Page 14: Creative Media Toolbox
Help, which offers a comprehensive How do I section. Creative Media Toolbox Creative Media Toolbox provides a single point of access to four software applications for cleaning, organizing and converting your music files. - Page 15 Zen MicroPhoto at a Glance Audio Converter Converts your audio files from one format to another, for example, WAV to MP3. This ■ application is only available with Creative MediaSource installed.
-
Page 16: Accessories
Zen MicroPhoto comes with some of the accessories described below. Accessories that are not included with your player are available from your Creative Labs dealer or at our online store at www.creative.com. Earphones Zen MicroPhoto’s earphones feature dynamic bass response and enhanced audio clarity. -
Page 17: Cradle
Accessories Cradle Use Zen MicroPhoto’s cradle with the belt clip for handsfree support. - Page 18 Accessories You can also use Zen MicroPhoto’s cradle with the stand to rest Zen MicroPhoto on your desk.
-
Page 19: Pouch
Accessories Pouch Zen MicroPhoto’s protective pouch keeps Zen MicroPhoto snug and safe. -
Page 20: Neckstrap
Accessories Neckstrap With Zen MicroPhoto’s neckstrap, your music collection goes wherever you go. NOTE Zen MicroPhoto’s neckstrap is available only in selected countries. -
Page 21: Wired Remote Control
Accessories Wired Remote Control Zen MicroPhoto’s wired remote control gives you easy access to basic playback functions. Connect the wired remote control to Zen MicroPhoto’s Headphone jack. NOTE Zen MicroPhoto’s wired remote control is available separately in selected countries. - Page 22 Accessories Volume Increase button Press this button to increase the volume. Volume Decrease button Press this button to decrease the volume. Play/Pause button Starts, pauses and resumes playback. Previous/Rewind button Press this button to go the previous track. Press and hold this button to move back within a track. Next/Fast-Forward button Press this button to go the next track.
-
Page 23: Transferring Content From Your Computer
Transferring content from your computer About Content Types Your Zen MicroPhoto is capable of playing different types of content, including audio tracks in the MP3, WAV or WMA formats, and photos in the JPEG (JPG) format. Getting Content You can acquire content from many legal sources. Here are some suggestions: Audio tracks —... -
Page 24: Ripping Music And Copying Files
Ripping music and copying files Rip music from your CD collection to your player, or copy audio files (such as music you have purchased online) from your computer. Before ripping or copying files, make sure your player is connected to your computer as shown below. To rip music from your CD collection Double-click the My Computer icon on your desktop. -
Page 25: To Copy Audio Files Or Photos From Your Computer
Locate your data files and copy them to your player or computer using the drag-and-drop method. Creating and transferring playlists With Creative MediaSource Player/Organizer, organizing music tracks into playlists (tracks you have organized into lists) has never been easier. You can create as many playlists as you like and transfer these to Zen MicroPhoto. -
Page 26: Synchronizing Content With Your Computer
Zen MicroPhoto and your computer. Connect Zen MicroPhoto to your computer. Start Sync Manager. You can start Sync Manager in either Creative MediaSource Player/Organizer or Creative Media Explorer. Select My Computer and Zen MicroPhoto as the devices you want to synchronize, and then click Next. -
Page 27: Disconnecting Your Player
Transferring content from your computer Disconnecting your player When you have finished transferring files, disconnect Zen MicroPhoto. DO NOT disconnect your player if you see the left picture below on the OLED display. Track or data file transfer is in progress and disconnecting your player may damage the content being transferred. -
Page 28: Playing And Managing Your Player
Playing and Managing your player Playing and Managing your player After transferring music or photos to Zen MicroPhoto, read on to learn how to get the most out of your player. Adjusting volume In the Now Playing screen, move your thumb up and down the Vertical Touch Pad to adjust the volume. - Page 29 Playing and Managing your player To lock Zen MicroPhoto Slide the Power switch towards the Lock icon. The Locked icon appears on the Now Playing screen.
- Page 30 Playing and Managing your player To lock the Zen MicroPhoto wired remote control (available separately) Slide the Lock switch towards the Lock icon.
-
Page 31: Selecting And Playing Music Tracks
You can search for music tracks by album, artist, genre or title. If you have created playlists (tracks you have organized into lists) on Zen MicroPhoto, or transferred playlists from Creative MediaSource Player/Organizer, you can search for music tracks in playlists as well. -
Page 32: Searching For Similar Tracks
Select Add to Selected. NOTE For more information about creating playlists on Zen MicroPhoto, see "Managing the list of selected tracks" on page 33. Searching for similar tracks During playback, you can search for another track that is similar to the currently playing track. -
Page 33: Managing The List Of Selected Tracks
Select Rarely Heard to let Zen MicroPhoto’s DJ play rarely played tracks. Managing the list of selected tracks Tracks you have selected for playback can be viewed and managed in the Selected Music screen. Press the Menu/Back button. The main menu appears. Select Now Playing. -
Page 34: Searching Within A Track
Press the Menu/Back button. The main menu appears. Select Play Mode. Select one of the following items in the Play Mode screen: Normal ■ Plays your selected tracks in sequential order. Repeat Track ■ Repeats the current track. When you select this play mode, screen. -
Page 35: Using Bookmarks
In the Now Playing screen, press the Options Move your thumb up and down the Vertical Touch Pad to scroll to any point within the current track. Firmly tap the Vertical Touch Pad to start playing from the selected position. Using bookmarks You can insert bookmarks during playback. -
Page 36: Listening To The Radio
Select the bookmark that you want. Listening to the radio The FM frequency range on your player is set to "International" by default. Most regions in the world receive FM broadcasts in this range. To perform an autoscan and autosave Press the Menu/Back button. - Page 37 To fine tune or manually scan for a radio station, press the Play/Pause to the manual tuning view. Press the Next/Fast-Forward radio frequency. Hold down the Next/Fast-Forward second to scan for the next available radio station. To save a radio station as a preset, press the Options and then select a preset number.
-
Page 38: Deleting Radio Presets
Deleting radio presets Press the Menu/Back button. The main menu appears. Select FM Radio. Press the Next/Fast-Forward you want to delete. Press the Options button and select Delete Preset. Recording radio broadcasts While listening to a radio broadcast, press the Options Radio to start recording. -
Page 39: Recording With The Built-In Microphone
To view and play back recorded tracks, see "Playing recorded tracks" on page 40. NOTE Make sure your earphones are connected to your player when recording radio broadcasts. The earphone cable acts as an antenna for radio reception. Recording with the built-in microphone Press the Menu/Back button. -
Page 40: Playing Recorded Tracks
Press the Options button and select Delete Playlist, Delete Album, Delete Artist, Delete Genre or Delete Track. For more song management tasks, connect your player to your computer and use Creative MediaSource Player/Organizer. Viewing track information To view detailed information about a track, such as its duration, scroll to the track, press the Options button, and select View Details. -
Page 41: Viewing Player Information
Viewing player information You can view player information, such as hard disk space and the total number of tracks, in the Information screen. Press the Menu/Back button. The main menu appears. Select System Information. Viewing and managing photos With Zen MicroPhoto’s high-capacity storage, you can store thousands of photos in your player, and even set up a slideshow, so that you can share memories with friends and family. - Page 42 To change the slideshow timer Press the Menu/Back button. The main menu appears. Select System Photo Settings Slide Timer. The current slideshow timing is displayed. Use the Vertical Touch Pad to scroll to the slideshow timing that you want. To delete a photo Press the Menu/Back button.
-
Page 43: Storing Photos And Data Files In Zen Microphoto
Use Creative Media Explorer if you need to transfer data files between Zen MicroPhoto and your computer. Creative Media Explorer offers you the ease of managing data files (as well as music tracks and photos) in Zen MicroPhoto, in a Windows Explorer environment. - Page 44 Storing Photos and Data Files in Zen MicroPhoto Connect Zen MicroPhoto to your computer using the supplied USB cable.
- Page 45 Zen MicroPhoto appears as a Removable Disk under My Computer in Windows Explorer. Use the drag-and-drop method in Windows Explorer to copy files to and from Zen MicroPhoto. When you have finished copying files, safely disconnect Zen MicroPhoto using the Safely Remove Hardware icon on the Taskbar.
-
Page 46: Changing The Amount Of Hard Disk Space In Removable Disk Mode
Data files saved in the Removable Disk Mode hard disk space cannot be viewed or ■ managed with Creative Media Explorer. Similarly, data files transferred to Zen MicroPhoto using Creative Media Explorer ■ cannot be viewed or managed in Removable Disk Mode. -
Page 47: Stopping Zen Microphoto Properly
Alternatively, connect Zen MicroPhoto to your computer and use Creative Removable Disk Manager to increase or decrease the amount of hard disk space in Removable Disk mode. Creative Removable Disk Manager is included with your player and is automatically ■... -
Page 48: Using Zen Microphoto's Organizer Features
Microsoft Outlook . Read on to learn how to use these organizer features. If you do not have Microsoft Outlook installed, you can use Creative Media Explorer to edit your calendar, "to do" tasks and contact information using the Personal Information Manager (PIM) editor. -
Page 49: Viewing The Calendar
Viewing the calendar Press the Menu/Back button. The main menu appears. Select Extras Organizer Calendar. Use the Next/Fast Forward months, and use the Vertical Touch Pad to scroll between the days in the selected month. Firmly tap the Vertical Touch Pad to view the events and to-do list of the selected day. Viewing today’s tasks Press the Menu/Back button. -
Page 50: Personalizing Zen Microphoto
Personalizing Zen MicroPhoto Zen MicroPhoto’s settings can be adjusted to suit your needs. Adjusting Vertical Touch Pad settings You can change the Vertical Touch Pad’s sensitivity, and turn the Vertical Touch Pad’s clicking sound on or off. Press the Menu/Back button. -
Page 51: Setting The Date And Time
Setting the date and time Press the Menu/Back button. The main menu appears. Select Extras Date & Time. The current date and time are displayed. Press the Options button and select Set Time or Set Date to change the time or date settings respectively. -
Page 52: Setting Playback At A Constant Volume
Select one of the EQ menu items. When an EQ setting is selected, To create a customized equalizer setting In the EQ screen, select Custom EQ. Each slider on the Custom EQ screen represents successively higher frequencies that can be adjusted. 80 controls bass frequency ■... -
Page 53: Enabling The Bass Boost Feature
Select System Audio Settings Smart Volume: On. Enabling the bass boost feature Enabling the bass boost feature enhances the bass in your track during playback. Press the Menu/Back button. The main menu appears. Select System Audio Settings Bass Boost: On. Labeling Zen MicroPhoto with your name Press the Menu/Back button. -
Page 54: Setting The Display Contrast
Setting the display contrast Press the Menu/Back button. The main menu appears. Select System Player Settings Contrast. Use the Vertical Touch Pad to scroll to the contrast setting that you want. Setting the Idle Sleep time You can specify how long Zen MicroPhoto remains inactive before it automatically shuts down. -
Page 55: Changing The Menu Language
Changing the menu language Press the Menu/Back button. The main menu appears. Select System Language, and select the language that you want. Resetting Zen MicroPhoto You can reset Zen MicroPhoto to its original settings. Press the Menu/Back button. The main menu appears. Select System Reset Settings. - Page 56 Use the Vertical Touch Pad to change the position of the highlighted menu item. To revert to the default menu settings, press the Options Menu. Personalizing Zen MicroPhoto button and select Default...
-
Page 57: Frequently Asked Questions
Creative Knowledge Base for more information. Creative's 24-hour self-help Knowledge Base helps you resolve and troubleshoot technical queries. Go to www.creative.com, select your region and then select Support Knowledge Base. For the latest firmware updates to improve Zen MicroPhoto’s functionality, go to www.creative.com, select your region and then select Support... - Page 58 Can I transfer Digital Rights Management (DRM) protected WMA files to my player? Yes. To transfer DRM protected WMA files to Zen MicroPhoto, you can use Creative MediaSource Player/Organizer or Creative Media Explorer. Can I use the player for portable data storage? Yes, you can.
- Page 59 One of the following diagrams appears on the OLED display. What does it mean? Your computer is actively managing your player. Warning: DO NOT disconnect your player while your computer is still actively managing it. Your computer is not actively managing your player. To use your player, disconnect it from your computer.
- Page 60 Frequently Asked Questions The firmware upgrade is complete. Reset your player for the new firmware to take effect. For more information, see "How do I reset Zen MicroPhoto?" on page 61. There was an unexpected power loss during audio file transfer.
- Page 61 How do I reset Zen MicroPhoto? You can solve most problems with Zen MicroPhoto by resetting it. Turn off Zen MicroPhoto. Slide open the battery cover. Remove the battery and wait five seconds before reinserting the battery. There was an unexpected power loss while saving settings. Reload the firmware, download a newer firmware version or contact Customer Support Services.
- Page 62 Zen MicroPhoto does not turn on or stops responding. What do I do? Make sure the Power switch is not in the Lock ■ If you’re using the Zen MicroPhoto wired remote control (available separately), make sure the ■ wired remote control’s Lock switch is not is the Lock Your battery may need to be recharged.
- Page 63 Selecting Reload Firmware erases your player’s firmware. DO NOT select the ■ Reload Firmware option unless you have downloaded a newer firmware version for Zen MicroPhoto, or have been advised to do so by the Creative Customer Services center. My Zen MicroPhoto wired remote control (available separately) is not working.
- Page 64 Frequently Asked Questions Where can I get more information on Creative products? Visit www.creative.com and select your region or country for updates and downloads relating to all Creative products.
-
Page 65: Safety Information
Do not dismantle or attempt to repair your player, battery or power adapter. ■ Refer all servicing to Creative or authorized repair agents. Do not expose your player or battery to temperatures outside the range of 0°C to 45°C (32°F to ■... -
Page 66: General Specifications
General Specifications Size (WxHxD) 51 mm (2.0") x 83 mm (3.3") x 17.2 mm (0.7") ■ Weight (approximate) 115 g (4.1 oz) with battery ■ Power Source Battery: 1 x Rechargeable Lithium Ion battery ■ USB bus powered when connected to a power outlet or powered USB port on a computer ■... - Page 67 ■ Display 128 x 128 pixel OLED display (262K color) ■ Firmware Support Upgradable via USB (firmware upgrades are available from www.creative.com) ■ Earphone Specifications Frequency Range: 20 Hz ~ 20 KHz ■ Sensitivity: 111 dB ±5 dB (I/P Level:1 mW) ■...
Need help?
Do you have a question about the ZEN ZEN MicroPhoto 4GB and is the answer not in the manual?
Questions and answers
creative media player
The Creative ZEN MicroPhoto 4GB media player has the following features:
- Now Playing Screen: Displays the currently playing track and allows volume adjustment using the Vertical Touch Pad.
- Selected Music Screen: Shows a list of pre-selected music tracks when the Vertical Touch Pad is tapped firmly.
- Status Icons: Indicate current settings and battery status.
- Creative Media Applications: Includes Creative Media Explorer, Creative MediaSource Player/Organizer, and Creative Media Toolbox for managing and organizing music files.
- Creative Media Explorer: Provides an interface similar to Windows Explorer for managing music and data files.
- DRM Support: Supports transferring DRM-protected WMA files using Creative MediaSource or Creative Media Explorer.
- Portable Data Storage: Can store photos and data files.
- Battery Conservation Tips: Battery life can be extended by adjusting display duration, contrast, minimizing fast-forwarding/rewinding, reducing power cycles, and lowering volume.
- Creative Media Toolbox: Includes applications like Auto Organizer, Auto Tag Cleaner, Tag Format Converter, and Audio Converter for organizing and converting music files.
- Accessories: Comes with earphones featuring dynamic bass response and enhanced audio clarity. A cradle is also available as an accessory.
This answer is automatically generated