
Related Manuals for PAX SK600


Summary of Contents for PAX SK600
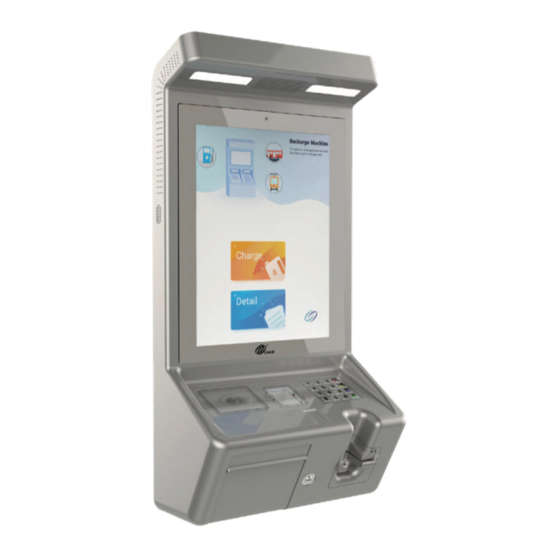
- Page 1 SK600 Smart Kiosk Note: Product images shown may be different than actual product received PAX TECHNOLOGY LIMITED...
-
Page 2: Contents Checklist
1、ContentsChecklist Please check the components after unpacking. If any are missing, please contact the dealer. Part SK600 Smart Kiosk SK600 Wall Bracket Printer Key Thermal Paper Roll M4-12 Combination Screw Expansion Screw Plastic Packaging Power Cable Telephone Handle (optional) Product Manual 2、Product Description... -
Page 3: Specifications
Power Port, Power Button, D89 Serial, SD Card Slot, HDMI Port, RS485 Port, Micro USB, Interface Diagram SIM Card Slot,Ethernet Port 3、Operating Instruction · Power on: Plug in the AC power cable and turn on the power button. · Contactless module indicator: Light indication when using the Contactless module. ·... -
Page 4: Load Printer Paper
Micro SIM card slot x 1 Micro SD card slot(Support maximum of 128GB) x 1 Peripheral Ports: RJ45 (LAN)x1 RS232 (DB9)x1 RS485 Half-duplex (RJ-11)x1 HDMIPort(1.4)x1 Power Portx1 Micro USBx1 Note: RJ11 is the RS485 signal, which will not be connected to the public network and is only used for data transmission of the same interface device Card Readers: 2-in-1 magnetic stripe card / IC card reader;... - Page 5 3. Remove the remaining paper roll. 4. Insert the new paper roll into the printer. 5. Pull out the end of the paper so that it extends past the cutting blade, Make sure the paper roll is placed in the direction as shown in the figure below. 6.Close the printer cover, and pull out the key.
-
Page 6: Install Introduction
6、Install introduction Installation List Part Picture Qty/pcs SK600Kiosk Wall Bracket M6-60 Expansion Screw M4-12 Combination Screw Installation Steps 1. Use 6pcs expansion screws to fix the bracket on the wall. Use an 8.0 mm diameter drill bit to drill holes in the wall according to the position of the bracket fixing hole. -
Page 7: Installation And Usage Tips
2.Use the 4pcs hooks on the back of the device to hang the whole device on the wall bracket. 3. Use 2pcs M4-12 combination 3screws to attach the machine to the wall bracket at the bottom of the machine. 4. The device installation is completed. 7、Installation and Usage Tips 1) There is no built-in battery, and the device can only be powered by the power adapter. -
Page 8: Fcc Regulations
4) Do not insert or unplug any part of the device while it is powered on. Otherwise, it may cause damage to the internal circuit. 5) If necessary, please contact PAX technical support for assistance with the device. 6) Before using the magnetic stripe /IC/contactless card, check if there is any suspicious person nearby, if so, pay attention to guard against theft. - Page 9 ISED Notice This device complies with Science and Economic Development Canada’s license-exempt RSS standard(s). Operation is subject to the following two conditions: this device may not cause interference, and this device must accept any interference, including interference that may cause undesired operation of the device.
- Page 10 - The equipment is only suitable for mounting at heights≤2m Moving partsKeep body parts away from moving parts Hereby, PAX Computer Technology (Shenzhen) Co., Ltd. declares that the radio equipment type SK600 is in compliance with Directive 2014/53/EU. The full text of the EU declaration of conformity is available at the following internet address:...
Need help?
Do you have a question about the SK600 and is the answer not in the manual?
Questions and answers