Advertisement
Quick Links
Phocos Any-Bridge™ Series
Monitoring & Control Gateway Model AB-PLC
for access to the PhocosLink Cloud
AB-PLC
User and Installation Manual
English
For further languages see
Für weitere Sprachen siehe
Pour autres langues voir
Para otros idiomas ver
对于其他语言请参阅
www.phocos.com
1
Introduction
Dear customer, thank you for choosing this quality Phocos product.
The Any-Bridge™ AB-PLC Monitoring & Control Gateway (referred to
as "gateway" in this manual) allows you to connect your Phocos Any-
Grid™ PSW-H Series inverter/charger with MPPT solar charge
controller (referred to as "power device" in this manual) to the
internet for access to the PhocosLink Cloud portal (referred to as
"portal" in this manual). This portal enables viewing and control
(functionality enabled by a future over-the-air automatic update, no
user intervention required) of your power device through any
internet-connected device with an internet browser such as a
personal computer, tablet or smartphone. The purchase of this device
enables free introductory access to the PhocosLink Cloud with up to
three
Any-Grid
PSW-H
devices
for
www.phocos.com for details regarding access plans.
This manual describes the installation and operation of this unit. Read
this entire document before proceeding with the installation.
2
Important Safety Information
SAVE THESE INSTRUCTIONS: This manual contains important
instructions for the model AB-PLC in the Any-Bridge Series. Read and
save this manual for future reference. The following words are used
to mark important sections for your safety:
Failure to follow instructions could cause physical
WARNING
harm.
WARNING: It is not necessary to open any covers or access any
high voltage components in the power device for installation.
The power device may only be opened by trained electricians.
3
About the Any-Bridge AB-PLC
A working internet connection is required for the gateway to be able
to communicate with the PhocosLink Cloud portal and upload data
regularly. However, in case of internet access interruption, data is
stored in the gateway until the internet connection is re-established,
then this data is seamlessly sent to the portal to fill any data gaps
caused by the internet interruption (functionality enabled by a future
over-the-air automatic update, no user intervention required).
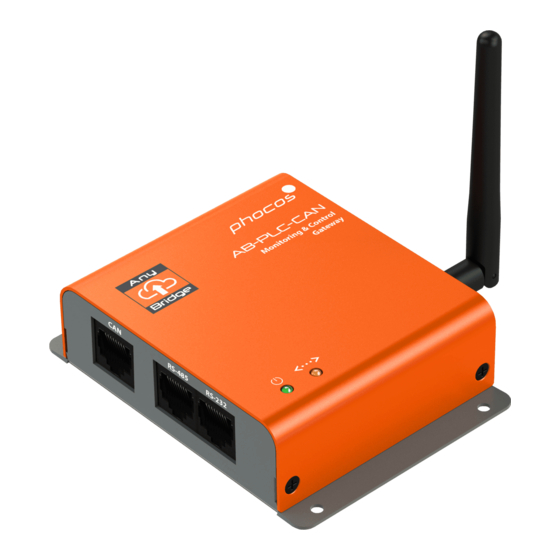
❶
❷
❸
①
MXI interface (unused at this time)
②
RS-485 interface (unused at this time)
③
RS-232 interface for Any-Grid PSW-H
④
Power indicator
⑤
Portal connectivity indicator
⑥
Reset button for factory reset
⑦
Ethernet LAN interface
⑧
Wi-Fi / BLE antenna
WARNING: The gateway is designed to be powered by the
connected power device. No external power supply is required.
a
limited
time,
see
Attempting to power the gateway with an external power supply
may cause physical harm or damage/destroy the gateway.
4
Installation
4.1
Requirements
•
Phocos Any-Bridge AB-PLC monitoring & control gateway
•
One to three powered Any-Grid PSW-H power devices with U2
firmware version ≥ 06.16
•
Working internet infrastructure (modem/router with active
DHCP for automatic IP address issuing) with Ethernet and/or 2.4
GHz 802.11b/g/n Wi-Fi access
•
Android™ or iOS device with BLE V4.2 or higher
❹ ❺
4.2
Package Contents
Before installation, please inspect the unit. If something inside the
package is missing or damaged, please contact your dealer. Package
contents:
•
Any-Bridge AB-PLC monitoring & control gateway
•
External antenna
•
Cable with 8P8C modular connectors at each end
•
User and installation manual
4.3
Physical Installation
Lightly screw the included antenna into the antenna connector at
position ⑧, ensuring it is less than hand-tight to avoid damage.
Either place the gateway on a flat surface as pictured in the title image
of this manual. Alternatively, mount the gateway on a vertical wall by
using the 4 pcs. M3-sized (3.5 mm / 0.14 in) screw-holes provided.
Once installed, point the antenna so that it runs parallel to your router
❻
antenna or, if in doubt, point it straight up vertically.
❼
4.4
Setup
❽
For
a
video
to
help
www.phocos.com/phocoslink-cloud. Choose any of the power
devices and connect the included cable with 8P8C connectors (any
direction) between the RS-232 port of the power device and the ③
RS-232 port of the gateway. Ensure the power device is not in stand-
by and that its display is on. The power ④ and portal connectivity ⑤
indicators will blink several times while the gateway starts up (see
chapter 5 for details). If using wired Ethernet, connect the Ethernet
cable from your router to port ⑦ of the gateway.
Download the latest "PhocosLink Mobile" App from the Google Play™
store or Apple's App Store® with an Android™ or iOS device,
respectively. Open the app and allow BLE and location permission
(location
recorded or used
by the app, but
access must be
permitted for BLE
to function). The
QR codes left and
right link to the
Google Play™
app directly.
In the app, scan for devices with the
and then tap the Any-Bridge™ gateway:
with
the
installation
visit
is
not
Apple App Store®
button at the bottom right
Advertisement

Subscribe to Our Youtube Channel
Related Manuals for Phocos Any-Bridge Series


Summary of Contents for Phocos Any-Bridge Series
- Page 1 ① MXI interface (unused at this time) by and that its display is on. The power ④ and portal connectivity ⑤ as “gateway” in this manual) allows you to connect your Phocos Any- ② RS-485 interface (unused at this time) Grid™...
- Page 2 24 months from the date of purchase indicators have the following meanings: and will repair or replace any defective unit when directly returned, postage paid by the customer, to Phocos. This warranty will be Portal Power considered void if the unit has suffered any obvious physical damage con.
Need help?
Do you have a question about the Any-Bridge Series and is the answer not in the manual?
Questions and answers