Advertisement
Available languages
Available languages
Husky Stabilizing Scissor Jacks
WARNING: Raising the corners or extreme ends of the trailer to excessive height can cause damage to the trailer.
Product Specifications
Vertical Height (max.)
Maximum Lift Capacity
Retracted Height
Foot Pad Area
Shipping Wt. (appx.) (set of 2)
Tools Required for Installation
• Marker
• Drill bits: 1/8in & 11/32in
• Center Punch
• Drill
• 9/16" Wrench
• Hammer
Installing the Scissor Jacks
1.
Park the trailer on a level surface and block the wheels.
2.
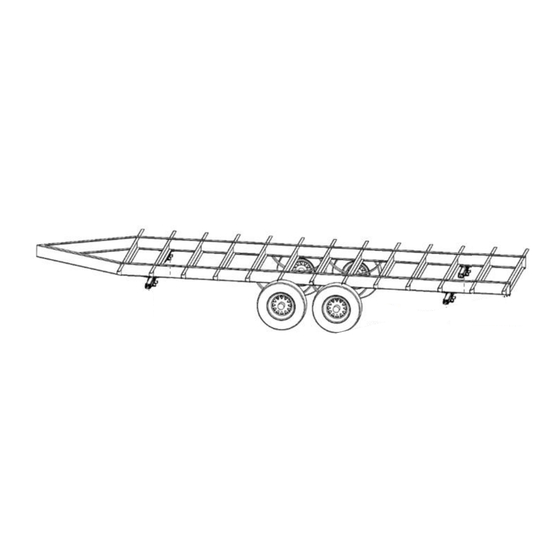
Position each Husky Scissor Jack under the trailer frame where it will
be installed. Choose front or rear installation, as shown in Figure 1.
FRONT INSTALLATION: Jacks should be 6'-8' behind the coupler.
REAR INSTALLATION: Jacks should be approximately halfway
between the rear axle and the end of the trailer. Ensure that there is
adequate ground clearance by running a length of string from the
bottom of the rear wheel to the back end of the trailer frame, as shown
in Figure 1A. Use the string to visualize the available installation
space for the jack. Ensure that the hex drive is accessible.
NOTE: Any object extending below the string is more likely to
come in contact with the ground when driving over inclined
surfaces.
3.
With each jack in position on each side of the trailer, extend each jack
to make contact with the trailer frame as follows.
a)
With jack #1, slide the socket end of the crank onto
the hex head on the jack.
b)
Turn the crank clockwise just until the jack begins to lift the trailer,
and then stop cranking.
4.
Using the pre-punched holes on the mounting plate as a template,
mark 2 screw locations on each side of the jack, for a total of 4 screws
per jack, as shown in Figure 2. NOTE: By using the different hole
patterns on the radial mounting plate, you can rotate the jack to
mounting positions at different angles, so that it does not protrude from
the side of the trailer, as shown in Figure 2a.
5.
Retract the jack and move it out of the way.
6.
Center punch the hole locations.
CAUTION:
To prevent getting metal particles in your eyes, wear safety
goggles while drilling overhead! Do not remove safety goggles
without first cleaning the particles from your face and hair.
To protect your hands from metal particles, wear gloves.
Before drilling holes, ensure that the drill will not damage
objects that may be installed on or within the trailer frame.
7.
Drill a pilot hole through the center punch using a 1/8" drill bit, then drill
to its final size using an 11/32" drill bit.
8.
Reposition the jack and install the 4 self-tapping 3/8" x 1" screws, as
shown in Figure 3. Turn screws until they seat and are tight.
9.
Repeat all steps to install jack #2.
Rev.02/17/2017 © DTS Manufacturing, Wilsonville, OR 97070 / DTS reserves the right to modify appearances and specifications without notice.
*** BEFORE INSTALLATION: READ ALL INSTRUCTIONS. ***
30 in.
5000 lbs.
5
4-
/
in.
16
2
26 in.
41 lbs.
• 10-15' string
• Safety goggles
Using the Scissor Jacks
1.
Before unhitching your trailer, try to obtain the most level position that
ground conditions will allow. Some sites may require wheel ramps or
planking under the tire on the low side.
NOTE: Always use wheel chocks when parking.
WARNING: Do not use ANY scissor jack to lift the trailer off the
ground. Trailers are not designed to be raised off the ground in this
manner.
2.
Unhitch the trailer, and then use the tongue jack to level the trailer front
to back.
a) Beginning on the lowest side of the trailer, extend the jack until it
makes contact with the ground, then extend until the trailer is level.
b) Then, on the opposite side of the trailer, extend the jack until it
makes firm contact with the ground for stability.
NOTE: If the RV door does not swing evenly when opened or if it
sticks, retract the jacks and make sure the wheels are as level as
possible before starting over and extending the jacks.
Maintaining the Scissor Jacks
Twice a year, lubricate the drive screws with grease.
Once a year, clean the drive screw joints and threads to remove any
dirt or debris, and then re-lubricate
Warranty - The warranty period is 2 years, beginning on the date of
original retail purchase. This warranty covers failure caused by faulty
manufacturing or material defects, it does not cover rust, weather damage,
fading colors, commercial use or abuse/misuse. Warranty is limited to the
replacement of parts or unit at the manufacturer's discretion. For warranty
assistance, contact warranty@coastdist.com or (855) 242-8922.
.
Advertisement
Table of Contents

Related Manuals for Husky 88124


Summary of Contents for Husky 88124
- Page 1 Installing the Scissor Jacks Park the trailer on a level surface and block the wheels. Position each Husky Scissor Jack under the trailer frame where it will be installed. Choose front or rear installation, as shown in Figure 1. FRONT INSTALLATION: Jacks should be 6’-8’ behind the coupler.
- Page 2 Instructions pour crics losanges Husky *** Veuillez lire attentivement les étapes suivantes avant d’effectuer l’installation. *** AVERTISSEMENT: Vous pouvez endommager la remorque si vous soulevez de façon excessive les coins ou extrémités. Caractéristiques techniques Distance verticale 30 po Capacité de levage maximale 5000 lb Hauteur repliée...
Need help?
Do you have a question about the 88124 and is the answer not in the manual?
Questions and answers