
Related Manuals for Taurus KCSB 1102


Summary of Contents for Taurus KCSB 1102
- Page 1 1050W IMPACT DRILL INSTRUCTION MANUAL MODEL NUMBER KCSB 1102 AFTER SALES SUPPORT TEL: 1300 922 271 EMAIL: service.australia@einhell.com N26704...
-
Page 2: Table Of Contents
Congratulations on choosing to buy a TAURUS® product. All products brought to you by TAURUS® are manufactured to the highest standards of performance and safety, and, as part of our philosophy of customer service and satisfaction, are backed by our comprehensive Year Warranty. - Page 3 10 3 After Sales Support TEL: 1300 922 271 EMAIL: service.australia@einhell.com...
- Page 4 After Sales Support TEL: 1300 922 271 EMAIL: service.australia@einhell.com...
- Page 5 After Sales Support TEL: 1300 922 271 EMAIL: service.australia@einhell.com...
-
Page 6: General Safety Rules
1. GENERAL SAFETY RULES d. Remove any adjusting key or wrench before turning the power tool on. A wrench or a key left attached to rotating part of the power tool may WARNING! Read all instructions Failure to result in personal injury. follow all instructions listed below may result e. -
Page 7: Safety Regulations
Keep your work area tidy. Untidiness in the Caution - Read the operating workplace can lead to risk of accidents. instructions to reduce the risk of injury. surrounding environment. Do not expose electrical appliances to rain. Do not use Wear ear-muffs. electric tools in damp or wet environments. -
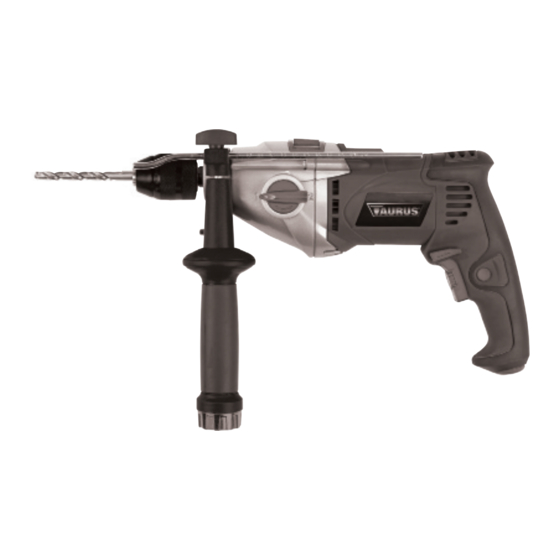
Page 8: Layout
3. Layout Always remove keys and wrenches after use. Before switching on, make sure that all keys and wrenches have been Drill chuck removed from the tool. Drill depth stop Drill/hammer drill selector switch Avoid unsupervised operation. Never carry mains-powered tools with your Locking button ON/OFF switch OFF when connecting the tool to the mains. -
Page 9: Technical Data
6. Technical data Keep the noise emissions and vibrations to a minimum. • Only use appliances which are in perfect Mains voltage: 230 V ~ 50Hz working order. • Service and clean the appliance regularly. Power input: 1050W • Adapt your working style to suit the Idling speed 1: 0 - 1,100 min appliance. -
Page 10: Operation
• The supplied additional handle (8) must • Remove the dust extraction system (11) by following the above in reverse. opened by turning the handle until it is wide • Fit the additional handle (8) on the machine enough for the additional handle to be slid as described in 6.1. - Page 11 8.4 Clockwise/Counter-clockwise switch 8.7.3 Starting holes (Fig. 11/Item 7) If you wish to drill a deep hole in a hard material • Change switch position only when the drill is (such as steel), we recommend that you start the at a standstill! hole with a smaller drill bit.
- Page 12 If the power cable for this equipment is damaged, it must be replaced by the manufacturer or its aftersales service or similarly trained personnel to avoid danger. Always pull out the mains power plug before starting any cleaning work. • Keep all safety devices, air vents and the motor housing free of dirt and dust as far as possible.
Need help?
Do you have a question about the KCSB 1102 and is the answer not in the manual?
Questions and answers