Table of Contents
Advertisement
Available languages
Available languages
Quick Links
Advertisement
Chapters
Table of Contents

Subscribe to Our Youtube Channel
Related Manuals for Malloca WQP6-87CP


Summary of Contents for Malloca WQP6-87CP
- Page 1 USER MANUAL HƯỚNG DẪN SỬ DỤNG Model: WQP6-87CP...
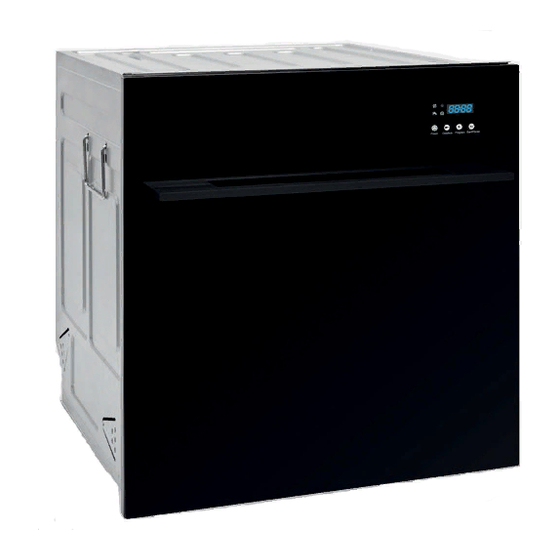
- Page 2 Fashion appearance Match with the kitchen General dish rack design. style freely Designed for different dishes. The dishwasher appearance is featured by the modern More applicable to the and fashion shape and the demands of different decent color. users, and more convenient to arrange the dishes.
-
Page 3: Table Of Contents
Catalog This Operation Manual is supplied together with the “Installation Manual”. Safety and Warning..........2 Dish Maintenance..........5 Product size specifications ..........6 Part name ............7 Product Specifications ..........9 Installation Precautions ........10 Installation Guidelines ........11-15 Instructions ............16 Cutlery basket ............19 Basket and Cup holder........20、21 Place the dishes in the drawer.......22 Water hardness is introduced........23 Washing procedure is introduced......24... - Page 4 ■Important safety instructions The well-designed dishwasher can operate safely during the normal use. ◆Installation The following operating methods must be kept in mind during the use of dishwasher. ●Before operating the dishwasher, it is necessary to install the dishwasher in accordance with ■Important safety instructions the installation manual.
-
Page 5: Dish Maintenance
Dish maintenance ■Important installation instructions ■ Dish maintenance ◆ Installation When the dishwasher is used to clean the dishes, the mixture of high-temperature water ●Before the dishwasher is cleaned or repaired, the power plug of dishwasher must be unplugged. and dish washing powder may damage the dishes. Please keep in mind that if you have To power off the dishwasher, the power plug must be disconnected in order to avoid damage. - Page 6 Part Name Product size specifications...
-
Page 7: Product Size Specifications
Product Specifications Part Name Product name Drawer dishwasher Rated Voltage 220-240~ Voltage Range 50Hz Rated Power 1850W Rated volume Laundry guide S p r a y t y p e Drying method After-temperature drying Electrical schematic diagram Inlet water pressure 0.04-1.0 Mpa Capacity 6 sets... -
Page 8: Installation Precautions
Product Installation Guidelines Installation Precautions... - Page 9 Installation Guidelines Water inlet connection to dishwasher: Connection method of drain pipe: The outlet end of the drain pipe can be inserted into the upright sewer,Or ● connect to the turning joint of the sink sink.The drainage pipe must be fastened with a clamp and the screws must be tightened.
-
Page 10: Installation Guidelines
Installation Guidelines Installation Guidelines... -
Page 11: Instructions
■Touch instructions ■Instructions ◆Lid motor operation ◆The operation interface 1. When press the "stop/start" button to boot, the top motor will drive the top drawer downward seal, and then the program will start. 2. The program is running mode, press the "stop/start" button to suspend the program runs. Within the prescribed period of time, the top motor driveUpward, completely release the machine head, a buzzer two sounds to inform lid seal has been released. -
Page 12: Cutlery Basket
Cutlery basket ■Touch instructions ◆Knife and fork barrel ●The following table shows visualization for each setting: ●In order to reduce the risk of injury, your are suggested to place the sharp edges of knives, forks and other sharp dishes downward. ●If the spoons are mixed with knives and forks, the contact faces may not be rinsed with water so you are suggested to place the spoons and the knives and forks separately, to ensure the complete water rinsing (of dishes). - Page 13 Basket Cup holder ◆ Tableware layout (reference): ◆Cup bracket placement diagram (reference):...
-
Page 14: Place The Dishes In The Drawer
Water hardness is introduced Place the dishes in the drawer ◆What’s the water hardness? ◆ Place the dishes in the drawer. Please make sure that: The hard water indicates the water with a high content of calcium, magnesium and other The arrangement of dishes must ensure that the water sprayed by spray arm can reach ●... -
Page 15: Washing Procedure Is Introduced
Adding of Washing Agent Washing procedure is introduced Adding of dish washing powder ■ ● First know the hardness of your water, and then determine the necessary dosage of washing agent according to the following form. Meanwhile, please refer to the section “Water Softener”. Notice: You can see the washing agent with similar washing effect sold in the supermarket, know and observe the use suggestions of washing agent manufacturer. - Page 16 Adding of washing block Inapplicable washing agent ■ ■ Notice: You can see the washing agent with similar washing effect sold in the supermarket, The following washing agents are inapplicable to the dishwasher, and may damage know and observe the use suggestions of washing agent manufacturer. the dishwasher and result in loss of warranty.
- Page 17 ◆How to add the rinse aid ◆Use instructions of washing block Note:If there is no distributor model, cannot add the rinse, If the washing block is used, the manufacturer’s suggestions on the packing bag shall be observed. Some washing blocks may not be applicable to all the washing programs. Combination of washing the dishes is recommended to be used.
-
Page 18: Water Softener
Water softener Important note! ■Setting of Water Softener The dishwasher salt shall be added into the water softener. The use of edible salt, rock (If there is no water softener models, then ignore the content) salt or ball salt is not suggested because such salt contains sundries and may damage ◆Determination of local water hardness the water softener and shorten the service life of water softener. -
Page 19: Cleaning And Maintenance
Cleaning of strainer and filter Cleaning and Maintenance Important note! ■ Important note! The dishwasher must be powered off during cleaning and maintenance (unplug the power ● If the cleaning or anti-scaling agent of dishwasher is used, one washing program shall be wire of dishwasher, or turn on the fuse). - Page 20 ■Cleaning of spray arm Removal and cleaning of strainer and filter 3.Lift up and remove the filter. It is normal if there is water under the filter. 1.Power off the dishwasher, or unplug the power wire plug. 4.As shown on the picture, rotate the filter cap and handle, and lift up the 2.Lift up the glass cup bracket from the bracket iron wires (if the bracket is folded), lift up all filter cap at the filter cap notch to separate the cap from the handle.
-
Page 21: Troubleshooting
Troubleshooting Failure Possible cause Solution Failure Possible cause Solution Refer to the “Quick Guidance” and select the suitable The washing program and the program; or, the dirt is dry and affixed onto the dishes dish capacity are not suitable. The drain pipe is not correctly so the dishes have to be soaked for a period. - Page 22 Occurrence of Failure Troubleshooting Failure Possible cause Solution Failure Possible cause Solution Disable the child lock. Press the key “ ” The child lock function is The drawer till no symbol is shown on the screen. Such case often happens upon initial use activated.
- Page 23 Fault Diagnosis Start Display Possible failure cause Press the key “ ” to eliminate the beeping sound Roof lifting motor failuer The water inflow is abnormal, unstable or low. Check and record the error code according to the failure table NTC test value is not symmetric (during Class B test) The temperature rise of heater is abnormal (Class B If “E02”...
-
Page 24: Data Of Washing Program
Data of Washing Program Technical Data To know the selecting method of program, please refer to “Quick Guidance”. The time of washing program is given in the following table: Power source 220-240V~ ,50Hz Auto Heavy Daily Short Delicate Power Max. power:1850W Prewashing Main washing Main washing... - Page 25 Thiết kế phù hợp với kiểu nhà bếp tự do. Thiết kế giá đựng chén đĩa chung, sử dụng được cho Bề ngoài của máy rửa nhiều loại khác nhau. chén được thiết kế một Phù hợp hơn với nhiều cách hiện đại, màu đen yêu cầu của người sang trọng.
- Page 26 Mục lục Sách hướng dẫn này được cung cấp cùng với "Hướng dẫn sử dụng". An toàn và cảnh báo............2 Bảo trì máy rửa chén............5 Thông số kich thước sản phẩm........6 Tên bộ phận..............7 Thông số kỹ thuật ............9 Khuyến cáo khi lắp đặt ..........10 Hướng dẫn lắp đặt............11-15 Hướng dẫn ..............16 Rổ...
- Page 27 ■Hướng dẫn an toàn quan trọng Máy rửa chén được thiết kế để hoạt động an toàn trong quá trình sử dụng bình thường. Các ◆L ắp đặt phương pháp vận hành sau đây phải được ghi nhớ trong quá trình sử dụng máy rửa chén. ●Trước khi vận hành máy rửa chén, cần lắp đặt máy rửa chén theo hướng dẫn lắp đặt.
-
Page 28: Bảo Trì Máy Rửa Chén
Bảo trì máy rửa chén ■Hướng dẫn lắp đặt quan trọng Bảo trì máy rửa chén ■ L ắp đặt ◆ Khi máy rửa chén được sử dụng để làm sạch chén dĩa, hỗn hợp nước nhiệt độ cao và xà ●Trước khi vệ... -
Page 29: Thông Số Kich Thước Sản Phẩm
Tên bộ phận Thông số kích thước sản phẩm Biểu tượng thông báo Màn hình hiển thị Phím cảm ứng Tay nắm Kính bảng điều khiển Tay phun Rổ đựng Kệ để tách Kệ để tách Bộ lọc hình Lưới lọc trụ... -
Page 30: Thông Số Kỹ Thuật
Thông số kỹ thuật Tên bộ phận Tên sản phẩm Máy rửa chén Lọc thô Điện áp 220-240~ Tần số Lọc chính 50Hz Công suất 1850W Dung tích Lọc tinh Loại rửa Loại phun Phương pháp sấy Sau-sấy bằng quạt Sơ... -
Page 31: Khuyến Cáo Khi Lắp Đặt
Hướng dẫn lắp đặt Khuyến cáo khi lắp đặt Hướng dẫn an toàn quan trọng! Việc lắp đặt chỉ nên được thực hiện bởi nhân viên kỹ thuật. • Hướng dẫn sử dụng phải được khách hàng lưu giữ. • Việc lắp đặt phải phù... -
Page 32: Hướng Dẫn Lắp Đặt
Hướng dẫn lắp đặt Kết nối nguồn cấp nước: Lưu ý khi kết nối điện và nước cho máy rửa chén: 1. Có thể đặt ống dẫn và ống thoát nước ở bên trái LỎNG hoặc bên phải Ống cấp nước tùy theo nhu cầu sử... - Page 33 Hướng dẫn lắp đặt Hướng dẫn lắp đặt Đưa ống nước qua kệ tủ. Máy rửa chén có thể điều chỉnh mức độ khi bắt đầu. Cố định máy rửa chén. Đặt máy rửa chén bên trong khoang tủ một cách cẩn thận. Sau đó...
-
Page 34: Hướng Dẫn
■ Hướng dẫn cảm ứng ■ Hướng dẫn ◆Giao diện hoạt động ◆Vận hành nắp che hộc máy 1. Khi nhấn phím "Bắt đầu/Tạm dừng" để khởi động, ben điện sẽ đóng nắp che lại, và sau đó chương trình sẽ bắt đầu. 2. -
Page 35: Rổ Đựng Muỗng Nĩa
Rổ đựng muỗng nĩa ■Hướng dẫn cảm ứng ◆Dao và nĩa ●Bảng sau đây thể hiện trực quan cho từng cài đặt: ●Để giảm nguy cơ chấn thương, bạn nên đặt các cạnh sắc nhọn của dao và các vật sắc nhọn khác xuống dưới. - Page 36 Rổ Khay đựng ly tách ◆Bảng sắp xếp (tham khảo): : Loại Dĩa món chính Dĩa súp Khay có thể gập lại Dĩa tráng miệng Mỗi khay có thể được điều chỉnh riêng theo chiều cao bất kỳ: Dĩa lót tách 1.
-
Page 37: Giới Thiệu Độ Cứng Của Nước
Giới thiệu độ cứng của nước Sắp xếp chén dĩa vào ngăn ◆Độ cứng của nước là gì? Sắp xếp chén dĩa vào ngăn. Đảm bảo rằng: ◆ Nước cứng cho thấy nước có hàm lượng canxi, magie và các khoáng chất khác cao. Hàm lượng Việc sắp xếp chén dĩa phải đảm bảo rằng nước được phun bằng cánh tay phun có... -
Page 38: Giới Thiệu Chương Trình Rửa
Thêm xà phòng Giới thiệu chương trình rửa Thêm xà phòng ■ Trước tiên, hãy tìm hiểu độ cứng của nước, sau đó xác định mức độ cần thiết theo mẫu sau. Trong ● khi đó vui lòng tham khảo phần làm mềm nước. Vui lòng đọc phần Hướng dẫn nhanh của phần Hướng Lưu ý: Bạn có... - Page 39 Thêm xà phòng dạng viên Xà phòng không thích hợp ■ ■ Lưu ý: Bạn có thể thấy xà phòng có hiệu quả tương tự được bán trong siêu thị, biết và quan sát Các loại sau đây thuộc nhóm xà phòng không phù hợp, nếu sử dụng có thể dẫn đến việc các gợi ý...
-
Page 40: Thêm Nước Làm Bóng
◆L àm thế nào để thêm nước làm bóng ◆Hướng dẫn sử dụng xà phòng dạng viên Lưu ý: nếu không có mô hình khay đựng, không thể sử dụng nước Nếu xà phòng dạng viên được sử dụng, phải tuân thủ các gợi ý của nhà sản xuất trên bao bì. Một số... -
Page 41: Làm Mềm Nước
Làm mềm nước Lưu ý quan trọng! ■Cài đặt bộ làm mềm nước (Nếu không có mô hình làm mềm nước, xin bỏ qua nội dung này) Muối phải được thêm vào để làm mềm nước. Việc sử dụng muối ăn, muối đá hoặc các loại muối khác không được đề... -
Page 42: Vệ Sinh Và Bảo Trì
Vệ sinh và bảo trì Vệ sinh bộ lọc và lưới lọc Lưu ý quan trọng! Lưu ý quan trọng! Máy rửa chén phải được ngắt nguồn điện trong quá trình vệ sinh và bảo trì (rút dây nguồn của ■... - Page 43 Tháo và làm sạch bộ lọc, lưới lọc ■Vệ sinh cánh tay phun 3.Nâng lên và tháo bộ lọc. Sẽ là bình thường nếu có nước phía dưới bộ lọc. 1.Tắt nguồn máy rửa chén hoặc rút phích cắm dây nguồn. 4.Như...
-
Page 44: Xử Lý Sự Cố
Xử lý sự cố Sự cố Nguyên nhân Giải pháp Sự cố Nguyên nhân Giải pháp Chương trình rửa và tải chén Hãy tham khảo "Hướng dẫn nhanh" hoặc bụi bẩn dính trên chén dĩa phải được ngâm trong một khoảng thời dĩa không phù... - Page 45 Xử lý sự cố Xử lý sự cố Sự cố Nguyên nhân Giải pháp Sự cố Nguyên nhân Giải pháp Vô hiệu hóa chức năng khóa trẻ em. Nhấn phím " " Chức năng khóa trẻ em Không thể mở cho đến khi không có...
-
Page 46: Chẩn Đoán Lỗi
Chẩn đoán lỗi Khởi động Màn hình Nguyên nhân Nhấn phím " " để loại bỏ tiếng bíp Lỗi động cơ. Dòng nước vào không bình thường, không ổn định. Kiểm tra và ghi lại mã lỗi theo bảng lỗi Giá... -
Page 47: Dữ Liệu Chương Trình Rửa
Dữ liệu chương trình rửa Thông số kỹ thuật Để biết phương pháp, vui lòng tham khảo hướng dẫn. Thời gian của chương trình được nêu trong bảng sau: Điện áp - tần số 220-240V~ ,50Hz Tự động Nặng Hằng ngày Mỏng Ngắn Công suất... - Page 48 Email: info@malloca.com Customer Care: Hotline: 1800 12 12 Email: chamsockh@malloca.com CÔNG TY TNHH MALLOCA VIỆT NAM Showroom: 279 Đường Nguyễn Văn Trỗi, Phường 10, Quận Phú Nhuận, TP.HCM Điện Thoại: (84) 28 39975 893 / 94 Fax: (84) 28 38447 102 Email: info@malloca.com...
Need help?
Do you have a question about the WQP6-87CP and is the answer not in the manual?
Questions and answers