Airxcel Aqua-Hot 200 Series Installation Manual
Hide thumbs
Also See for Aqua-Hot 200 Series:
- Service manual (96 pages) ,
- Use and care manual (20 pages) ,
- Service manual (105 pages)
Table of Contents
Advertisement
Quick Links
Advertisement
Table of Contents

Subscribe to Our Youtube Channel
Related Manuals for Airxcel Aqua-Hot 200 Series


Summary of Contents for Airxcel Aqua-Hot 200 Series
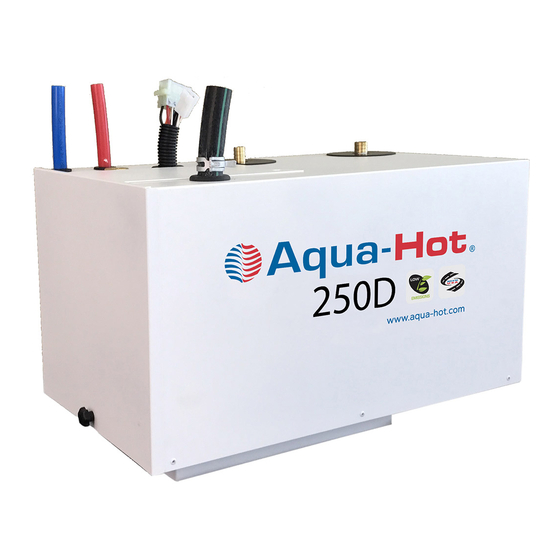
- Page 1 Installation Manual Series AHE-250-D02...
-
Page 2: Table Of Contents
Introduction Contents Caution Notes As you read this information, take particular note of the NOTICE, Caution Notes ................1 CAUTION, WARNING, and DANGER symbols when they appear. Introduction ..................2 This information is important for safe and effi cient use of the System Features ................4 Aqua-Hot system. -
Page 3: Introduction
Introduction Read all instructions before installing the Aqua-Hot unit. Aqua- WHAT TO DO IF YOU SMELL GAS Hot Heating Systems is not liable for damage resulting from failing to follow instructions contained in this, and any other Aqua-Hot documentation relevant to this unit. •... - Page 4 Introduction About the Aqua-Hot 200 Series System Overview The Aqua-Hot 250 Diesel Series Hydronic (water-based) The Aqua-Hot 250 Diesel Series is a Hydronic Heating heating systems provide interior heat and tank-less continuous System that can provide heat and hot water on demand using a hot water in one small, easy to install package.
-
Page 5: System Features
System Features Figure 1 System Specifi cations Electric Element Power Consumption ........1000 W (maximum) Voltage ................120V AC DC Power Heat Input ..........66,000 BTU/hr ± 10% Fuel Consumption ..........0.40 gallon/hr Power Consumption ......... 108W (maximum) Zone Heat Circulation Pumps ...................1 Power Consumption (max) ............. 21W Voltage ................ -
Page 6: Component Cut-Aways
Component Cut-Aways 1. Access Cover Screw 2. Drain Valve 3. 3-Way Valve 4. Diesel Burner Controller 5. Tempering Valve 6. Diesel Burner Assembly Interlock Switch 8. Domestic Cold Water Inlet 9. Domestic Hot Water Outlet 10. 120V AC Connection 11. Diesel Fuel Return Port NOTE: The side and top panels in the view below have been 12. -
Page 7: Installing The 250-D02
Support and Clearance Aqua-Hot Installation Installing the 250-D02 NOTE: Inspect the area beneath the mounting location to ensure that no structural members will interfere with the Install the Aqua-Hot in a compartment which protects the cutout for the mounting fl ange. Verify that a support structure unit and allows service access to the top and front panel of the of adequate strength has been constructed. -
Page 8: Support And Clearance
Support and Clearance Minimum Clearance on all sides is 1”. 7.125” 2” 7.685” 26” 12.625” 6.13” 12.57” Figure 4 NOTE: The mounting fl ange of the Aqua-Hot is not centered on the body of the heater. Reference Figure 4 for the correct dimensions to construct the surface on which the Aqua-Hot will be mounted. - Page 9 Support and Clearance Seat the Aqua-Hot in the Flange cutout Coach Bay Floor ¼-20 Bolt and Lock Washer Figure 6 Mounting Brackets on both sides, front, and rear NOTE: Angle mounting bracket must be fl ush to the underside of the coach fl oor and fl ush to the heater fl ange. Tighten bolts to roughly 76 in-lbs.
-
Page 10: Installation Of The Expansion Bottle
Fluid Expansion Bottle Installation of the Expansion Bottle Fill Cap Introduction: Upper Fitting The fl uid expansion bottle is integral to the operation of the Aqua-Hot. It provides an area for hot, expanded fl uid to empty Hot Fluid Line into, and also protects the Aqua-Hot from low-fl... -
Page 11: Heat Exchanger Layout
Heat Exchanger Layout Fluid Expansion Bottle Heat Exchanger 1 NOTE: For the best performance, the fi rst heat exchanger should be placed where heat loss is the greatest. The fi rst heat exchanger will always output the largest volume of heat as compared to subsequent exchangers. -
Page 12: Installing Heat Exchangers
Installing Heat Exchangers Installation Requirements Vertical Orientation Cozy heat exchangers can be mounted in one of two confi gurations: either fl at on the ground, or vertically. Reference Figure 12. Horizontal Orientation • Supply ventilation cross-sectional area of at least 29in (74cm ) must be supplied to each heat exchanger. -
Page 13: Mounting The Heat Exchangers
Installing Heat Exchangers Mounting the Heat Exchangers Mounting the Heat Exchangers 1. Cut out a 2.5” x 10” (7cm x 26cm) opening for each heat exchanger outlet and cold-air return grate as shown in Figure 15. Figure 14 2. Mount each heat exchanger permanently into place. There are 4 tabs on both sides - see Figure 23. -
Page 14: Heat Exchanger Locations And Clearances
Locations and Clearances Heat Exchanger Locations and Clearances NOTE: For single slide-out confi gurations, it is usually simplest to place a heat exchanger on the opposite side of the coach pointing towards the slide-out. • Position the heat exchangers so that even heat is distributed throughout the coach interior. -
Page 15: Wiring The Heat Exchangers
Wiring Heat Exchangers Wiring the Heat Exchangers Wiring for OEM RV-C or Multiplex Control Systems This section will explain in detail how to wire the heat exchangers for optimal functionality. Do not deviate from these When choosing a zone control for the heat exchangers, the guidelines. -
Page 16: Plumbing The Heating Zone
Wiring Heat Exchangers Heat Exchanger Install Plumbing the Heating Zone The following guidelines should be used when planning Outlet the coolant loop for the heating zone. The order of the heat exchangers should consider priority on the loop. Failure to adhere to these installation principles can hinder the operation of the heat exchangers. - Page 17 Wiring Heat Exchangers Heat Exchanger Install Figure 25 Figure 26 p. 16 ©Aqua-Hot® 250-D02 Diesel Series Installation Manual...
-
Page 18: Domestic Water System Requirements
Domestic Water System Domestic Water System Requirements Plumbing the Domestic Water System The Aqua-Hot is also able to provide domestic hot water • Reference A119.2/NFPA 501C Standard on Recreational while the boiler tank is up at operating temperature. Activate Vehicles 1993 Edition for relevant regulatory information the diesel burner to provide adequate heat for hot water needs. -
Page 19: Interior Switch Panel
Switch Panel Installation Domestic Water System Interior Switch Panel Switch Panel Mounting 1. Cut out a 3.75” W x 1.25” H opening for the switch Select a location in the interior of the coach that allows for panel plate. Reference Figure 28. easy operator access. - Page 20 Domestic Water System 250-D01 Switch Panel Switch Panel Rear View Electric Burner Figure 29 Jumper Pins (see note) AC Electric 12-Pin Mate-N- 12-Pin Mate-N- Burner Switch NOTE: The Electric Element switch Switch Lock Lock must possess a jumper wire between Pin 4 and Pin 10 as depicted.
-
Page 21: Diesel Fuel System
Domestic Water System Diesel Fuel System Diesel Fuel System Fuel System Requirements • The diesel fuel supply should be drawn directly from the The following section will outline details of installing the vehicle’s main fuel tank, if applicable. diesel fuel delivery system to the Aqua-Hot 250-D02. These •... - Page 22 Domestic Water System Diesel Fuel System Diesel Fuel System Installation TOP View Fuel Filter Fuel System Installation 1. Run two ¼” fuel lines from the fuel tank inlet and outlet ports to the Aqua-Hot. Label both fuel lines indicating whether the line is incoming or outgoing. 2.
- Page 23 Domestic Water System Diesel Fuel System Fuel Supply 25 ft. Maximum Distance Maximum Allowable Suction Height 7 feet Figure 34 Fuel Return 25 ft. Maximum Distance Maximum Allowable Head Pressure 10 ft. Figure 35 p. 22 ©Aqua-Hot® 250-D02 Diesel Series Installation Manual...
-
Page 24: Exhaust System
Domestic Water System Exhaust System Exhaust System Refer to “Internal Combustion Engine Exhaust and Vehicle Wall Openings”in RVIA’s ANSI/NFPA 1192 Handbook for Recreational Vehicle Standards, as well as the National Fire This section outlines in detail the specifi cations and Protection Association’s (NFPA) 1192 Standard on Recreational requirements for installing the exhaust system. - Page 25 Domestic Water System Exhaust System 2” I.D. Automotive-Type Exhaust Pipe (Aluminized Steel) NOTE: Total exhaust length shall not exceed 30 ft, and shall contain no more than two 90° pipe bends. Exhaust Clamp Figure 36 1.5” NPT Black Pipe Elbow 1.5”...
- Page 26 Domestic Water System Exhaust System NOTE: If the exhaust pipe has low points, a ⅛” weep hole is required so as to drain any condensation from the exhaust pipe. Flange Flange 3” Nipple Exhaust Tip Elbow Exhaust Tip 4” Nipple Elbow Figure 38 Figure 39...
-
Page 27: Pin-Out Information
Introduction to Wiring Pin-Out Information 200 Series Pin-Out Information The following section serves to provide electrical information particularly pertaining to pin-out confi gurations to assist in correctly wiring the coach-side electrical connections. Installation must be performed by a professional installer or technician as per national/local regulations. -
Page 28: Connecting The 250-D02 To 12V Dc Power
Introduction to Wiring Supplying Power to the 12-Pin Mate-N-Lock Connecting the 250-D02 to 12V DC Power 1. Run two properly gauged wires (red for + and black for -) from the main power disconnect to the 12-Pin Mate-N- Lock connector located at the top of the Aqua-Hot. •... -
Page 29: Connecting The Aqua-Hot To Ac Power
Providing AC Power Connecting the Aqua-Hot to AC Power 3-Pin Molex AC Switch Connector & 12-Pin Plug Harness Plug Do NOT activate the burner until antifreeze and water heating solution has been added to the boiler tank and the heating system has been completely bled of air. -
Page 30: Filling/Purging The Aqua-Hot 250-D02
Filling the Aqua-Hot Filling and Purging the Aqua-Hot 250-D02 5. Attach the fl uid expansion hose and the expansion bottle to the expansion tank port located on top of the Aqua-Hot. Before the fi rst activation of the Aqua-Hot, fi ll the unit with Secure the hose as shown on Page 9. -
Page 31: First Operation
Filling the Aqua-Hot First Operation Aqua-Hot First Operation Activation Instructions (Burner) 1. Make sure there are no blockages or debris to the exhaust The fi rst start-up of the Aqua-Hot may not light up perfectly. outlet or combustion air inlet. This is normal. -
Page 32: Winterizing
Winterizing the Aqua-Hot Filling the Aqua-Hot Winterizing the Aqua-Hot The Aqua-Hot’s domestic water heating system must be completely drained of domestic water at any time the heater is stored where freezing temperatures may be experienced. Not winterizing the Aqua-Hot when freezing temperatures are Please follow these instructions when winterizing the Aqua- present will result in serious damage to the Aqua-Hot domestic Hot domestic water heating system. -
Page 33: Appendix A: System Schematic
Filling the Aqua-Hot System Schematic p. 32 ©Aqua-Hot® 250-D02 Diesel Series Installation Manual... -
Page 34: Appendix B: Antifreeze
Measuring Antifreeze Appendix Measuring Antifreeze Using a Refractometer Calibration Screw Prism Assembly Daylight Plate Assembly Eye Piece Properly Apply Antifreeze to the Prism Assembly Use the guide below to properly apply the propylene glycol mixture to the prism assembly of the refractometer. Once that is complete, peer through the eyeglass of the refractometer to continue to the next step. - Page 35 Antifreeze Types Appendix Antifreeze Types concentrated propylene glycol for the Aqua-Hot’s antifreeze and water heating solution. The following information addresses the necessary usage Please note that this is only necessary when mixing of a propylene glycol based “boiler” type antifreeze in the concentrated propylene glycol antifreeze with water;...
- Page 36 Antifreeze Appendix the brand of propylene glycol antifreeze employed. mixed with distilled water, at a ratio of 35% to 50% is recommended to provide the best performance combination of the aforementioned functions. If excess propylene glycol Rust and Anti-Corrosive Inhibitors exists within the heating solution, the water’s heat absorption properties are compromised.
-
Page 37: Appendix C: Parts & Accessories
Parts & Accessories Appendix AHE-250-D02 250 Series Diesel w/ Electric Element (1kW @ 120V AC) ELE-400-900 ELE-000-508 Boost Pump Harness Panel, Switch, 2-Position ASM ELX-700-007 EXE-103-0EX Room Thermostat, Positive Off Heat Exchanger, Cozy III p. 36 ©Aqua-Hot® 250-D02 Diesel Series Installation Manual... - Page 38 Parts & Accessories Appendix EXE-505-65A EXX-006-500 Heat Exchanger, Whisper Silent, 12V DC. Grille, Long, 3.5” x 21.5”, Black EXX-013-100 EXX-013-105 Nozzle, 4” Round w/ 2-½” Connector, Black Nozzle, Round 4” w/o Connector, Black EXX-950-411 EXX-006-501 Grille, 10” x 2” Cozy Grille, Medium, 3.5”...
- Page 39 Parts & Accessories Appendix EXX-006-502 MSE-200-OFB Grille, Small, 3.5” x 8.5”, Black Overfl ow Bottle Kit (Tank, Hose, Clamp, Tie, Labels). PLX-000-200 PLX-000-820 Tube, ⅝” Safety Stripe, 12ft. Fitting, Elbow, 90°, ¾”, Barb, Black Nylon PLX-000-835 PLX-100-836 Fitting, Reducer ¾” to ⅝” Black Nylon Pump Mounting Bracket p.
- Page 40 Parts & Accessories Appendix PLX-100-900 PLX-120-626 Boost Pump Tube, ⅝”, Red O2 Barrier Pex 100 Ft. PLX-200-103 PLX-284-74V Fitting ½” (M) NPT x ¾” Barb Black Nylon Hose, Molded, Elbow 90° PLX-432-000 PLX-664-730 Fitting, Straight, ½” PEX x ½” (M)NPT PSF Fitting, Pipe Nipple, Exhaust, 1-½”...
- Page 41 Parts & Accessories Appendix PLX-803-000 PLX-664-750 Fitting, Exhaust Nipple, 1-½” x 3” NPT Fitting, Straight, ½” PEX x ½” (F) NPT PLX-803-FSE PLX-803-ELB Elbow Fitting, 90°, ½” PEX x ½” PSF Elbow Fitting, 90°, ½” PEX Fitting PLX-CTB-270 PLX-A51-106 Clamp, Hose, Constant Tension, 0.75” Bend Support, ⅝”...
- Page 42 Parts & Accessories Appendix PLX-A65-200 PLX-A65-300 Fitting, Brass Barb, 90°, ¾” x ½” (M) NPT Fitting, Brass Barb, ¾” x ½” (M) NPT PLX-T44-006 SME-102-000 Fitting, Insert Modifi ed Bras Cozy Plenum Assembly ©Aqua-Hot® 250-D02 Diesel Series Installation Manual p. 41...
- Page 43 Parts & Accessories Appendix MSE-200-EXH MSX-300-270 Exhaust Kit Boiler Antifreeze, 1-gallon, Pink MSX-300-300 Boiler Antifreeze, 1-gallon, Green p. 42 ©Aqua-Hot® 250-D02 Diesel Series Installation Manual...
-
Page 44: Warranty
Warranty 2-YEAR LIMITED WARRANTY AQUA-HOT® HYDRONIC HEATING SYSTEM Aqua-Hot Heating Systems Inc. warrants the Aqua-Hot Heater to be free from defects in material and workmanship under normal use and service for a period of two years on both parts and labor commencing upon the original date of registration of the vehicle. Replacement parts are warranted for the remainder of the Heater’s standard warranty coverage or for six months, whichever is greater. - Page 45 Installation Manual SERIES Aqua-Hot Heating Systems, LLC 7501 Miller Drive, Frederick, CO 80504 Visit us online at www.aquahot.com Call us at 574-AIR-XCEL (574-247-9235) ©2021 Aqua-Hot Heating Systems, LLC. Printed in the USA...
Need help?
Do you have a question about the Aqua-Hot 200 Series and is the answer not in the manual?
Questions and answers