
Related Manuals for HDL MAIR-Q/H.10

Summary of Contents for HDL MAIR-Q/H.10
- Page 1 MAIR-Q/H.10 AirKit Air Quality Sensor User Manual Version: V1.0.6 Published on Oct. 16, 2020...
- Page 2 AirKit Air Quality Sensor User Manual Overview Overview MAIR-Q/H.10 AirKit Air Quality Sensor is a comprehensive index of intelligent air monitoring instrument, which can monitor the air PM2.5 concentration, temperature, humidity, carbon dioxide (CO2), TVOC, etc.. Remote data viewing and intelligent management can be performed through the HDL ON mobile application.
-
Page 3: Technical Data
AirKit Air Quality Sensor User Manual Technical Data Technical Data General specification PM2.5 parameter AC power supply 180-240V Theory Laser scattering DC power supply 7-32V Range 0~999μg/m³ Working current ≤250mA Accuracy ±15% Communication Response time ≤5s RS-485 interface sensor Ceiling mounting, Wall mounting, Installation Theory... -
Page 4: Installation Position
AirKit Air Quality Sensor User Manual Installation Installation position This product is mainly point-mounted and only needs to be installed on the roof or wall of the area of interest. Since the air flow is constant, the parameters across regions are relatively close. If there are specific or rigorous requirements, the sensor can be installed separately in each section. - Page 5 AirKit Air Quality Sensor User Manual Wiring Wiring 1. The sensor is connected to the RS232/RS485 Gateway (Model: HDL-MRS232U.431, Hardware Version: Timer) through the Modbus485 interface, please use them in conjunc- tion. 2. There are two power interfaces on the product: DC (recommended) and AC power inter- faces.
-
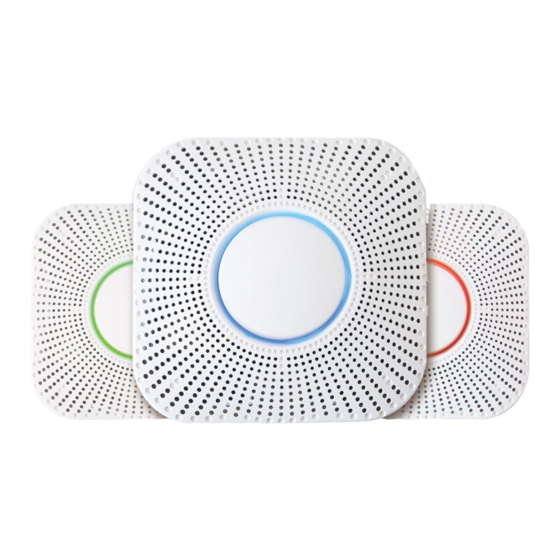
Page 6: Device Address Setting
Device address setting AirKit Air Quality Sensor User Manual Device address setting An AirKit Air Quality Sensor can only be used in conjunction with an RS232/RS485 Gate- way (Hardware Version: Timer). The sensor needs to be dialed as shown in the figure below, namely: Position 5 is dialed to the top, and the rest positions are dialed to the bottom. - Page 7 AirKit Air Quality Sensor User Manual Display light indication Display light indication This sensor is equipped with a circular indicator light in the middle of the front device, and the corresponding relationship between the device status and the indicator status is as follows: Configuration status: flashing in blue every 1 second Detecting air quality: rotating...
- Page 8 HDL ON operation - Registration in HDL ON, gateway MAC binding 1.Open the HDL ON App and enter the login interface. Click the Register button to enter the registration interface, and register by email or mobile number. 2. After completing the HDL ON account registration, you need to bind the MAC address of the HDL intelligent system gateway (take 1 Port Programming Gateway as an example).
- Page 9 Project creation HDL Buspro Setup Tool operation - Project creation Open the HDL Buspro Setup Tool software, click "Function" in the menu bar → select "HDL ON/Xiaobai/5.7" in the drop-down box to open the project management interface and create a...
- Page 10 AirKit Air Quality Sensor User Manual Add room, device HDL Buspro Setup Tool operation - Add room, device 1. Click "Room" to add a room, select the room, and click "Add device". 2. Select the temperature, humidity, TVOC, PM2.5 and CO...
- Page 11 AirKit Air Quality Sensor User Manual Parameter setting HDL Buspro Setup Tool operation - Parameter setting 1. Set the subnet ID, device ID and channel number of temperature, humidity, TVOC, PM2.5 and CO sensor respectively. 2. Fill in the subnet number and device number of the RS232/RS485 Gateway that the AirKit sensor is connected to.
- Page 12 HDL Buspro Setup Tool operation - Data upload In the upload window, select "HDL ON/5.7" and click "Find ON" to search for HDL ON in the LAN to obtain its IP address and HDL ON account. After obtaining the IP address and HDL...
- Page 13 HDL ON operation - View overview of device monitoring data 1. In HDL ON, click "Functions" → "Environment Monitor" in order, and select the room name, you can view the real-time monitoring data of the selected items presented in a circle.
- Page 14 HDL Buspro Setup Tool operation - Search device/change enable function 1. After the device is correctly connected, click "Quick Search" in the HDL Buspro Setup Tool, and you can find 1 Port Programming Gateway and AirKit Air Quality Sensor. 2. Double-click the "Model" or "Description" of the AirKit Air Quality Sensor to open the configuration interface.
- Page 15 The condition for receiving the push on the mobile phone must be that the push function is enabled in the HDL Buspro Setup Tool and HDL ON mobile application. 1. Click the "Remark and Range" tab in the configuration interface.
- Page 16 AirKit Air Quality Sensor User Manual Automation configuration HDL Buspro Setup Tool operation - Automation configuration 1. Click the "Automation" tab in the configuration interface. 2. Click the "+" on the left to add a new trigger condition. 3. Select the trigger condition in the condition list on the left, configure the device that needs...
- Page 17 AirKit Air Quality Sensor User Manual Automation running time configuration HDL Buspro Setup Tool operation - Automation running time configuration 1. In the configuration interface, click the "Automation running time" tab. 2. The trigger condition can be selected on the left, and the automation running time can be selected or customized on the right.
-
Page 18: Package Contents
AirKit Air Quality Sensor User Manual Notes, Technical support Notes 1. The sensor is wall-mounted, please pay attention to the back of the product and keep the arrow pointing upwards for installation. 2. The power wiring terminal is suitable for AC180-240V, DC7-32V(recommended), exceed- ing the specified range or connecting the wrong terminal will permanently damage the de- vice. - Page 19 ©Copyright by HDL Automation Co., Ltd. All rights reserved. Specifications subject to change without notice.
Need help?
Do you have a question about the MAIR-Q/H.10 and is the answer not in the manual?
Questions and answers