Advertisement
Quick Links
Advertisement

Related Manuals for COVER VALET Cover Rx


Summary of Contents for COVER VALET Cover Rx
- Page 1 Cover Rx Premium Hot Tub Cover Lifter...
- Page 2 Installing it on spas sitting on dirt, gravel, grass, etc. could void the warranty. • The hardscape on the side of the spa where the Cover Rx will be installed should extend at least 5” beyond the edge of the spa to ensure the lifter will be fully supported.
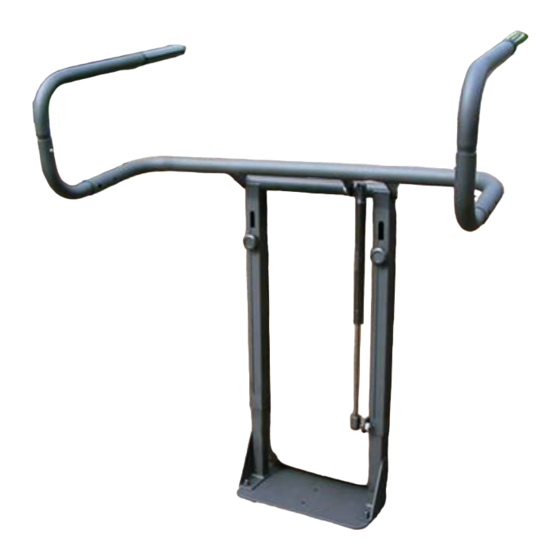
- Page 3 Cover Rx Parts and Hardware Please begin by inspecting the contents of this box and ensuring that all of the parts below are included Components Hardware rxAA rxBB rxA (2) rxC (2) rxB (2) rxD (2) Hex Cap Metal Metal...
- Page 4 Attach Base Plate rxDD to Support Legs rxEE using four Carriage Bolts, Washers and Acorn Nuts. Make sure the square part of the Carriage Bolt head seats into the square hole in the base. Attach Pivot Arm rxGG to Main Body rxEE. On each side, insert Hex Cap Screw rxA through the Metal Washer rxB and Metal Spacer rxC.
- Page 5 Slide Main Body over Support Legs. Thread Hex Bolts rxJ and Washers rxK into the threaded holes near the top of the legs. Leave the bolts loose for now – they will be tightened later when adjusting for the spa’s height. Assemble the U-arms as shown with Long Elbows rxCC, Short Elbows rxFF and (only if necessary) spacers rxSPACER2.
- Page 6 Insert the U-Arms into the Pivot Arm. Depress the spring button when inserting and ensure that it clicks in the hole on the back of the Pivot Arm (not the side). NOTE: The U-Arms are differentiated by the direction of the diagonal cut-out in each one.
- Page 7 Insert Keyring Pins rxF into holes on the side of the Pivot Arm. The pins will go through the Diagonal Cut-Outs in the U-Arm, and out the other side of the Pivot Arm. Attach Ball Studs rxE to tabs on the Pivot Arm and Main Body. The balls will face opposite directions.
- Page 8 U-Arm should be flush with the top of your spa. Tighten the two height adjustment bolts. 3. Ensure that all other screws and bolts are firmly tightened. 4. Fill your spa and ensure that the weight of the water is holding your Cover Rx firmly in place .
- Page 9 Using your Cover Rx Preparing the lifter for use • Rotate the U-Arms outward until they are perpendicular to the spa. The spring buttons will “click” into position. • Swing the U-arms up into their raised (horizontal) position. Using the lifter •...
- Page 10 Cover Rx 5-Year Limited Warranty Any Cover Rx shown to be unserviceable due to defects in materials or workmanship within 5 years from the date of purchase will be repaired or replaced at the option of California Home Spas, Inc., without charge for labor or materials. (This excludes the cost of freight to and from the manufacturer).
Need help?
Do you have a question about the Cover Rx and is the answer not in the manual?
Questions and answers