Table of Contents
Advertisement
Quick Links
Advertisement
Table of Contents

Subscribe to Our Youtube Channel
Related Manuals for DKN technology EMX-800


Summary of Contents for DKN technology EMX-800
- Page 1 EMX-800 Owner’s Manual www.dkn-uk.com...
- Page 2 Thank you for purchasing The DKN EMX-800 Elliptical Cross Trainer. You have chosen a high-quality, safe and innovative piece of exercise equipment as your training partner and we are certain it will keep you motivated on the way to achieving your personal fitness goals.
-
Page 3: Important Safety Information
Important Safety Information Please read these instructions carefully before using this product and retain this manual for future reference. The specifications of this product may vary slightly from the illustrations and are subject to change without notice. NOTE THE FOLLOWING PRECAUTIONS BEFORE ASSEMBLING OR OPERATING THIS ELLIPTICAL CROSS TRAINER: 7. - Page 4 13. Your health can be affected by incorrect or 21. Examine the machine carefully excessive training. Consult a doctor before before you use it, especially the beginning a training program. components most susceptible to 14. WARNING! Heart rate monitoring systems wear, e.g.
- Page 5 WARNING: Before beginning using this DKN assumes no responsibility for personal injury and/or property machine or doing any exercise program, damage sustained by or through the consult your doctor. This is especially important for people over the age of 35 use of this product.
-
Page 6: Warning Decal Placement
Warning Decal Placement Quick incline & quick resistance decal Safety warning Handlebar sticker Moving handlebar sticker Pedal L & R sticker Safety warning www.dkn-uk.com... - Page 7 Unpacking Your EMX-800 • Do not dispose of the packing Before beginning assembly, carefully read the following information and materials until assembly is completed. instructions: • As you assemble the elliptical, make sure all parts are oriented as shown in the drawings.
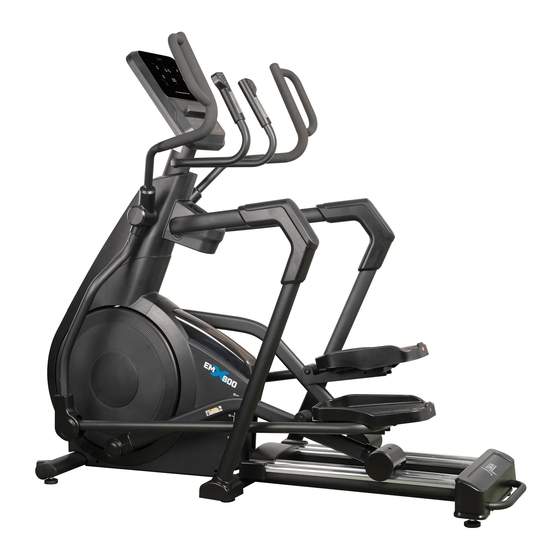
- Page 8 Overview of Your EMX-800 Thank you for selecting the DKN EMX-800 elliptical cross trainer. This manual will guide you through the assembly process. Please familiarise yourself with the parts labeled in the drawing below and check that they are all present and correct before you begin to assemble your machine.
- Page 9 EMX-800 Assembly Contents Checklist www.dkn-uk.com...
-
Page 10: Hardware Pack
Hardware Pack NOTE: To begin assembling, prepare all the parts depicted above, checking to make sure all are present. www.dkn-uk.com... - Page 11 Assembly Instructions Your DKN EMX-800 is partially pre-assembled to help ensure it runs smoothly and to reduce the amount of assembly required. There are 10 straight-forward steps that need to be followed before you can use the machine: STEP 1: Use a screwdriver (B19) and two screws (D02) to attach the roller cover (C10) to the bottom of the left roller arm (A10).
- Page 12 STEP 2: While a second person holds the main upright (A01) near the frame (A06), connect the upper wire (E08) to the bottom wire (E10), and the upper wire (E09) to the bottom wire (E11). Please make sure the wires are properly connected before moving on to the next step. Use the Allen key (B20) to fix the upright (A01) onto the frame (A06) with four bolts (D07), four spring washers (D09) and two flat washers (D18).
- Page 13 STEP 3: Slide the lower end of the left vertical handrail (A12) into the left handrail cover (C29) and the lower end of the right vertical handrail (A12) into the right handrail cover (C30). Then, use the Allen key (B20) and two bolts (D07) to attach fixing plate (A16) to the lower end of the left vertical handrail (A12) and fixing plate (A17) to the lower end of the right vertical handrail (A12).
- Page 14 STEP 4: Use the screwdriver (B19) and four screws (D02) to attach handrail covers (C38) to the left & right vertical handrails (A12). Use the screwdriver (B19) and three screws (D01) to attach handrail covers (C27 & C28) to the vertical handrails on the left and right (A12) as shown. Fill in the screw holes on both sides using three bolt caps (C36).
- Page 15 STEP 5: Attach the lower water bottle holder cover (C09) to the centre of the handrail (A11) using the screwdriver (B19) and two bolts (D16). Place the rubber rings (C26) into position as shown and use the screwdriver (B19) and three screws (D17) to attach the upper water bottle holder cover (C08).
- Page 16 STEP 6: Using the screwdriver (B19) attach left console cover (C06) and right console cover (C07) to the main upright (A01) using six screws (D01) and two screws (D29) as shown. www.dkn-uk.com...
- Page 17 STEP 7: Use the Allen key (B20) to attach the left lower handlebar (A04) to the left hand side of the upright (A01) with a bolt (D07), spring washer (D09) and a flat washer (D08). Then, attach the right lower handlebar (A05) to the right hand side of the upright (A01) in the same way. Attach the left lower handlebar (A04) to the left pedal frame (A08) using the multi-hex spanner tool (B21), bolt (D12), flat washer (D13) and nut (D14).
- Page 18 STEP 8: Using the screwdriver (B19) and two screws (D01), attach the moving handlebar covers (C14 & C15) to the upper part of the left lower handlebar (A04) as shown. Then, using two screws (D10) attach the moving handlebar covers (C18 & C19) to the lower part of the left handlebar (A04) as shown.
- Page 19 STEP 9: 1. While a second person holds the console (E01) near the upright (A01), connect the wires on the console to the corresponding, matching, wires coming out of the upright (A01). Please make sure the wires are properly connected before moving on to the next step. Using the screwdriver (B19) and four bolts (D16) attach the console (E01) onto the upright (A01).
- Page 20 STEP 10: 1. Plug the power supply cable (E04) into the DC input socket located next to the on/off button (E05) in the frame (A06). NOTE: Make sure that all parts are properly tightened before you use the elliptical. www.dkn-uk.com...
-
Page 21: Mounting And Dismounting
Before You Use Your EMX-800 In order to be stable, the elliptical must be set level on a rigid floor before you use the machine for the first time. To eliminate any rocking motion or movement of the frame on an uneven surface, there are three sets of leg levellers. - Page 22 Body Positioning The elliptical is ergonomically designed to help encourage a good posture while exercising. Position your body correctly to achieve better results, train safely and avoid injury. Maintain a good upright posture keeping your back straight and your head held high. To avoid strain in the neck and shoulders, your hands should be positioned at or below shoulder height with a firm, full grip.
- Page 23 However, in the event that you need to safely move it across the room, your EMX-800 comes with transport wheels located at the front of the machine. With the help of another person, both bending your knees and gripping the handle on the rear stabiliser (A), keep your backs straight and use your leg muscles to lift the machine until it tilts up onto the transport wheels.
- Page 24 Operating Instructions Console Images www.dkn-uk.com...
-
Page 25: Console Instructions
Console Instructions Controls In stop mode, press to start body fat measurement. See [BODY FAT] page 34 for more information. Press RECOVER button to test heart rate recovery status. [RECOVER] See page 34 for more information. When the elliptical is in standby mode, press MODE key to [MODE] cycle through the available programmes: manual, 12 pre-set programmes (Coach: P1-P12), 4 HRC programmes (55%,... -
Page 26: Handlebar Controls
Handlebar Controls The elliptical features controls on the handlebars for increasing and decreasing resistance and incline more conveniently during workout. They function in the same way as the +/- resistance buttons and v/ʌ incline buttons on the console. Console Feedback Display Functions Displays the theoretical calorie count or target calorie [ CALORIES ] countdown. - Page 27 Heart Rate Function To measure your heart rate, hold the hand pulse sensors during your workout. After about 5 seconds, the window will display your pulse data. For a more accurate reading, you can use a Bluetooth® Smart wireless receiver with an optional chest strap. This data is for reference only and cannot be used for medical purposes.
- Page 28 Configuring Your EMX-800 Personalising The Units When you connect the power supply and turn on the elliptical for the first time, the initial display is the user profile setting (Fig. 1). Fig.1 To switch between metric and imperial measurements, simultaneously press the console "+"...
-
Page 29: Setting Up User Profiles
Setting Up User Profiles Using user profiles allows you to enter your personal data to get personalised feedback on your workout performance. The screen will show U1 first (Fig. 4). To select a user profile, press +/- keys on the console and choose from 4 available profiles including U1, U2, U3, and U4. -
Page 30: Workout Programs
Workout Programs Selecting Workout The EMX-800 has a manual mode, 12 pre-set programs, 4 HRC programs and a Watt program. After setting up a user profile, choose your workout pressing MODE key and +/- keys on the console. Press ENTER to confirm your selection. -
Page 31: Preset Programs
Pre-Set Programs When in the main menu, press the MODE key or +/- keys to select one of the 12 pre-set programs (Coach). Each of the programs has 20 sections. The overall time of the workout is divided equally among each section (e.g. if the workout time is set to 20 minutes, then each section is 1 minute). - Page 32 Fig.12 Heart Rate Control (HRC) Programs The EMX-800 features a Bluetooth® Smart wireless heart rate receiver. To perform the HRC programs you need to wear a compatible wireless heart rate chest strap (sold separately). After selecting the desired user profile, press MODE key or +/- keys to choose an HRC program and then, press ENTER to confirm your selection.
- Page 33 Fig.13 Fig.14 Fig.15 Fig.16 For more information about target heart rate, see the section in the Beginner’s Guide to Exercise on page 36. WATT Mode The amount of power you produce whilst you train can be measured in Watts. The higher the figure, the more power you are producing and therefore the harder you are working.
- Page 34 Recovery Mode Recovery mode is a fitness test that tests your heart rate recovery status. After exercising for a period of time, press the RECOVER button and keep holding the handgrips. All functions will stop displaying except for TIME, which will start counting down from 00:60 to 00:00. The screen will display your heart rate recovery status with the F1, F2…...
-
Page 35: Beginner's Guide To Exercise
Beginner’s Guide To Exercise Before You Start The following guidelines will help you to plan your workout program and exercise safely. Remember that proper nutrition and If you’re beginning an exercise program for adequate rest are essential for successful the first time or starting a new exercise results. - Page 36 How To Begin Target Heart Rate To train effectively you should aim to work in • Start with two or three 15-minute the heart rate zone appropriate to your age sessions per week with a rest day as stipulated below. Please note this is a between workouts.
-
Page 37: Stretching Guide
Stretching Guide Warm-Up And Cool-Down Tips For Stretching • Begin with small mobility exercises of all A successful cardio-vascular exercise program consists of a full-body warm-up, the joints e.g. simply rotate your ankles, bend your knees and roll your hips. aerobic exercise, and a cool-down. - Page 38 Stretching Stretching while your muscles are warm after a proper warm-up and again after your strength or aerobic training session is very important. Muscles stretch more easily at these times because of their elevated temperature, which greatly reduces the risk of injury. Stretching develops flexibility and reduces muscles soreness.
-
Page 39: Troubleshooting
Troubleshooting If the console behaves abnormally, please unplug the mains adapter, leave it unplugged for 60 seconds and then plug it back in again. If the problem persists please see below: Issue: Corrective Action: 1. Make sure that the On/Off button is turned on. - Page 40 1. Make sure that you are holding the hand pulse sensors correctly. Hold the handgrips with your palms resting against the sensors. Hold the sensors firmly but not too tight and avoid moving your hands during pulse measurement. Make sure the protective film on the sensors has been removed.
-
Page 41: Customer Support
Precise description of the issue or defect In the case of an issue with the electrics, the EMX-800 provides error codes on the console. Please note the code your machine displays The best way to contact us is via the website: so we can help with diagnosing and resolving www.dkn-uk.com/contact-us... -
Page 42: Manufacturer's Warranty
Manufacturer’s Warranty d) Repairs not provided by DKN DKN warrants this product to be free of e) Accidents, lightning, water, fire, or any defects of material and workmanship, under other causes beyond the control of normal use and conditions, for a period of 12 months from the date of the original purchase. -
Page 43: Appendix 1: Exploded Diagram
Appendix 1: Exploded Diagram www.dkn-uk.com... -
Page 44: Appendix 2: Parts List
Appendix 2: Parts List KEY NO. DESCRIPTION SPEC. Q’TY KEY NO. DESCRIPTION SPEC. Q’TY Left main protection cover Right main protection cover Middle protection cover Big rolling cover Crank cover Left console cover Right console cover Upper water bottle holder cover Lower water bottle holder cover Roller cover Roller arm cover... - Page 45 KEY NO. DESCRIPTION Q’TY KEY NO. DESCRIPTION SPEC. Q’TY SPEC. Handrail cover Big flat washer Φ8*Φ32*1.5 Incline wheel Screw ST4.2*12 Foot pad Screw ST4.2*19 Belt Screw ST4.2*12 Transport wheel Spring washer Roller arm wheel Bolt M6*16 Console End cap Flywheel connection Limit spacer Φ45*12 Control board...
-
Page 46: Appendix 3: Space Requirements
Appendix 3: Space Requirements A minimum free space of 1m in the front and rear of the elliptical and 0.6m on each side is required to use it. The minimum ceiling height required is 2.3m. 2.3m 1.7m 0.6m 0.9m www.dkn-uk.com...
Need help?
Do you have a question about the EMX-800 and is the answer not in the manual?
Questions and answers