Advertisement
Quick Links
TOOLPRO
18V BRUSHLESS HAMMER DRILL
Instruction Manual
Important
- Please read these instructions fully before operating or maintaining your Hammer drill
These instructions contain important information that will help you get the best from your
Hammer drill, ensuring it remains safe to operate.
If you need help or have damaged or missing parts, call the Customer Helpline on 1300 889 028
CDI218BWG.1
After Sales Support
FREE CALL 1300 889 028
EMAIL:salesau@positecgroup.com
Advertisement

Related Manuals for ToolPRO CDI218BWG.1

Summary of Contents for ToolPRO CDI218BWG.1
- Page 1 TOOLPRO 18V BRUSHLESS HAMMER DRILL CDI218BWG.1 Instruction Manual After Sales Support FREE CALL 1300 889 028 EMAIL:salesau@positecgroup.com Important - Please read these instructions fully before operating or maintaining your Hammer drill These instructions contain important information that will help you get the best from your Hammer drill, ensuring it remains safe to operate.
-
Page 2: Table Of Contents
Contents Safety Information.....................3 In The Box........................9 Accessories.......................9 Operating Instructions....................10 Trouble Shooting..................... 16 Maintenance......................16 Technical Data......................17 Customer Helpline 1300 889 028... -
Page 3: Safety Information
Safety Information Important - Please read these instructions fully before starting assembly Warning Symbols To reduce the risk of injury, user must read instruction manual Warning Wear eye protection Wear ear protection Indoor use only Wear dust mask Do not burn Batteries may enter water cycle if disposed improperly, which can be hazardous for ecosystem. - Page 4 Safety Information Important - Please read these instructions fully before starting assembly General Power Tool Safety Warnings WARNING! Read all safety warnings, instructions, illustrations and specifications provided with this power tool. Failure to follow all instructions listed below may result in electric shock, fire and/or serious injury. Save all warnings and instructions for future reference.
- Page 5 Safety Information Important - Please read these instructions fully before starting assembly General Power Tool Safety Warnings have the switch on invites accidents. d) Do not overreach. Keep proper footing and balance at all times. This enables better control of the power tool in unexpected situations. e) Dress properly.
- Page 6 Safety Information Important - Please read these instructions fully before starting assembly General Power Tool Safety Warnings clips, coins, keys, nails, screws or other small metal objects, that can make a connection from one terminal to another. Shorting the battery terminals together may cause burns or a fire.
- Page 7 Safety Information Important - Please read these instructions fully before starting assembly Safety Warnings for battery pack a) Do not dismantle, open or shred cells or battery pack. b) Do not short-circuit a battery pack. Do not store battery packs haphazardly in a box or drawer where they may short-circuit each other or be short-circuited by conductive materials.
- Page 8 Safety Information Important - Please read these instructions fully before starting assembly General Safety Warnings WARNING: Read all safety warnings and all instructions. Failure to follow the warnings and instructions may result in electric shock, fire and/or serious injury. Save all warnings and instructions for future reference. - This appliance is not intended for use by persons (including children) with reduced physical, sensory or mental capabilities, or lack of experience and knowledge, unless they have been given supervision or instruction concerning use of the appliance by a person...
-
Page 9: In The Box
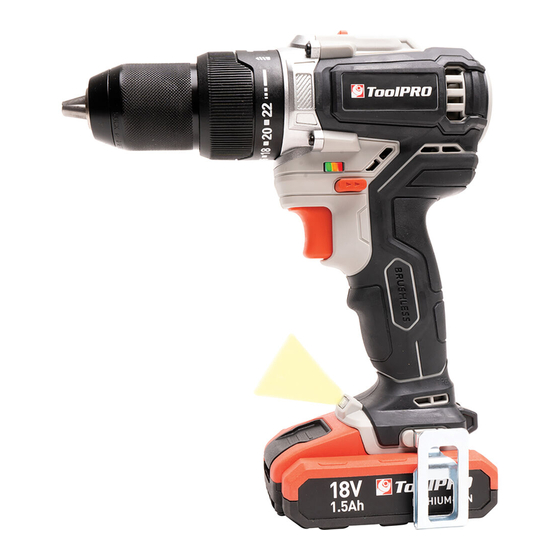
In The Box Parts Battery Pack Keyless Chuck Battery Pack Release Button Torque Adjustment Ring LED Light Two-speed Gear Control On/Off Switch Forward/Reverse Rotation Control Battery Capacity Indicator Soft Grip Handle Belt Clip Accessories Belt clip Battery pack Charger Customer Helpline 1300 889 028... -
Page 10: Operating Instructions
Operating Instructions NOTE: Before using the tool, read the instruction book carefully. Intended Use The machine is intended for driving in and loosening screws as well as for drilling in wood, metal, plastic, masonry and concrete. BEFORE PUTTING INTO OPERATION 1. - Page 11 Operating Instructions Red Light Green Light 2. REMOVE OR INSERT BATTERY PACK (SEE FIG. B,C) Press the battery pack release button and remove the battery pack from the tool. After recharge slide the battery pack into tool’s battery port. A simple push and slight pressure will be sufficient.
- Page 12 Operating Instructions OPERATION 1. ON / OFF SWITCH (SEE FIG. D) Depress the On/Off switch to start and release it to stop your drill. The on/off switch is fitted with a brake function which stops your chuck immediately when you quickly release the switch. It is also a variable speed switch that delivers higher speed and torque with increased trigger pressure.
- Page 13 Operating Instructions Gear II High speed range: for working with small diameter drill. WARNING: To prevent gear damage, always allow the chuck to come to a complete stop before changing the direction of rotation or the two-speed gear control. When overload occurs frequently on the high speed gear, switch to the low speed gear to avoid the motor overheating.
- Page 14 Operating Instructions 6. TORQUE ADJUSTMENT (SEE FIG. I) The torque is adjusted by rotating the torque adjustment ring. The torque is greater when the torque adjustment ring is set on a higher setting. The torque is less when the torque adjustment ring is set on a lower setting.
- Page 15 Operating Instructions Fuel Gauge Capacity >70% 3 lights 2 lights 40%~70% 1 light <40% 10. DRILLING When drilling into a hard smooth surface, use a center punch to mark the desired hole location. This will prevent the drill bit from slipping off center as the hole is started. Hold the tool firmly and place the tip of the bit at the point to be drilled.
-
Page 16: Trouble Shooting
Trouble Shooting 1. WHY DOES THE DRILL NOT TURN ON WHEN YOU PRESS THE SWITCH? The forward/reverse rotation control, which is on top of the trigger, is positioned in the lock function. Unlock the forward/reverse rotation control by putting it into the required rotation position. -
Page 17: Technical Data
Technical Data Technical Data Table Type: CDI218BWG.1(CDI -designation of machinery, representative of Drill) Voltage No load speed 0-500/0-2000/min Impact rate 0-8000/0-32000bpm Number of clutch positions 22+1+1 Max torque 60N.m Chuck capacity 13mm Steel 13mm Max. drilling Wood 40mm capacity Masonry...
Need help?
Do you have a question about the CDI218BWG.1 and is the answer not in the manual?
Questions and answers